The Blueprint for Root Success: Why 80% of Landscaping Happens Underground
To guarantee 2026 sod roots instantly, homeowners must prioritize soil pH testing because chemical imbalances prevent nutrient uptake and root elongation. Testing identifies the specific hydrogen ion concentration, allowing for precise lime or sulfur applications that stabilize the biological foundation before any grass touches the ground. Most people treat sod like a roll of carpet they can just throw down over dead dirt. They are wrong. Sod is a living, breathing biological system. If you do not prepare the site, you are just buying very expensive, very temporary green mulch. I always drill into my new crew members: if you don’t fix the soil grading and chemistry first, every plant you put in the ground is just expensive compost. I have seen guys throw $10,000 worth of premium Zoysia onto high-clay soil with a pH of 4.5. Within two months, the roots were stunted, the blades were yellowing, and the homeowner was out ten grand. It is a tragedy of poor preparation. Soil chemistry is not a suggestion; it is a law of physics. When the pH is off, the nutrients are locked in the soil particles like they are in a safe without a combination. No amount of water or fertilizer will save it. You have to unlock the safe first. [IMAGE_PLACEHOLDER]
The Science of Soil Acidity and Turfgrass Performance
Soil pH measures the acidity or alkalinity of the environment where your sod roots must survive and thrive. A neutral pH of 6.0 to 7.0 is the sweet spot where nitrogen, phosphorus, and potassium become chemically available for the plant to absorb through its root hairs. When you skip this step during your initial yard cleanup and landscaping phase, you risk total system failure.
“Maintaining a soil pH between 6.0 and 7.0 is critical for nutrient availability in turfgrass, as levels outside this range can lead to toxicity or deficiency.” – Penn State Extension
This is because the cation exchange capacity of your soil depends on the electrical charge of the particles. In acidic soil, aluminum and manganese become soluble and toxic, effectively burning the tender new roots of your sod install before they can even knit into the subsoil. You need to think about soil as a battery. If the chemicals are imbalanced, the battery won’t hold a charge, and your irrigation system will just be washing expensive fertilizer into the local watershed instead of into your grass.
What is the best soil pH for new sod?
The ideal soil pH for most standard turfgrasses, including Kentucky Bluegrass and Fescue, ranges from 6.2 to 6.8. This range ensures that the microscopic root hairs can efficiently transport water and minerals via osmotic pressure. If you are dealing with Centipede grass, you might aim lower, but for the majority of residential 2026 sod projects, hitting that 6.5 mark is the gold standard.
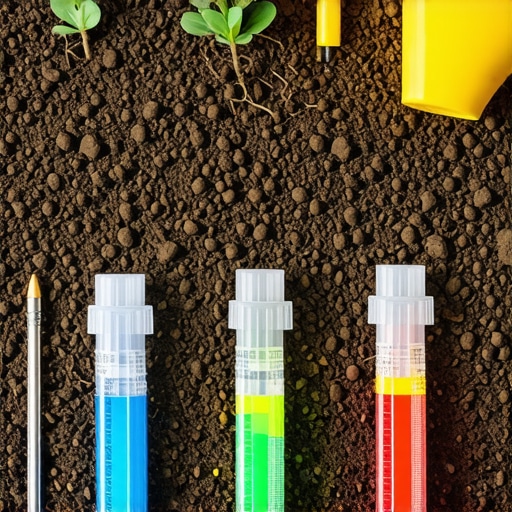
Test 1: The Precision Lab Slurry Analysis
The precision lab slurry analysis provides a definitive measurement of your soil chemistry by mixing distilled water with soil samples collected from multiple locations. This test is the only way to determine the exact buffering capacity of your land, which tells us how much lime is needed to move the needle. A simple probe might tell you the current pH, but it won’t tell you how much resistance the soil has to change.
| pH Level | Nutrient Availability | Action Required |
|---|---|---|
| 4.0 to 5.5 | Very Low (P, K, Mg Locked) | Heavy Lime Amendment |
| 6.0 to 7.0 | Optimal (Maximum Uptake) | No Adjustment Needed |
| 7.5 to 8.5 | Iron and Zinc Lockout | Sulfur or Peat Amendment |
During a professional yard cleanup, we don’t just pull weeds; we take core samples at a 6-inch depth. We look for the rhizosphere health. If your soil is compacted, the pH will often trend toward acidity because of anaerobic bacterial activity. You cannot just guess at this. You must use a calibrated meter or a certified laboratory. One inch of discrepancy in your soil grading can lead to water pooling, which shifts the pH in a localized area, causing those mysterious brown patches that drive homeowners crazy.
Test 2: The Direct Liquid Reagent Field Test
The direct liquid reagent field test offers a fast, visual confirmation of soil pH levels across different zones of your property. By using a chemical indicator that changes color based on the hydrogen ion concentration, you can map out high-risk areas where your irrigation system might be causing mineral buildup. This is vital for complex landscaping projects where different plant species are grouped together.
“A retaining wall doesn’t fail because of the stone; it fails because of the water trapped behind it, which also alters the local soil chemistry through leaching.” – Hardscape Engineering Axiom
I often use this test when I suspect a property has “hot spots” near concrete walkways or limestone gravel paths. Concrete leaches lime, which can spike the pH and kill off acid-loving plants or specific sod varieties. You need to be a detective. Look at the edges of your property. Is the grass thinner there? Is there moss? Moss is a classic indicator of low pH and high moisture. It won’t go away until you fix the chemistry. Don’t skip this.
How long does it take to change soil pH?
Changing soil pH is a marathon, not a sprint. It typically takes 3 to 6 months for pelletized lime to fully react with the soil and shift the pH level. If you are planning a sod install for 2026, you need to be testing and amending in 2025. You cannot dump lime and sod on the same day and expect results. The chemistry needs time to stabilize.
Test 3: The Electrical Conductivity (EC) and Moisture Probe
An electrical conductivity and moisture probe measures the salt concentration and electrolyte balance in the soil solution to ensure optimal root conductivity. High salt levels, often from poor quality irrigation water or over-fertilization, can mimic the symptoms of low pH by causing physiological drought in the grass. This is the zooming perspective that separates professionals from hacks. We aren’t just looking at the grass; we are looking at the ion flow. If your soil EC is too high, the roots can’t pull in water, no matter how much you run your irrigation. It is like trying to drink through a straw filled with sand. During a proper landscaping overhaul, we check the EC to ensure that previous “mow-and-blow” contractors haven’t torched the lawn with cheap, high-salt fertilizers. If the EC is high, we have to flush the soil before the new sod arrives. It will rot if you don’t. Correcting the soil structure involves a strict checklist:
- Remove all surface debris and old thatch layers.
- Core aerate to a depth of at least 4 inches to relieve compaction.
- Apply amendments based on lab-verified CEC (Cation Exchange Capacity).
- Verify soil grading to ensure 1 inch of fall for every 10 feet of run.
- Check irrigation coverage to prevent anaerobic pockets.
Proper sod install procedures require a firm, level base that has been screened of rocks larger than 1 inch. When the sod hits the ground, it should feel like it is being laid onto a sponge, not a brick. That sponge-like quality comes from healthy organic matter and a balanced pH that supports microbial life. Beneficial fungi like mycorrhizae need that 6.5 pH to build the symbiotic bridges that help grass survive the heat of summer. Without them, you are just a slave to your water bill. Get the dirt right, and the grass will take care of itself. Forget the dirt, and you will be calling me in two years to tear it all out and start over. I have done it hundreds of times. Don’t be that customer. Fix it now. Roots won’t move if the chemistry is wrong. Period.