The Brutal Reality of Modern Turf Survival
The dirty secret of the landscaping industry is that most sod is dead before it even hits your driveway. Homeowners spend thousands on yard cleanup and sod install projects only to watch the grass turn into expensive kindling by July. If you want a lawn that survives the projected heat spikes of 2026, you have to stop thinking like a gardener and start thinking like a civil engineer. I always drill into my new crew members: if you don’t fix the soil grading first, every plant you put in the ground is just expensive compost. You can’t out-water a bad base. We recently saw a site where a ‘mow-and-blow’ hack laid TifTuf Bermuda directly over compacted construction debris; within three weeks, the root system had hit a literal wall and charred. If the roots don’t chase the moisture down into the sub-base, the surface heat will cook the crown of the plant every time.
1. Precision Sub-Grade Excavation and Soil Decompaction
Soil decompaction involves mechanically breaking up the ‘hardpan’ layer to a depth of 6-8 inches to ensure roots can penetrate deep enough to escape surface thermal 100-degree spikes. Most residential soils are compacted to a bulk density that rivals concrete, preventing oxygen exchange and water infiltration. Do not ignore the 811 markers before you dig. We use a heavy-duty hydraulic tiller or a subsoil ripper to shatter the clay. If you are dealing with heavy red clay, you must incorporate expanded shale or coarse sand to create macropores. This isn’t about fluffing the dirt; it’s about structural soil integrity.
“A retaining wall doesn’t fail because of the stone; it fails because of the water trapped behind it, and a lawn fails for the same reason—poor subsurface drainage and compaction.” – Hardscape Engineering Axiom
How deep should soil be tilled before sod installation?
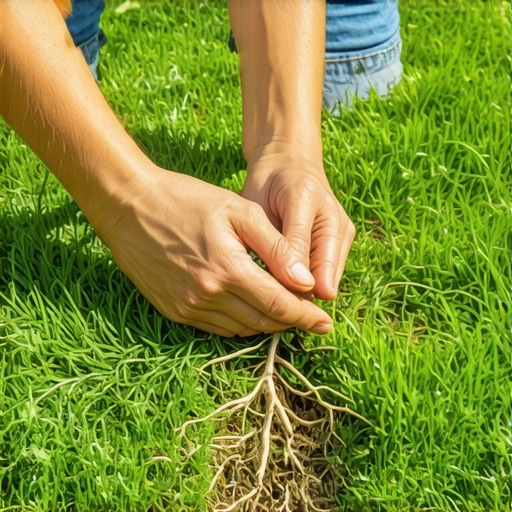
For high-performance turf, you need a minimum of 6 inches of friable, loose soil. This allows the primary and secondary roots to establish a vertical architecture. If you only scratch the surface, the roots will grow horizontally, making them extremely susceptible to desiccation during a drought. We measure compaction with a penetrometer; if it’s over 300 PSI, the roots stop growing. Period.
2. Calibrating Irrigation for Deep Capillary Action
Irrigation calibration for new sod requires a shift from frequent, shallow misting to deep, infrequent soaking once the initial knitting phase is complete to force root elongation. In 2026, water restrictions will likely be tighter, meaning your irrigation system must be 100% efficient. We use MP Rotator heads because they deliver water at a slower rate (0.4 inches per hour), which matches the soil’s infiltration rate. If you apply water faster than the soil can absorb it, you get runoff and wasted money.
| Phase | Frequency | Duration (Target) | Goal |
|---|---|---|---|
| Days 1-10 | 3x Daily | 10-15 mins | Keep pads moist |
| Days 11-21 | 1x Daily | 30 mins | Encourage initial rooting |
| Day 22+ | 2x Weekly | 1.0 inch total | Deep root chasing |
How much water does new sod need in high heat?
New sod needs approximately 1 inch of water per day for the first week, split into three sessions to prevent the soil from reaching the ‘wilting point.’ However, by week four, you must drop the frequency. If you keep the surface wet, the roots have no reason to grow down. They stay lazy and shallow. That is how you kill a lawn.
3. Microbial Inoculation and Cation Exchange Optimization
Soil microbiology optimization involves introducing mycorrhizal fungi and humic acid to the soil profile to enhance the plant’s ability to uptake nutrients and withstand osmotic stress. We don’t just dump 10-10-10 fertilizer; that’s a rookie mistake. High-salt fertilizers can actually burn the tender new roots of fresh sod. Instead, we focus on the Cation Exchange Capacity (CEC).
“The ability of a soil to hold onto nutrients is just as critical as the nutrients themselves; without organic matter, your fertilizer is just washing into the groundwater.” – Texas A&M Agronomy Extension
We use a liquid kelp and humic acid blend during the landscaping process to stimulate the ‘root hairs’—the microscopic structures that do 90% of the water absorption. It’s science, not magic.
4. The ‘Forensic’ Yard Cleanup and Thatch Management
A professional yard cleanup prior to sodding must involve the total removal of legacy vegetation and the application of a non-selective herbicide to prevent Bermuda or Nutsedge from punching through your new $5,000 lawn. You cannot just lay sod over old grass. It will rot. The decaying matter creates an anaerobic environment that breeds Pythium blight. We use a sod cutter to strip the old layer entirely. Then, we inspect the grade. If the water doesn’t move away from the house at a 2% slope, we fix it with a Harley rake before the first pallet arrives. Don’t skip this. A flat yard is a swamp; a sloped yard is a system.
5. Mechanical Integration: The Roller Mandate
Root-to-soil contact is the single most overlooked factor in sod survival; air pockets between the sod pad and the dirt act as a death trap for new roots. After the sod install, you must use a water-filled lawn roller. It should weigh at least 200-300 pounds. The goal is to press the sod into the mud. If you can pull a corner of the sod up easily, it isn’t making contact.
- Step 1: Lay sod in a brickwork pattern to minimize seams.
- Step 2: Use a sharp machete for clean cuts around irrigation heads.
- Step 3: Roll the entire area in two directions (North-South and East-West).
- Step 4: Top-dress the seams with a 50/50 sand and compost mix to prevent edge drying.
- Step 5: Apply a starter fertilizer with high Phosphorus (the ‘P’ in NPK) to trigger ATP production in the roots.
The 2026 Survival Checklist
- Verify soil pH is between 6.0 and 7.0; adjust with lime or sulfur 3 weeks prior to install.
- Ensure the irrigation system has a rain sensor and smart controller (EPA WaterSense certified).
- Check for ‘root flare’ visibility if planting trees near the new turf.
- Confirm the sod was cut within 24 hours of delivery; yellowing is a sign of nitrogen burn and heat stress in the pallet.