The sound of a failing irrigation system is unmistakable to a professional. It is not the rhythmic, soothing ‘chk-chk-chk’ of a well-tuned impact head. It is a frantic, high-pitched hiss—the sound of water atomizing into a useless mist that drifts off in the wind before it ever touches a blade of grass. When your lawn starts showing those tell-tale localized brown spots, most homeowners make a fatal mistake: they assume they need more water. In reality, they usually need better pressure management. For over two decades, I have seen ‘mow-and-blow’ contractors tell clients they need a $3,000 mainline replacement when the solution was actually a $15 mechanical adjustment at the valve. Landscaping is not just about aesthetics; it is about managing the hydraulic forces and soil physics that keep a micro-ecosystem alive.
The Anatomy of a Pressure Failure: A Forensic Audit
To fix irrigation pressure drops, you must first distinguish between static pressure (the PSI when the water is off) and dynamic pressure (the PSI when the zone is running). If your heads are barely popping up or ‘weeping’ at the base, you are likely suffering from friction loss caused by undersized Schedule 40 PVC or a malfunctioning flow control mechanism. A drop of just 10 PSI can reduce the radius of a rotor head by 15%, leaving your yard with catastrophic ‘donuts’ of dead turf.
I remember a homeowner who called me in a panic after they completely torched their front lawn. They saw yellowing grass and, assuming it was a nutrient deficiency, dumped forty pounds of high-nitrogen fertilizer and liquid iron onto a lawn that was already suffering from irrigation pressure loss. Without enough water to dilute the salts, the nitrogen literally sucked the moisture out of the root cells through osmotic stress. The lawn looked like it had been hit with a flamethrower. They didn’t need chemicals; they needed a screwdriver and a $15 replacement part for their Hunter PGV valve. It was a textbook case of treating a symptom while ignoring the engineering reality of the yard.
“A landscape irrigation system is only as efficient as its weakest hydraulic link; excessive pressure creates misting, while insufficient pressure causes poor distribution uniformity.” – Texas A&M AgriLife Extension
How do I know if my irrigation pressure is too low?
You can diagnose low irrigation pressure by observing the spray pattern of your heads; if the water is ‘drooping’ and failing to reach the adjacent head (head-to-head coverage), your PSI is below the manufacturer’s operating threshold. Use a pitot tube and a pressure gauge to get a real-time reading at the nozzle. Anything under 30 PSI for spray heads or 45 PSI for rotors is a red flag.
What causes a sudden drop in sprinkler pressure?
A sudden drop in sprinkler pressure is typically caused by a clogged solenoid filter, a cracked mainline, or a failed diaphragm inside the zone valve. If the drop is isolated to one zone, the problem is mechanical and located at the valve box, not the meter. Debris as small as a grain of sand can prevent the valve diaphragm from opening fully, restricting flow.
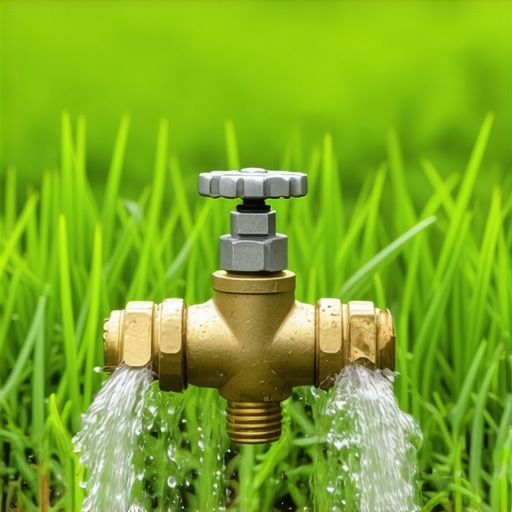
The $15 Valve Hack: Flow Control Calibration
The ‘hack’ that most big-box contractors won’t tell you about is the manual flow control adjustment. Most professional-grade valves (like the Rain Bird DV or Hunter Pro-C series) have a flow control handle—a small knob on top of the valve. Over time, these can vibrate shut or become clogged with mineral deposits from hard water. By replacing the valve bonnet or just the flow control assembly—a part that costs less than $15—you can manually override the resistance and restore full dynamic flow to the zone. This is significantly cheaper than excavating a sod install to find a nonexistent pipe crush.
| Symptom | Probable Cause | The $15 Fix |
|---|---|---|
| Misting/Fogging | High PSI (Over 60) | Install Pressure Regulating Stem (PRS) |
| Heads Won’t Pop Up | Flow Restriction | Replace Valve Diaphragm/Flow Handle |
| Dry Spots Between Heads | Poor Uniformity | Adjust Flow Control Nozzle Output |
| Valve Won’t Close | Debris in Solenoid | Flush Valve and Replace Solenoid |
The Physics of Soil and Water Interaction
When you are dealing with a sod install, the first 14 days are critical. If your pressure drops during this window, the knitting process of the roots to the soil subgrade will fail. The soil pH and cation exchange capacity (CEC) won’t matter if the water isn’t penetrating the first 3 inches of the profile. We see too many ‘experts’ ignore the hydrostatic reality of the site. If your yard has a slope, the heads at the top will always have lower pressure than the heads at the bottom due to elevation head loss. For every 1 foot of elevation rise, you lose 0.433 PSI. It’s basic physics. Do not ignore it.
“To ensure long-term stability of any hardscape or turf project, water must be managed through precise mechanical regulation, not guesswork.” – ICPI Tech Spec 2
- Check the Solenoid: Unscrew the solenoid and check for grit in the plunger.
- Inspect the Diaphragm: If the rubber is brittle or torn, your pressure will fluctuate.
- Flush the Zone: Remove the last head on the line and run the water to clear debris.
- Audit the Nozzles: Ensure you haven’t exceeded the GPM (Gallons Per Minute) capacity of your pipe diameter.
Professional Maintenance Protocol
Irrigation isn’t ‘set and forget.’ It’s a mechanical system subject to thermal expansion and mineral calcification. A yard cleanup should always include a system audit. Check your backflow preventer for leaks. Inspect the valve box for standing water. If you see a ‘swamp’ in your valve box, your pressure drop isn’t a hack—it’s a leak. Fix it. Don’t let a $15 part turn into a $5,000 sod replacement. Real landscaping is about precision. If you can’t measure the PSI, you aren’t managing the yard; you’re just guessing. And guessing is expensive.