Understanding the Mechanics of Irrigation Pressure Loss
Low sprinkler pressure is rarely a mystery of the city water supply; it is usually a failure of hydraulic management within the valve manifold. Irrigation pressure loss occurs when mechanical obstructions or diaphragm failures restrict the flow rate (GPM), preventing the sprinkler heads from reaching their intended PSI operating range. Resolving these issues is critical for maintaining a high-end landscaping project or a fresh sod install.
The Apprentice Lesson: Infrastructure Before Aesthetics
I always drill into my new crew members: if you don’t fix the soil grading and the irrigation infrastructure first, every plant you put in the ground is just expensive compost. I remember a kid named Miller who thought he could skip the pressure test on a 12-zone yard cleanup. He laid $8,000 worth of premium tall fescue sod before checking the valves. Two weeks later, the south-facing slope was a sea of brown straw. Why? A single 1-inch valve was only opening 30% of the way because of a grain of sand in the bleed port. He had to hand-water for three days while we excavated the manifold. It’s a mistake you only make once. Infrastructure isn’t pretty, but it’s the only thing that keeps the pretty things alive.
“A retaining wall doesn’t fail because of the stone; it fails because of the water trapped behind it.” – Hardscape Engineering Axiom
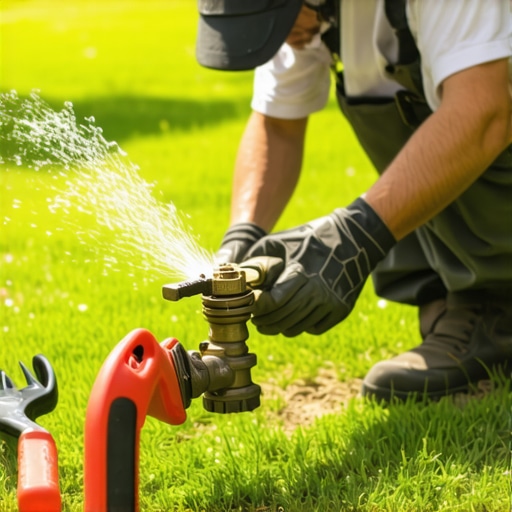
1. Cleaning the Valve Diaphragm and Bleed Port
Troubleshooting the diaphragm involves disassembling the valve bonnet to remove sediment and calcification that prevents the internal rubber from seating or lifting correctly. This hydraulic restriction is the primary cause of low dynamic pressure in residential irrigation systems. It requires zero new parts—just a clean rag and a steady hand.
When you pull the top off a Rain Bird or Hunter valve, you’re looking at a piece of EPDM rubber. Over time, especially in areas with hard water, minerals build up on the edges. If that rubber doesn’t lift completely, you’re trying to force 15 GPM through a gap the size of a thumbnail. It creates massive friction loss. Check the porting holes. These tiny holes regulate the pressure on top of the diaphragm. If one is clogged with a bit of PVC glue from the original sod install, the valve won’t open fully. Use a thin wire to clear it. Don’t use a drill bit. You’ll ruin the seal. It’s precise work.
2. Adjusting the Flow Control Stem
The flow control stem is a manual override that limits the travel distance of the valve diaphragm, and it is often inadvertently turned down during routine yard cleanup or maintenance. Adjusting this component restores the internal orifice size, allowing the maximum volume of water to pass through the manifold to the lateral lines.
Many homeowners don’t even know that handle on top of the valve exists. It’s designed to prevent “misting” by throttling pressure, but if it gets bumped, your rotors will barely pop up. Turn it counter-clockwise until it stops. Then, back it off a quarter turn. This ensures the plunger isn’t binding. If you’ve recently had a landscaping crew out for a yard cleanup, they might have hit the valve box with a power rake or a mower. Always check the physical settings before you start digging up pipes. It’s a two-minute fix that saves a $200 service call.
How do I know if my irrigation valve is bad?
You can diagnose a failing irrigation valve by checking for weeping heads when the system is off or measuring the voltage at the solenoid using a multimeter. If the valve fails to open despite receiving 24VAC, the solenoid plunger or the internal diaphragm is likely seized. Physical cracks in the valve body also indicate replacement is necessary.
3. Inspecting the Solenoid for Debris and Continuity
The solenoid acts as the electromagnetic trigger for the valve, and any internal friction or electrical resistance will prevent the valve from fully engaging the hydraulic bypass. Testing for continuity and cleaning the plunger housing ensures the valve receives the signal to open to its full rated capacity.
Remove the solenoid by turning it counter-clockwise. Look at the plunger. It should move freely against the spring. If it’s sticky, it’s covered in biofilm or silt. Wipe it down. While you’re there, check the wires. Wire nuts in irrigation boxes are notorious for corrosion. If the solenoid isn’t pulling enough amperage, the magnetic field isn’t strong enough to lift the plunger against the static water pressure. This leads to a “half-open” state. Use a waterproof connector. Tape doesn’t count. It will rot.
4. Clearing Obstructions in the Valve Orifice
An orifice obstruction occurs when debris, such as PVC shavings or gravel, becomes lodged in the valve seat, creating a localized pressure drop. This is common after a new irrigation repair or a sod install where the mainline was opened and not properly flushed before the valves were energized.
If you’ve cleaned the diaphragm and the pressure is still low, you have a physical block. I’ve found everything from small pebbles to bits of purple primer stuck in the valve seat. You have to flush the mainline. Remove the valve guts, turn the water on slowly, and let it blow the debris out of the box. Wear boots. You’re going to get wet. This is why I tell my guys to flush every line before the final nozzle install. One tiny rock can kill an entire zone’s distribution uniformity. It’s about hydrodynamics, not just plumbing.
| Pipe Size (Schedule 40 PVC) | Flow Rate (GPM) | PSI Loss per 100ft |
|---|---|---|
| 3/4 Inch | 8 GPM | 3.91 PSI |
| 1 Inch | 12 GPM | 2.20 PSI |
| 1.25 Inch | 20 GPM | 1.75 PSI |
“Irrigation efficiency is not a suggestion; it is a mathematical requirement for plant survival.” – Texas A&M AgriLife Extension
How much pressure should my sprinkler system have?
Most residential sprinkler systems require a working pressure of 30 to 50 PSI at the nozzle to achieve proper head-to-head coverage. If the pressure exceeds 60 PSI, you risk misting and evaporation loss, which necessitates the use of pressure-regulating valves or PRS-dial rotors.
Irrigation Maintenance Checklist
- Test static pressure at the hose bib before every season.
- Clean internal filters on all rotors and spray heads.
- Inspect valve box for standing water or leaks.
- Check solenoid wiring for oxidation or loose connections.
- Verify distribution uniformity to prevent hydrophobic soil spots.
Precision matters. A lawn doesn’t just need water; it needs the correct volume at the correct pressure. If your valves are gunked up, your sod install is a ticking time bomb. Don’t be the homeowner who spends $5,000 on landscaping but won’t spend 20 minutes cleaning a $15 valve diaphragm. Fix the pressure, and the grass will take care of itself. Forget the fluff. Focus on the hydraulics. That is how you maintain a professional-grade property in 2026.