The Economics of Dirt: Why Preparation is Your Best Investment
To save $400 on your 2026 sod install, you must perform the site yard cleanup and rough grading yourself at least 48 hours before the delivery truck arrives. By removing organic debris, killing off dormant weed seeds, and establishing a 1% grade away from the foundation, you eliminate the high-cost labor hours typically billed by landscaping crews for site preparation. Most contractors charge a premium for the ‘grunt work’ of clearing stone and old turf; doing this yourself ensures your budget goes toward high-quality grass rather than labor overhead.
I always drill into my new crew members: if you don’t fix the soil grading first, every plant you put in the ground is just expensive compost. I have seen countless homeowners waste thousands of dollars because they thought the sod would hide the sins of the soil. It doesn’t. Sod is a living, breathing biological carpet that requires an immediate interface with the native earth to survive. If that interface is blocked by rocks, old roots, or compacted clay, those expensive rolls will be brown and brittle within 14 days. You aren’t just laying grass; you are engineering a biological filter for your property. 80% of the success of any sod install happens before the first roll is even harvested from the farm. This isn’t about aesthetics; it is about the physics of root penetration and the chemistry of nitrogen availability.
“Successful turf establishment depends more on the physical and chemical properties of the seedbed than on the quality of the sod itself.” – Penn State Center for Turfgrass Science
Why Site Prep Costs So Much in Professional Quotes
Professional installers factor in the ‘unknowns’ of a yard. They don’t know if they will hit buried bricks, hidden irrigation pipes, or a root system from a tree removed ten years ago. To cover this risk, they bake a massive labor buffer into the quote. When you handle the yard cleanup yourself, you remove that risk. You are handing the contractor a ‘clean slate.’ Most crews will happily knock $400 to $600 off a standard residential quote if the ground is already tilled, leveled, and cleared. It allows them to get in and out in half the time. Speed is profit for them. Preparation is savings for you. Don’t skip the utility check. Call 811. Do it now.
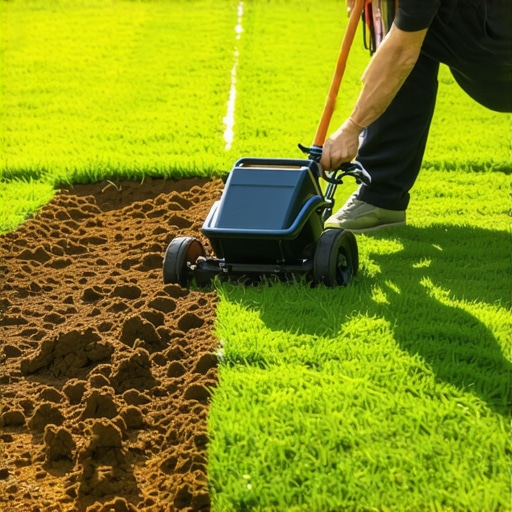
The 1-Day Prep Hack: Step-by-Step Breakdown
The hack relies on mechanical efficiency and timing. You need to focus on the ‘Sub-Grade.’ This is the soil sitting exactly 1.5 inches below your finished grade. This is where the roots will live. If this layer is compacted to a high PSI (pounds per square inch), the roots will grow horizontally instead of vertically. This leads to a shallow root system that will fry in the first heatwave of July. Use a core aerator if the soil is heavy clay. Don’t use a spike aerator; it just pushes the compaction further down. You need to physically remove plugs of earth to create gas exchange pathways. Air is just as important as water for root respiration.
| Prep Task | Professional Cost (Estimated) | DIY Cost (Rental/Materials) | Time Required |
|---|---|---|---|
| Debris & Rock Removal | $150 – $250 | $0 (Manual Labor) | 3 Hours |
| Old Vegetation Kill-off | $100 – $200 | $30 (Glyphosate) | 1 Hour |
| Rough Grading (1% Slope) | $200 – $400 | $60 (Leveling Rake) | 4 Hours |
| Soil Compaction Relief | $150 – $300 | $75 (Aerator Rental) | 2 Hours |
How deep should I till soil before laying sod?
You should till the soil to a depth of at least 4 to 6 inches to ensure proper root penetration and moisture retention. Tilling deeper than 6 inches can actually destabilize the soil structure and lead to uneven settling later. Once tilled, the soil should be lightly firmed with a water-filled roller. You want it firm enough that your boots don’t sink more than half an inch, but loose enough for a finger to easily poke into the surface. This balance is the ‘Goldilocks zone’ for landscaping success. If the soil is too loose, the sod will have air pockets underneath. Air pockets kill roots. Use a landscape rake to break up large clods. Aim for the consistency of coarse breadcrumbs.
The Science of Soil pH and Nutrient Availability
If your soil pH is below 6.0, your new sod cannot ‘see’ the nutrients in the ground. It is like being in a room full of food with your mouth taped shut. Acidic soil locks up phosphorus, which is the primary element needed for root development. Before you spend a dime on sod, spend $20 on a soil test from your local agricultural extension office. If you need to add lime, do it during your 1-day prep. Lime takes time to react with the soil chemistry. By the time 2026 rolls around, the lime will have neutralized the acidity, making your sod install much more likely to take hold. Most people wait until the grass is yellow to fix the pH. That is too late.
Addressing Irrigation and Drainage Issues
Before the sod arrives, you must test your irrigation system’s ‘head-to-head’ coverage. This means the spray from one sprinkler head must reach the base of the next one. Any gap in coverage will result in a ‘brown donut’ in your lawn. During your prep day, check for leaking valves or clogged nozzles. Water pressure is the lifeblood of a new lawn. You also need to ensure the soil slopes away from your home at a rate of at least 1/4 inch per foot. Water should never pool. Standing water causes anaerobic conditions where pathogens like Pythium blight thrive. It will rot. Don’t think the sod will soak up a drainage problem. Sod is not a sponge; it is a living system that can drown.
“A retaining wall doesn’t fail because of the stone; it fails because of the water trapped behind it.” – Hardscape Engineering Axiom
The Post-Prep Checklist for Homeowners
- Verify all underground utilities are marked by calling 811.
- Kill all perennial weeds and old turf using a non-selective herbicide 10 days prior.
- Remove all stones larger than 1.5 inches in diameter.
- Apply a starter fertilizer high in phosphorus (the middle number on the bag).
- Roll the subgrade to ensure a flat, even surface for the sod rolls.
How much water does new sod actually need?
New sod requires approximately 1 inch of water per day for the first two weeks, split into two or three short cycles. This keeps the root zone moist without saturating the soil to the point of rot. You aren’t watering the grass blades; you are keeping the soil-to-sod interface damp. Once the roots have knitted into the soil (you’ll know because you can’t lift the corner of a roll anymore), you should transition to deep, infrequent watering. This forces the roots to grow deeper into the earth to find moisture. Shallow watering creates weak grass. Deep roots create a drought-resistant lawn. It is that simple.
The Critical 24-Hour Window After Install
Once the sod is down, the clock is ticking. You have a very narrow window to get that first saturation in. If the edges of the sod rolls start to gap, they are drying out and shrinking. Use a heavy roller after installation to press the sod into the soil. This removes the air pockets I mentioned earlier. If you see the grass turning a blue-gray color, it is in wilt. Water it immediately. Do not mow the new lawn for at least 14 to 21 days. Let the top growth support the root growth. When you finally do mow, never take off more than one-third of the grass blade at a time. Scalping a new lawn is the fastest way to kill it. Keep your blades sharp. Dull blades tear the grass, leaving it open to fungal infections.