It was a chilly morning when I stepped outside and realized my yard looked like a patchwork quilt of brown patches and bare ground. I had just laid new sod, but instead of lush, green perfection, I was staring at a disappointment that made me wonder if I had messed up beyond repair. That was my lightbulb moment—figuring out that soil temperature isn’t just some technical trivia; it’s the secret sauce to making sod establish swiftly and thrive in 2026.
If you’ve ever battled with patchy grass or struggled to get that perfect lawn to take hold, you’re not alone. Many homeowners overlook a crucial factor: knowing the *exact* soil temp your sod needs to root within the first critical 7 days. Trust me, understanding this simple yet overlooked detail can save you weeks of frustration—maybe even months.
Why Soil Temperature Is the Key to Sod Success
Soil temperature influences how well your grass roots establish. If it’s too cold, roots won’t grow; too hot, and they might dry out or get stressed. I learned this the hard way when my sod struggled to root because I didn’t check the soil temp early on. Turns out, soil should be between 55°F and 65°F for optimal rooting within that vital week—an insight supported by turf experts (source: University of Illinois Extension). That range is a sweet spot where grass can settle in comfortably, ensuring a lush, green yard that lasts.
Have you ever planted sod in the wrong conditions and watched it struggle? The good news is, there’s a reliable way to get it right, and I’ll walk you through it.
Before diving into the how, I want to share a quick mistake I made initially—which, looking back, almost sabotaged my entire project. I thought I could ignore soil temps and just rely on the calendar and weather forecasts. Spoiler: that doesn’t work. Instead, targeting the right soil temp takes a little proactive effort, like checking soil thermometers or using soil temperature maps.
Now, let’s explore how to pinpoint that perfect soil temp and set the stage for rooting success.
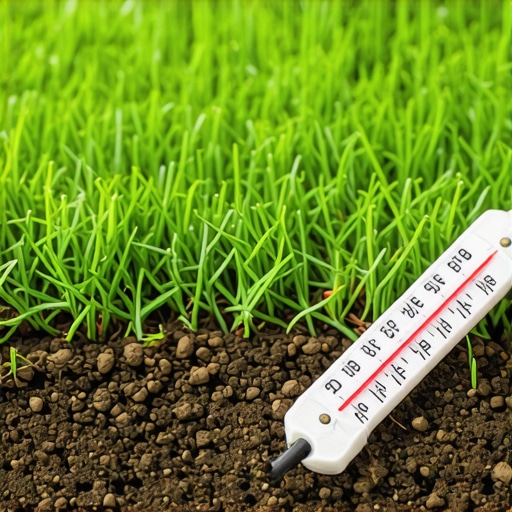
Use a Reliable Soil Thermometer and Record Your Readings
The first step is to acquire a quality soil thermometer, ideally one with a metal probe and a digital or analog display that provides quick, accurate readings. I remember a weekend when I decided to skip this tool, assuming the soil was warm enough because of a sunny forecast. That mistake cost me a week of slow rooting. So, I inserted the thermometer about 2 inches into multiple spots across my yard, especially in shady and sunny areas, to get an overall understanding of the soil temperature. Recording these readings helps monitor changes and plan watering schedules effectively.
Identify the Critical Rooting Window
Timing is everything. The goal is to have the soil temperature between 55°F and 65°F during the first 7 days after laying your sod. During my first attempt, I didn’t check soil temps at this stage; instead, I relied on the calendar, which was a mistake. Once I realized soil dips below 55°F, I adjusted my watering and shading practices to keep the soil warmer during cold spells. Consistently measuring soil temp during this key period ensures that roots can establish without stress, leading to a healthier, greener lawn long-term.
Utilize Soil Temperature Maps and Local Weather Data
To supplement your direct measurements, consult soil temperature maps or local weather reports that include soil data. When I experimented with a soil temperature map from a local extension service, I discovered that nearby shaded spots were significantly cooler than open areas. This insight allowed me to focus on adjusting watering and shading techniques more precisely. Combining real-time thermometer readings with these maps provides a comprehensive picture, guiding you to take proactive steps like installing temporary shade or adjusting irrigation timings to keep soil within the optimal range.
Adjust Your Watering Routine Based on Soil Temp
This step involves manipulating your irrigation schedule to maintain optimal soil temperature. For example, during warmer afternoons, I increased watering slightly to lower soil temperature, especially in areas prone to overheating. Conversely, on cooler mornings, I minimized watering to prevent chilling. I found that watering deeply encourages better rooting, but timing it around soil temperature data maximizes its effectiveness. Regular checks every couple of days keep your efforts aligned with the target range, dramatically improving sod success rates.
Monitor and Iterate for Consistent Results
Finally, continual monitoring is essential. I set a weekly calendar reminder to recheck soil temps, especially after significant weather changes. In one instance, a cold front pushed soil temperatures below 50°F, risking root stalling. I responded by covering sections with a tarp and delaying the watering schedule slightly. Every adjustment based on data reinforced healthy root development, making my yard look vibrant and lush. Remember, soil temperature monitoring isn’t a one-time task—it’s a critical routine to ensure your sod roots well and thrives into the growing season, turning your yard into a landscape masterpiece. For more detailed step-by-step guidance, check out this detailed guide.Many homeowners and even seasoned landscapers make common assumptions when it comes to yard cleanup, landscaping, sod installation, and irrigation, but these often hide nuanced pitfalls that can compromise your results. For instance, a widespread myth is that using heavy machinery for yard cleanup saves time and effort. However, this can lead to soil compaction and damage to existing root systems, ultimately making your lawn more vulnerable (source: University of California Cooperative Extension). Instead, integrating targeted debris removal and soil aeration techniques can enhance soil health and promote better plant growth.
Another advanced mistake is neglecting soil health before planting or installing sod. Many focus solely on the visible elements—grading, planting, watering—without considering soil composition and microbiome. This oversight can cause poor root development and drought stress, even if your watering schedule is impeccable. Regular soil testing and amendments based on specific deficiencies often yield superior turf and landscape outcomes.
A particularly tricky nuance involves irrigation system balancing. Conventional wisdom suggests that more watering equals better lawn vigor, but overwatering can lead to root rot and shallow rooting, making grass more susceptible to disease. Experts recommend implementing zone-specific irrigation schedules that adapt to seasonal and microclimate variations. According to the University of Georgia, proper zone tuning and smart controllers reduce water waste and promote resilient root systems.
When planning your yard overhaul, don’t fall into the trap of overgeneralizing strategies, such as assuming all grass types require the same care or that all soil amendments are interchangeable. Each yard’s unique conditions demand a tailored approach—testing, observation, and adjustment are your best tools for success. For detailed insights into soil preparation, irrigation efficiency, and landscaping tricks, check out our guides [here](https://urbanlandscapingx.com/transform-your-yard-with-pro-landscaping-yard-cleanup-strategies-2025) and [here](https://urbanlandscapingx.com/pro-sod-install-irrigation-expert-tips-for-lush-lawns-2025).
Have you ever fallen into this trap? Let me know in the comments.Maintaining a beautiful yard requires more than initial effort; it demands reliable tools and consistent routines to keep everything functioning smoothly over time. One of my go-to equipment pieces is a high-quality soil probe, which I use weekly during the rooting period to ensure soil temps stay within the optimal range. Investing in a digital moisture meter is equally crucial—it helps me prevent overwatering or underwatering, both of which can hinder sod establishment and long-term health. Additionally, I rely on a smart irrigation controller that adapts watering schedules based on weather forecasts, reducing waste and promoting sustainable habits.
Regular maintenance isn’t just about hardware—software tools play a significant role, too. I recommend using landscape management apps like iScape or Yardzen, which help visualize changes and plan adjustments in your yard layout, soil amendments, and watering zones. These tools integrate weather data, soil conditions, and plant needs, making long-term planning much more manageable.
Looking ahead, the trend is moving toward AI-driven irrigation systems capable of learning your yard’s specific needs and adjusting automatically. This evolution promises to minimize human error and maximize resource efficiency, directly impacting your costs and environmental footprint.
How do I maintain yard tools and systems over time?
To keep your tools and systems functioning optimally, establish a monthly maintenance routine. Clean and calibrate soil thermometers and moisture meters to ensure accuracy. Check irrigation sprinklers and drippers for clogs and wear—unsurprising given that debris and mineral buildup are common culprits of system failures, as detailed by industry experts at the University of Georgia. Regularly update your smart controllers’ firmware and back up settings to avoid data loss. Moreover, schedule seasonal inspections of hoses, filters, and valves, replacing parts as needed to prevent costly breakdowns.
A practical tip is to keep a maintenance log that tracks the date and nature of each check or repair. This habit simplifies troubleshooting and ensures nothing gets overlooked, ultimately extending the lifespan of your equipment and maintaining yard health.
If you haven’t already, try calibrating your irrigation system using a catch cup test or soil moisture readings. Precise adjustments can dramatically cut water waste—saving your money and supporting sustainable landscapes. For comprehensive guidance on designing a resilient irrigation plan, check out this resource. Keep your tools well-maintained, and your yard will thank you with lush, healthy growth season after season.
What the Experts Might Not Tell You About Soil Temperature Myths
One of the biggest lightbulbs I had was discovering how much misinformation is out there about soil temps. I once believed that if the weather forecast predicted warm days, my soil was automatically ready for sod, but the reality was far from that. The myth that soil temperature isn’t critical often leads homeowners down a path of patchy, struggling lawns—trust me, I’ve been there. Learning to crack the code of soil warmth revealed that patience and measurement trump guesswork, turning my lawn from disappointment to envy-worthy green.
My Secret Weapon for Consistent Lawn Success
Through trial, error, and lots of soil thermometer checks, I realized that the right tools make all the difference. Investing in a quality soil probe and pairing it with local weather data helped me predict and adjust in real time—saving water, energy, and frustration. These insights, combined with personalized watering routines, set the stage for roots to establish deep and resilient, even during unpredictable weather patterns. This strategy isn’t just for seasoned landscapers; it’s accessible to anyone willing to measure and adapt.
The Turning Point in My Yard Transformation
The breakthrough moment came when I stopped relying solely on calendar dates and started verifying soil temps directly. That extra step prevented me from rushing or delaying crucial watering, ensuring my sod rooted within the optimal window. As a result, I watched my yard flourish, lush and vibrant, as if I had unlocked a secret recipe. The difference was clear: paying attention to soil temps turned a struggling project into a satisfying, enduring success story.
When You Execute This, Your Yard Will Thrive
Now, imagine the satisfaction of knowing that each sod installation is backed by science—not guesswork—and that your yard’s health hinges on these small, deliberate checks. Don’t let misconceptions hold you back from achieving your dream lawn. Implement these soil temperature practices, and watch your landscape become the envy of your neighborhood. If you want a step-by-step guide to perfect your yard, you might find this detailed resource especially helpful. Your green oasis awaits—go ahead, take the first measurement today.
My Top Tools and Resources for Yard Victory
Over the years, I’ve curated tools that made a real difference. A reliable soil thermometer is my constant companion during the rooting window; I favor digital probes for accuracy. Pair that with soil temperature maps from friendly local extension services—these provide context for microclimate variations in my yard, guiding me on shading and watering adjustments. Lastly, a good weather app that includes soil data completes the toolkit, helping me stay ahead of sudden cold snaps or heatwaves. These resources have transformed my approach from reactive to proactive, making yard care both manageable and rewarding.
Embrace the Process and Watch Your Yard Flourish
Whenever I get discouraged, I remember that mastering soil temps is an ongoing journey, not a one-time fix. Patience, measurement, and adaptation are the keys. Every yard has its quirks, but with consistent effort, you’ll develop an intuitive feel that turns routine maintenance into a satisfying routine. Your dream lawn isn’t out of reach—it’s just one measurement away. So, start today, and soon you’ll see your yard thrive as a testament to your dedication and newfound knowledge. How about sharing your own soil temp wins or challenges below? I’d love to hear your story!