The Forensic Autopsy of a Sinking Driveway
I recently got called out to tear up a $30,000 driveway that was sinking because the previous contractor failed to sleeve the irrigation main line. The homeowner noticed a small wet spot on the edge of the turf, but by then, the damage was done. The water had been eroading the compacted sub-base for months, creating a massive subterranean void. When a five-ton SUV parked over that void, the four-inch reinforced concrete slab snapped like a dry cracker. It was a total structural failure caused by a two-dollar PVC coupling. Fixing a leak under concrete isn’t just about plumbing; it is about restoring the structural integrity of your property’s civil engineering.
Why Irrigation Leaks Occur Under Concrete Structures
Irrigation leaks under concrete driveways occur due to soil shifting, poor pipe material selection, or the lack of protective sleeving during the initial install. These leaks cause hydrostatic pressure to build up, leading to soil erosion and eventual concrete cracking or void formation under the slab. Detecting these early requires monitoring water bills and checking for localized soil saturation at the slab edges. Water is lazy; it will always take the path of least resistance, often traveling along the outside of the pipe until it finds an exit point.
“A retaining wall or concrete slab doesn’t fail because of the stone or cement; it fails because of the water trapped behind or beneath it.” – Hardscape Engineering Axiom
The Physics of Sub-Slab Erosion
When a pipe bursts under concrete, the water doesn’t just sit there. It begins a process called piping. This is where moving water carries fine soil particles away from the compacted base. Most residential driveways are built on a four-to-six-inch layer of modified gravel. If that gravel is washed out, the concrete loses its support. Concrete has high compressive strength but low tensile strength. Without a solid base, it cannot handle the weight of a vehicle. It will fail. Every time.
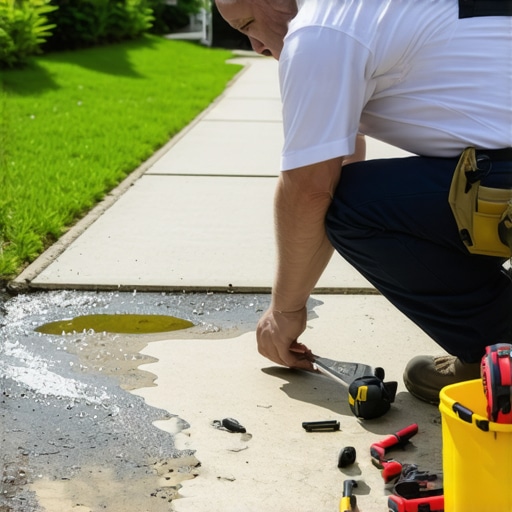
How do I know if my irrigation is leaking under my driveway?
Identify a sub-slab leak by performing a static pressure test on the specific irrigation zone. Turn off all water inside the home, ensure no faucets are running, and watch your water meter’s low-flow indicator. If the dial moves, you have a leak. To isolate it to the driveway, look for efflorescence (white salty stains) on the concrete surface or pavement heaving where the slab has actually lifted due to water pressure. You might also see a ‘squish’ in the nearby sod install area where the water is finally surfacing.
Remediation Strategies: Tunneling vs. Boring
Fixing a leak under concrete requires either directional boring, hand-tunneling under the slab, or cutting the concrete to reach the pipe. The choice depends on the soil density, the depth of the pipe, and the width of the driveway. Hand-tunneling is feasible for narrow paths, but wide driveways often require a horizontal boring tool or a jetting kit to create a new path for a Schedule 40 PVC sleeve. Never just patch the pipe; always install a sleeve to prevent future headaches.
| Method | Estimated Cost | Labor Intensity | Structural Risk |
|---|---|---|---|
| Hand Tunneling | Medium | High | Low |
| Directional Boring | High | Medium | Low |
| Slab Cutting | High | High | High (Joint Failure) |
| Pipe Bursting/Sleeving | Medium | Medium | Very Low |
Can I sleeve a new irrigation line under existing concrete?
Yes, you can sleeve a new line by using a hydro-jetting technique or a mechanical boring bit to create a void beneath the concrete. Once the hole is clear, slide a larger diameter Schedule 40 or 80 PVC pipe through the opening. This sleeve acts as a protective conduit. If the inner line ever leaks again, the water will be directed to the ends of the sleeve rather than eroding the driveway’s base. This is the only way I’ll do it on my job sites. No exceptions.
Restoring the Ecosystem: Yard Cleanup and Sod Install
Restoring a landscape after a major irrigation repair involves soil stabilization, grade correction, and a professional sod install to prevent further erosion. You must ensure the soil pH is balanced and the compaction levels are returned to 95% Modified Proctor Density before laying new grass. This prevents the ‘settling’ look where your new sod sits lower than the existing lawn. Don’t just throw dirt in the hole. Tamp it in four-inch lifts. Use a jumping jack or a hand tamper. Don’t be lazy.
“Irrigation efficiency is not measured by how much water you put down, but by how much water actually reaches the root zone without causing anaerobic soil conditions.” – Texas A&M AgriLife Extension
- Inspect all lateral lines for 2026 wear and tear.
- Flush the system to remove any PVC shavings or dirt that entered during the fix.
- Grade the area away from the driveway at a 2% slope.
- Install high-quality sod that matches your existing cultivar.
- Calibrate the irrigation controller for deep, infrequent watering.
The Biological Cost of Leaks
When you have a constant leak, you are drowning the soil. This creates an anaerobic environment. The beneficial microbes die. The roots of your turf grass will rot. I see it all the time in ‘yard cleanup’ jobs where the homeowner thinks they just have a fungus. No, you have a leak. The soil is sour. You have to dry it out, aerate it, and maybe even add some gypsum to help break up the salt buildup from the city water. Landscaping is applied biology. You can’t ignore the chemistry of the dirt.
The Critical Importance of Proper Compaction
If you dug a trench to get to that pipe, you’ve disturbed the soil’s structure. You cannot just shovel the dirt back in. It will settle over the next year, and your new sod will look like a ditch. You need to backfill in layers. Every four inches of soil needs to be compacted. This is the difference between a professional and a hack. A hack fills the hole and leaves. A pro ensures the ground stays level for the next decade. Don’t skip the tamper. It is the most important tool you’ll use on the job.