
The Science of Sealing: Why Your Sod Edges Fail and How to Fix It
I always drill into my new crew members: if you don’t fix the soil grading first, every plant you put in the ground is just expensive compost. I have seen it a thousand times. A homeowner or a cut-rate contractor lays down three pallets of premium Tall Fescue, and within seventy-two hours, the seams look like they have been hit with a blowtorch. It is not just a lack of water. It is a failure of engineering. Most people treat sod like a carpet, but it is a biological system. When you leave an air gap at the edge of a sod roll, you are creating a chimney effect. This air infiltration pulls moisture directly out of the root zone through evaporation and transpiration. If that edge is not sealed, the plant will die. Period. I have had to replace entire lawns because the previous guy did not understand that soil-to-root contact is not optional: it is a requirement for survival.
Why Your Sod Edges Turn Brown First
Sod edges dry out primarily due to air infiltration between the rolls, which accelerates the evaporation of moisture from the exposed root mat and the underlying soil bed. Without a physical seal, the capillary action required to move water from the ground into the grass blades is broken. This leads to edge desiccation, a condition where the perimeter of the turf roll reaches a permanent wilting point even if the center remains moist. To prevent this, you must eliminate the air pockets through precise mechanical tamping and proper joint knitting.
“Proper sod-to-soil contact is the single most critical factor in successful establishment, as air pockets inhibit the development of root hairs and lead to rapid tissue death.” – Turfgrass Science Manual, University of Georgia Extension
When we talk about sod, we are talking about a plant that has just had 90 percent of its root system sliced off. It is in a state of extreme stress. The edges are the most vulnerable because they have the highest surface-area-to-volume ratio. In my 20 years of doing this, I have learned that the difference between a lawn that takes and a lawn that dies is about 15 pounds of pressure applied at a 45-degree angle. We call this the ‘Bevel and Lock’ move. You are not just stepping on the grass; you are knit-welding two biological organisms together to create a unified moisture barrier.
The Physics of Air Infiltration and Soil Bulk Density
To understand why tamping works, you have to understand soil bulk density. If your soil is too loose, it holds too much air and not enough water. If it is too compacted, the roots cannot penetrate. We aim for a bulk density of about 1.3 to 1.4 grams per cubic centimeter. When you lay sod, there is a micro-gap between the bottom of the sod and the top of your grade. If you don’t close that gap, the wind moves through it, dries out the roots, and the grass goes dormant or dies. This is especially true at the seams. Each seam is a potential leak in your irrigation system’s efficiency. You can dump a hundred gallons of water on that lawn, but if the air is hitting the roots, the water will evaporate before the plant can drink it. This is why yard cleanup and prep are so vital: you need a smooth, debris-free surface to ensure that seal is perfect.
The Professional Tamping Move: Step-by-Step Execution
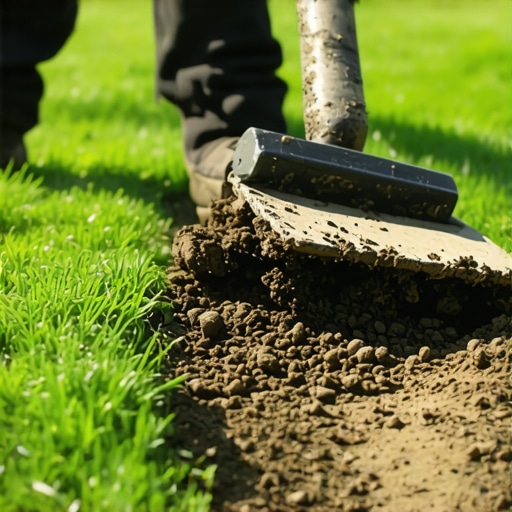
The ‘Bevel and Lock’ is a specific tamping move used during sod install to ensure the perimeter of each roll is physically integrated with the soil and the adjacent roll. You use a 10-pound or 12-pound hand tamper, or in a pinch, the flat back of a heavy-duty landscaping shovel. You do not hit the center of the roll; you hit the joints. You want to see the edge of the sod slightly deform and push into the neighbor roll. This eliminates the ‘V’ gap where the two rolls meet. This is the only way to stop the ‘wicking effect’ that kills the edges.
“Edge desiccation in newly laid turf is primarily driven by the wicking effect where exposed soil surfaces pull moisture from the plant tissues at an accelerated rate, necessitating a physical compaction seal at the margins.” – Agronomy Extension Service
How hard should I tamp new sod edges?
You should apply enough force to compress the sod thickness by roughly 25 percent at the very edge. If you are using a standard 10-pound tamper, a drop from 12 inches height is usually sufficient. You are looking for a ‘knit’ look where the seam disappears. If you can still see the line between the two pieces of sod, you have not tamped hard enough. However, do not smash it until the soil is mud. You need to maintain some pore space for oxygen. It is a balance of pressure and biology.
Why is my new sod dying at the seams?
If your sod is dying at the seams, it is almost certainly due to poor soil contact or improper butt-jointing during the sod install. When rolls are laid with gaps or ‘tucked’ edges (where the grass of one roll is folded under the next), air gaps form. These gaps act like heat sinks. You must ensure the rolls are laid tight, like bricks, and then tamped down to lock the moisture in. This is a critical part of landscaping and irrigation management.
Material and Tool Comparison for Sod Sealing
Not every tool is right for every job. If you are doing a 5,000-square-foot install, a hand tamper will kill your back. If you are doing a small patch, a water roller is overkill. Here is the breakdown of how we select our gear based on the site conditions and soil type.
| Tool Type | Primary Use Case | Pressure (PSI) | Effectiveness on Edges |
|---|---|---|---|
| Hand Tamper (10×10) | Tight corners, edges, and seams | High (Point Load) | Excellent |
| Water-Filled Roller | Large open areas for general contact | Low to Medium | Poor (Misses Edges) |
| Shovel Back | Quick fixes on small patches | Variable | Moderate |
| Plate Compactor | Hardscape base only (DO NOT USE ON SOD) | Fatal | N/A (Will kill grass) |
The Ultimate Sod Installation Checklist
- Soil Test: Check pH levels. Aim for 6.5. If it is below 5.5, add lime. If above 7.5, add sulfur.
- Grade Depth: Ensure the soil level is exactly 1 inch below the level of sidewalks or driveways so the sod sits flush.
- Moisture Prep: Dampen the bare soil slightly before laying. Never lay sod on bone-dry, hot dirt.
- Staggered Seams: Lay the sod in a brick-work pattern. This prevents long run-off channels for water.
- The Tamping Move: Execute the 45-degree bevel tamp on every single seam and perimeter edge.
- Initial Irrigation: Water within 30 minutes of laying. You want the soil underneath to be wet at least 4 inches deep.
Irrigation Science: Beyond Just Turning on the Sprinkler
Watering is not just about volume; it is about timing and penetration. For the first 14 days, your irrigation schedule should be focused on keeping that root mat from ever drying out. I recommend three short cycles a day: 6:00 AM, 11:00 AM, and 3:00 PM. Do not water at night. Night watering is an invitation for Pythium blight and other fungal pathogens that love wet, stagnant air. You want the blades to dry off before the sun goes down. After two weeks, you shift. You stop the frequent light watering and move to deep, infrequent soaking. This forces the roots to dive deep into the soil to find moisture. If you keep babying them with surface water, the roots will stay in the top inch, and the first hot day in July will kill the whole lawn. We are building a resilient system, not a weak one. This is the difference between a professional result and a DIY disaster.