The Foundation of Successful Sod Installation
To fix 2026 sod rooting issues, you must focus on soil de-compaction, bio-available phosphorus levels, and microbial inoculation. Ensuring a soil pH between 6.0 and 7.0 allows for optimal nutrient uptake, preventing the common failure where roots sit on top of the soil instead of penetrating the sub-grade. I once saw a homeowner who had spent five figures on high-end fescue, only to watch it turn into a yellowing crisp within three weeks. They had followed the big-box store advice and dumped high-nitrogen fertilizer on the surface in the middle of a heatwave. The nitrogen sat there, salt-burned the tender new roots, and essentially pickled the grass from the bottom up. It was a chemical nightmare that could have been avoided with a simple soil test and a basic understanding of cation exchange capacity. That is the difference between a professional sod install and a DIY disaster. You cannot just slap grass on top of hardpan clay and expect a miracle. You are building a biological engine, and the soil is the fuel system.
Why Yard Cleanup is the Secret to Root Penetration
Effective yard cleanup involves more than just raking leaves; it requires the removal of the hydrophobic layer of old organic matter that prevents water from reaching the root zone. When we talk about landscaping, we are talking about managing the interface between the plant and the earth. If you leave old thatch or construction debris under your new sod, you create air pockets. These air pockets are death traps. Roots hit air, dry out, and die. We call this ‘air pruning,’ and while it is great in a nursery pot, it is a catastrophe in your front yard. You need 100 percent soil-to-root contact. This requires a clean slate, stripped down to the bare mineral soil before any amendments are added.
“Soil testing is the only way to determine the actual nutrient needs of your lawn, as visual symptoms of nutrient deficiency often mimic those of disease or environmental stress.” – Penn State Extension Agronomy Manual
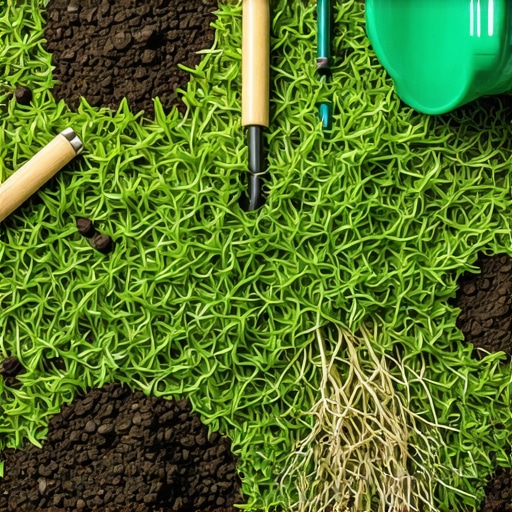
Hack 1: Bio-Inoculation with Mycorrhizae
Inoculating your soil with mycorrhizal fungi creates a symbiotic relationship that extends the root system’s reach by up to 1,000 times, significantly increasing drought resistance and nutrient absorption. These fungi attach to the sod roots and act as an auxiliary plumbing system. They can mine phosphorus from the soil that the grass roots cannot reach on their own. In the 2026 growing season, where we expect more volatile moisture shifts, this biological insurance policy is non-negotiable. Don’t just buy any bag; look for products containing Glomus intraradices. Apply this directly to the soil surface before the sod hits the ground so the roots make immediate contact upon installation.
Hack 2: Mechanical Sub-Soiling and Fracturing
Mechanical sub-soiling involves using a tiller or aerator to break the compaction layer at least 6 inches deep, ensuring that irrigation water and roots can move vertically through the soil profile. Most modern suburban yards are compacted to the density of concrete by heavy equipment during home construction. If you don’t fracture that hardpan, your sod will grow ‘pancake roots’—sideways instead of down. Deep roots are the only thing that will keep your lawn green when the irrigation system inevitably faces a mid-summer glitch. Use a core aerator to pull plugs, then top-dress with a mix of coarse sand and leaf compost to keep those channels open.
Hack 3: The Slow-Release Phosphorus Matrix
Applying a starter fertilizer with a high phosphorus (P) value—the middle number on the bag—is essential for ATP production and cellular energy transfer during the critical first 14 days of rooting. While nitrogen (N) makes the grass green, phosphorus makes the grass strong. However, you must use a slow-release granular form to prevent runoff into local waterways. We want the phosphorus to stay in the root zone, not wash into the storm drain. Aim for a 10-20-10 ratio for new installs. This provides the energy the plant needs to push through the shock of being cut, transported, and re-laid in a foreign environment.
Comparison of Soil Amendments for 2026 Sod Success
| Amendment Type | Primary Benefit | Application Rate | Best For |
|---|---|---|---|
| Biochar | Carbon sequestration/Water retention | 10 lbs per 1000 sq ft | Sandy soils |
| Gypsum | Breaks up clay/Calcium boost | 40 lbs per 1000 sq ft | Heavy clay/Sodic soil |
| Humic Acid | Increases nutrient uptake | Liquid or Granular spray | All soil types |
| Compost | Microbial life/Organic matter | 1/4 inch top-dress | Depleted urban soil |
How long does sod take to root in clay soil?
In heavy clay, sod install projects typically take 14 to 21 days to establish a shallow root system, but deep rooting can take a full growing season. Because clay has small pore spaces, irrigation must be managed carefully to avoid waterlogging the roots, which leads to Pythium blight and root rot. You must use the ‘tug test’—if you pull the corner of a sod piece and it resists, the roots are taking hold.
What is the best fertilizer for new sod installation?
The best fertilizer for new landscaping with sod is a starter fertilizer rich in phosphorus and potassium, specifically designed to stimulate root growth rather than top-growth. Avoid high-nitrogen ‘weed and feed’ products for the first 60 days, as these can chemically burn the new root tips and increase the plant’s water demand beyond what the immature root system can provide.
“Water movement in soil is governed by matric and gravitational forces; a saturated soil layer prevents oxygen from reaching the root zone, effectively suffocating the plant.” – Texas A&M AgriLife Extension
The 2026 Sod Installation Checklist
- Conduct a soil pH test (target 6.5).
- Remove all rocks, debris, and existing weeds (clean yard cleanup).
- Till the soil to a depth of 6 inches.
- Apply mycorrhizal inoculant to the bare earth.
- Grade the soil away from the home foundation to prevent drainage issues.
- Lay sod in a staggered brick pattern to minimize seam drying.
- Roll the sod with a water-filled roller to ensure soil contact.
- Set irrigation for 3 short cycles per day for the first 10 days.
Optimizing Irrigation for Root Depth
Proper irrigation for new sod is not about total volume; it is about frequency and timing. During the first week, you want the soil under the sod to stay consistently moist but not swampy. By week three, you should transition to deep, infrequent watering. This is the ‘tough love’ phase. By letting the top inch of soil dry out slightly, you force the roots to grow downward in search of moisture. This builds a resilient, drought-tolerant lawn. If you water every day for five minutes, you are training your lawn to be weak. It will die the first time you go on vacation. It will rot. Don’t skip the transition to deep watering. This is where the engineering of your landscaping pays off.