You look out at your $25,000 investment and all you see is green. Not the intentional green of a managed turf grass, but the jagged, invasive stalks of crabgrass and dandelions rupturing through your stone work. It looks cheap. It looks neglected. More importantly, it is a structural warning sign. I recently got called out to tear up a $30,000 patio in a high-end neighborhood that was sinking and tilting toward the foundation. The homeowner thought they just had a ‘weed problem.’ When we pulled the first few pavers, the autopsy revealed the truth: the previous contractor skipped the drainage layer and used cheap play sand in the joints. The weeds weren’t just an eyesore; their root systems had channeled water directly into the base, liquefying the bedding layer and turning a structural hardscape into a muddy mess. This is the reality of hardscaping. If you don’t control the biology and the physics of the joint, the environment will reclaim your patio in less than three seasons.
The Root Cause of Paver Joint Weed Infestation
To eliminate weeds in paver joints, you must understand they primarily grow from windblown seeds landing in organic debris accumulated within the gaps. Contrary to popular belief, weeds rarely come from the soil beneath a properly installed base layer; they are a result of joint sand erosion and maintenance neglect. When your joint material washes away, it is replaced by dust, leaf litter, and dirt. This creates a high-nitrogen growing medium that acts as a nursery for invasive species. If you see weeds, your joint integrity has already failed. This failure allows moisture to penetrate the bedding sand, leading to heaving during freeze-thaw cycles and subsidence during heavy rains. We are dealing with hydrostatic pressure and capillary action, not just gardening. If the sand is gone, the structural interlock is gone. Without interlock, your pavers are just loose stones sitting in the mud. This is why a simple yard cleanup isn’t enough; you need a full joint stabilization protocol.
“A retaining wall doesn’t fail because of the stone; it fails because of the water trapped behind it.” – Hardscape Engineering Axiom
Why Traditional Sand Fails the Longevity Test
Standard leveling sand or play sand lacks the angularity and binding agents required to resist erosion and insect intrusion. Because these grains are often rounded or too fine, they do not lock together under compaction, allowing water to flush the material out of the joints during every storm. This creates voids. Ant colonies love these voids, further excavating the base material and creating sub-surface cavities. Once the sand is gone, the pavers can shift laterally. This is called ‘creep.’ If you are planning a sod install adjacent to a patio, the moisture from the new irrigation schedule will accelerate this erosion if your joints aren’t sealed with a high-performance polymeric sand or resin. You need a material that can transition from a flexible state to a solid state while remaining permeable enough to handle vapor pressure. Traditional sand is a 1970s solution to a 2024 engineering problem. It simply cannot stand up to modern high-pressure irrigation systems or the intensity of current storm patterns.
| Material Type | Erosion Resistance | Weed Inhibition | Flexibility | Installation Cost |
|---|---|---|---|---|
| Play/Mason Sand | Low | None | High | Low |
| Polymeric Sand | High | High | Medium | Moderate |
| Resin-Based Jointing | Extreme | Total | Low | High |
The Science of Polymeric Sand and Joint Stabilization
Modern polymeric sand is a calibrated mixture of graded sand and polymer binders (usually polypropylene or polyurethane) that hardens upon activation with water. When these polymers wet out, they form a glue-like bond between the sand grains, creating a semi-rigid mass that resists washout and root penetration. This material is designed to be ‘self-healing,’ meaning it can slightly expand and contract with the stone without cracking. However, if you apply it to a wet surface, the polymers activate prematurely, leaving a white, hazy residue known as polymeric haze on your expensive pavers. This is a nightmare to remove. You must ensure the pavers are bone dry and the humidity is below 60 percent before you even open the bag. We measure the moisture content of the stones because even a small amount of trapped dampness can ruin the cross-linking of the chemical binders. This is high-stakes chemistry, not just sweeping dirt.
How much modified gravel do I need for a patio base?
For a standard residential paver patio, you need a minimum of 4 to 6 inches of compacted modified gravel (such as CR6 or 21A) to ensure structural stability. This base must be compacted in 2-inch ‘lifts’ using a vibratory plate compactor to reach 95 percent Standard Proctor Density, preventing future settling. If your soil is heavy clay, you may need to increase the base depth to 8 inches and include a geotextile fabric to prevent the gravel from sinking into the subgrade. Skipping this step is the number one reason patios fail within the first five years. It doesn’t matter how good your polymeric sand is if the foundation beneath it is shifting like a tectonic plate.
How do I stop water from pooling on my pavers?
To prevent surface ponding, your hardscape must be graded with a minimum slope of 1/8 to 1/4 inch per linear foot away from any structures. This pitch ensures that hydrostatic pressure does not build up under the pavers, which can liquefy the bedding sand and cause the stones to ‘float’ or sink. Proper landscaping drainage, including French drains or catch basins, should be integrated into the yard cleanup phase to manage high-volume runoff. If you see water sitting on the surface for more than 15 minutes after a rain, your pitch is incorrect or your joints are completely clogged with non-permeable debris. Water is the enemy of stone. You must give it a path to leave.
Step-by-Step Remediation: How to Seal Paver Joints Forever
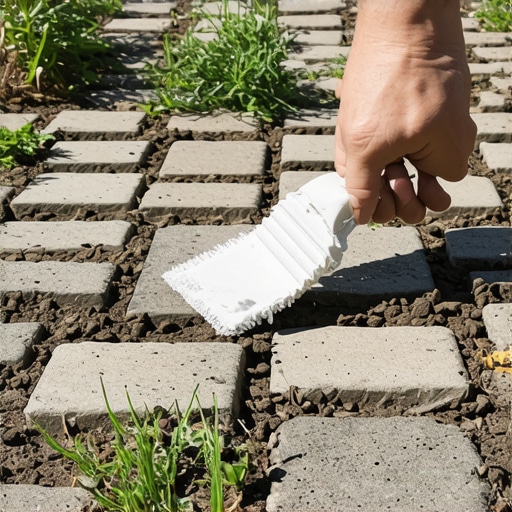
Successful joint stabilization follows a rigid mechanical protocol that cannot be bypassed or rushed for the sake of convenience. If you cut corners on the cleaning or drying phase, the new polymeric sand will fail to bond, and you will be back to square one within six months. [IMAGE_PLACEHOLDER] Follow this professional checklist for a permanent fix:
- Deep Excavation: Use a pressure washer with a 25-degree tip to blast out old sand and weeds to a depth of at least 1.5 inches. Do not skip this; the new sand needs vertical surface area to grip the sides of the stone.
- Sterilization: Apply a sodium hypochlorite solution to kill any remaining microscopic spores or root fragments in the joints.
- The 48-Hour Dry: The pavers and the gaps must be bone dry to the full depth of the joint. If there is moisture at the bottom, the sand will clump and fail.
- Installation: Sweep the polymeric sand into the joints until they are filled. Use a plate compactor with a protective mat to vibrate the sand down. This eliminates voids and air pockets.
- The Reveal: Sweep off all excess sand. The sand level must be 1/8 inch below the chamfer (the beveled edge) of the paver. If it is too high, it will scuff and peel.
- Activation: Set your hose to ‘mist’ and lightly dampen the joints. Do not flood them. You want to trigger the polymers without washing them out of the sand.
“Proper compaction is the difference between a lifetime hardscape and an expensive pile of rocks.” – ICPI Tech Spec No. 2
Irrigation and Drainage: The Silent Killers of Hardscapes
Your irrigation system is often the primary culprit behind failing paver joints. If your sprinkler heads are over-spraying onto the patio, they are providing a constant supply of moisture to the organic matter in the joints, essentially watering the weeds. Furthermore, constant saturation weakens the polymer bonds over time, leading to premature degradation. When we perform a sod install next to a patio, we always recalibrate the irrigation zones to ensure the hardscape remains as dry as possible. You should also check your downspouts. A single downspout dumping 500 gallons of water onto a corner of your patio during a storm will erode even the best polymeric sand. Redirect that water into a solid-wall pipe and move it at least 10 feet away from the hardscape. It will rot the foundation if you don’t. Protect your investment by controlling where the water goes. A dry joint is a weed-free joint. Period.