Fix 2026 Drip Line Leaks with a $1 Coupler: The Professional Guide
I always drill into my new crew members: if you dont fix the soil grading first, every plant you put in the ground is just expensive compost. But even with perfect grading, if your irrigation system fails, your entire investment in landscaping dies in the summer heat. Last season, I walked a job site where a junior tech had buried a kinked 1/2-inch poly line. Within three weeks, a $15,000 sod install of premium Zoysia was a brown, soggy mess. The culprit? A tiny crack that could have been solved with a plastic part that costs less than a cup of coffee. We are talking about the humble barbed coupler. This isnt about a quick fix; its about understanding the hydraulics of your yard cleanup and irrigation maintenance. Precision matters. A leak isnt just wasted water; it is a structural threat to your property. Ground saturation leads to soil instability. It will rot your roots. Don’t skip the details.
The Anatomy of a Drip Line Failure
You identify drip line leaks by looking for oversaturated soil patches, geysers at emitter points, or drop-offs in downstream pressure. These failures usually stem from UV degradation, mechanical damage from shovels during a yard cleanup, or rodent chewing, requiring immediate excision and coupling to prevent soil erosion. When you see a puddle in a dry zone, you are looking at a forensic crime scene. The irrigation system has been compromised. The pressure drop caused by a single leak can starve every plant downstream. Most 1/2-inch drip lines operate between 20 and 30 PSI. When that envelope is breached, the flow rate (GPH) at the emitters collapses. You arent just losing water; you are killing your landscaping stock.
How much pressure can a poly-tubing coupler handle?
Most standard 1/2-inch barbed couplers are rated for up to 50 PSI, though they perform best at a regulated 25 to 30 PSI. Exceeding this pressure without a locking collar or clamp often leads to the tubing blowing off the barb during high-heat cycles when the polyethylene softens. Always use a pressure regulator at the valve to protect your landscaping infrastructure.
“Drip irrigation systems can achieve over 90% efficiency when properly maintained, significantly reducing runoff compared to overhead sprays.” – Texas A&M AgriLife Extension
The $1 Coupler vs. The $500 Cleanup
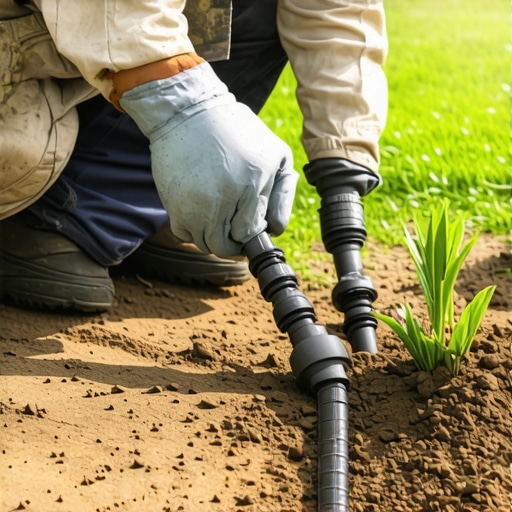
A barbed coupler provides a mechanical seal by biting into the inner wall of polyethylene tubing, costing less than a dollar but preventing thousands in landscape damage. Ignoring a 1/2-inch leak leads to hydrostatic pressure issues near foundations and root rot in expensive nursery stock. If you are doing a sod install, the last thing you want is a subterranean leak washing away your topsoil. The coupler is a simple friction-fit device. It relies on the memory of the LLDPE (Linear Low-Density Polyethylene) plastic to shrink back around the barbs. In professional landscaping, we don’t use glue on these lines. We use physics. Heat the pipe slightly with your hands, shove the coupler in until it seats, and it is set for a decade. It is a permanent fix for a temporary problem.
| Material Type | Average Cost | Expected Lifespan | Pressure Rating |
|---|---|---|---|
| Standard Barbed Coupler | $0.45 – $0.85 | 10+ Years | Up to 50 PSI |
| Compression Coupler | $1.50 – $3.00 | 15+ Years | Up to 60 PSI |
| Locking Nut Coupler | $1.20 – $2.50 | 15+ Years | Up to 60 PSI |
| PVC Transition | $2.00 – $5.00 | 25+ Years | 80+ PSI |
Forensic Repair: The Step-by-Step Execution
Before you dig, understand the soil. If you have heavy clay, the leak site might be five feet away from where the water surfaces. In sandy loam, the water goes straight down, making the leak easier to find. First, clear the debris. Use a square-point shovel to avoid slicing the 1/2-inch main line further. Cut the damaged section out cleanly. I use professional pipe cutters; a dull pocketknife will leave a jagged edge that leaks. Check for grit inside the line. If dirt gets into the irrigation emitters, you will be replacing the whole run. Flush the line before you seal it. This is a non-negotiable step in landscaping maintenance. Insert the coupler. You should feel it click or seat firmly against the center stop. If the line is cold and stiff, do not force it. You will crack the barb. Use a heat source or warm water to make the poly more pliable. It must be a snug fit. Tight. Secure.
What is the best way to cut drip irrigation tubing?
The best way to cut drip irrigation tubing is to use a dedicated ratcheting pipe cutter or a sharp bypass pruner to ensure a perfectly square, burr-free edge. A square cut ensures the barbed coupler seats fully against the internal stop, preventing high-pressure bypass and ensuring the integrity of your sod install irrigation zones.
- Identify the leak by checking for soil bubbling or localized mud.
- Excavate at least 6 inches around the tubing to allow for hand room.
- Cut out the damaged section with a square, clean stroke.
- Check the inner diameter for debris or mineral scaling.
- Insert the $1 barbed coupler until the tubing hits the center ridge.
- Connect the second side, ensuring no kinks are introduced.
- Run a manual test cycle to check for weeping at the seal.
- Backfill the hole, tamping the soil to prevent future settling.
“Soil saturation from irrigation leaks reduces the shear strength of the soil, potentially leading to the failure of adjacent retaining structures.” – Hardscape Engineering Axiom
Why Soil Logic Trumps Technology
You can buy the most expensive Wi-Fi controller on the market, but if your irrigation lines are leaking, your landscaping will suffer. Many homeowners think more water is the answer to a dying lawn. Wrong. Deep, infrequent watering forces roots to chase moisture down into the soil profile. A leak creates a shallow, localized water table. The roots stop searching. They get lazy. Then the fungus moves in. Pythium blight and Rhizoctonia will devour a new sod install in days if the soil stays saturated. This is why we focus on the $1 coupler. It restores the balance of the nitrogen cycle and ensures the soil microbiology isn’t drowned. Maintenance is 80% of the battle. The other 20% is knowing when to stop digging. If you find a leak under a hardscape, do not try to tunnel. Redirect the line. Use your head. Protect the base layer compaction. If you lose the base, you lose the patio.
The Professional Maintenance Schedule
Every spring, before the first heat wave, you must pressure test the system. Close all manual emitters and watch the meter. If that dial is spinning, you have a leak. This is the core of a professional yard cleanup. We don’t just rake leaves; we audit the life-support systems of the property. Check the filters. Clean the screens. A clogged filter increases backpressure, which is exactly when those $1 couplers earn their keep. They hold the line. If you see a coupler starting to