Fixing 2026 Sod Edge Gaps: The Forensic Approach to Seam Failure
I always drill into my new crew members: if you don’t fix the soil grading first, every plant you put in the ground is just expensive compost. Last season, I walked onto a site where a homeowner had spent four grand on premium Kentucky Bluegrass rolls only to have the yard look like a grid of brown scars two weeks later. The issue wasn’t the grass quality or the watering schedule. It was the installation technique. They had laid the slabs side-by-side like bathroom tiles without accounting for the biological reality of turf desiccation. When sod dries, it doesn’t just get thirsty; it physically contracts. Those gaps allow air to reach the delicate root flares, effectively kiln-drying the plant from the side. We had to go in, pull up the edges, and remediate the entire perimeter. If you are seeing gaps in your 2026 sod install, you are likely witnessing the result of poor soil contact and lateral shrinkage. This is not a cosmetic issue. It is a structural failure of the lawn. If those gaps stay open, you are inviting weed seeds into the perfect incubation chamber of exposed, nutrient-rich soil. You need to understand the physics of the sod slab to fix it.
How Do I Fix Gaps in My New Sod?
You can fix 2026 sod edge gaps by using a vertical hand-tamping technique at a 45-degree angle to physically shear the turf edges together while simultaneously eliminating the air pockets that cause desiccation. This method ensures capillary action between the sod and the soil substrate is restored immediately.
The science of a sod install is often misunderstood by the DIY crowd. They think it is like carpet. It is not. It is a living, breathing ecosystem with a high percentage of water weight. When you cut a piece of turf from its original field, you are severing 90 percent of its root system. The remaining 10 percent is held together by a thin layer of soil and organic matter. This layer is highly susceptible to the laws of thermodynamics. As the water evaporates, the volume of the soil layer decreases. If your seams aren’t tight, that contraction pulls the slabs apart. Most people try to fix this by throwing topsoil into the cracks. That is a mistake. All you are doing is creating a medium for crabgrass and poa annua to take root while the sod edges continue to die back. Instead, you need to use the tamping trick. This involves using a standard 8-inch by 8-inch hand tamper. You don’t just hit the top of the grass. You strike the edge of the gap at an angle, forcing the two slabs to mash into each other. This physical displacement closes the gap and, more importantly, compresses the soil at the seam to lock in moisture.
“Turfgrass establishment failure is often attributed to the lack of intimate contact between the sod and the underlying soil surface, which prevents immediate root proliferation.” – NC State Extension
The Physics of Sub-Base Compaction and Grading
Before you even touch a roll of sod, your yard cleanup must be surgical. You can’t just rake away the dead stuff and call it a day. You need to examine the soil profile. Most residential yards suffer from severe compaction at the 4-inch to 6-inch depth. This is where the heavy equipment from the home builder rolled over the lot. If you lay sod on top of this hard-pan, the roots have nowhere to go. They will grow horizontally, causing the edges of the slabs to become even more unstable. You need to break that tension. I recommend a core aerator or a heavy-duty tiller to reach at least 5 inches down. Once the soil is loose, you need to manage the grade. If the yard slopes toward the house, you aren’t just looking at a dead lawn; you are looking at a basement flood. Every sod install must be preceded by a grading check using a transit or a simple line level. You need a 2 percent slope away from all structures. This ensures that the irrigation you are about to install doesn’t pool in one spot and rot the roots. Hydrostatic pressure is a silent killer of both retaining walls and turf. If the water can’t move through the soil, it will sit on top, creating an anaerobic environment that turns your expensive grass into a muddy mess within weeks.
Why Do My Sod Seams Keep Opening?
Sod seams open primarily because of evapotranspiration-induced shrinkage and a lack of sub-soil integration. When the rhizosphere dries out, the organic matter in the sod slab loses volume, causing the edges to pull away from adjacent pieces, which is exacerbated by high-nitrogen fertilizers that promote top growth over root development.
| Sod Variety | Shrinkage Risk | Rooting Speed | Best Tamping Pressure |
|---|---|---|---|
| Kentucky Bluegrass | High | Moderate | Medium (15 PSI) |
| Tall Fescue | Medium | Fast | High (20 PSI) |
| Bermuda Grass | Low | Very Fast | Light (10 PSI) |
| Zoysia | Moderate | Slow | Medium (15 PSI) |
Let’s talk about the yard cleanup phase. If you have old debris, rocks, or even small sticks left on the soil, they create air voids. An air void is a death sentence for sod. When a root hits an air pocket, it stops growing. It is called air-pruning. This is why the edges are the first to die. They are the most exposed to the air. Your cleanup must be thorough. We use a power rake followed by a magnetic sweep to ensure no metallic debris is left. Then, we apply a starter fertilizer with a high Phosphorus count. Look for an NPK ratio like 10-20-10. Nitrogen builds the green you see, but Phosphorus builds the roots you don’t. Without those roots, your sod is just a temporary decoration. Once the fertilizer is down, you lay the sod in a staggered, brick-like pattern. Never align the seams. If you align them, you create a continuous channel for water to run through, which leads to erosion under the sod. Staggering the joints breaks up the water flow and forces the slabs to support each other.
How much modified gravel do I need for a patio base?
While this article focuses on sod, many homeowners integrate hardscapes. For a standard patio base, you need 6 inches of compacted CR6 or 21A modified gravel. To calculate the volume, multiply the square footage by 0.5 (for 6 inches depth) and divide by 27 to get the cubic yardage required for a stable, non-settling foundation. Do not skip the compaction. Every 2 inches of gravel must be hit with a plate compactor until the surface is rock hard. If you don’t, your pavers will shift, and your sod edges will be the least of your worries.
“Effective drainage must account for both surface runoff and subsurface infiltration to prevent the saturation of the root zone and the subsequent anaerobic conditions that lead to turf decline.” – Texas A&M Agronomy Manual
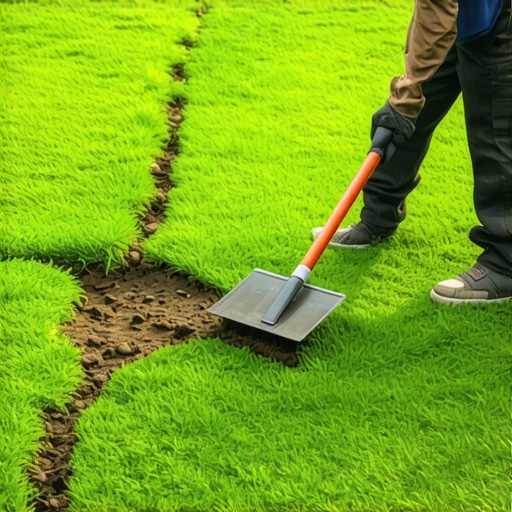
The Tamping Trick: Step-by-Step Execution
Once the sod is laid, you will notice the seams. Even the best installers leave tiny gaps. This is where the trick comes in. Don’t use a water roller yet. Grab a heavy hand tamper. Stand over a seam where two slabs meet. Hold the tamper so that its edge is aimed directly at the gap. You want to strike the grass about an inch away from the actual crack. When you hit it, the force should be directed downward and slightly toward the center of the gap. This action ‘shears’ the soil. It pushes the edge of slab A into the edge of slab B. You are essentially welding the two pieces together with soil. You will see the grass blades intermingle. This is what you want. After you have gone over all the seams, then you use the water roller. The roller should be filled to about 75 percent capacity. If it is too heavy, you will compact the soil too much and kill the oxygen supply. If it is too light, it won’t settle the sod into the soil. You are looking for that ‘sweet spot’ where the sod feels firm under your boot, not squishy. If it feels squishy, there is air underneath. Get the tamper. Hit it again. Don’t be afraid to work the edges. The grass is tougher than you think.
- Check for soil-to-sod contact: Pull up a corner; if it lifts easily with no soil sticking to it, you haven’t tamped enough.
- Monitor irrigation coverage: Ensure your heads have 100 percent overlap. A single dry spot will cause a seam to open in 24 hours.
- Avoid high-traffic: Stay off the new sod for 14 days. Every footprint on a seam is a potential gap in the making.
- Sharp mower blades: The first mow should be at 3 inches. Use a sharp blade. Dull blades pull the grass up, ripping the new roots right out of the ground.
Irrigation is the final piece of the puzzle. Most people water every day for 10 minutes. This is garbage advice. That just keeps the top wet and the bottom dry. You need to water deeply. You want to soak the soil to a depth of 6 inches. This forces the roots to dive down deep to find the moisture. Deep roots mean a stable lawn that won’t shrink during a heatwave. We recommend one inch of water per week, delivered in two heavy sessions. Use a rain gauge or a tuna can to measure it. If you are just guessing, you are failing. Landscaping is math and biology. It isn’t magic. You have to measure the input to get the output. If you follow this tamping protocol and manage your soil moisture with precision, those 2026 sod gaps will disappear, and you will have a monolithic carpet of turf that can withstand the summer heat. Don’t be a hack. Do the work. Fix the seams before they fix your wallet.