Fixing Sprinkler Pressure Loss: The Expert Guide to Cleaning Valve Diaphragms
You notice it first at the heads. A zone that used to throw water thirty feet is suddenly weeping, barely clearing the grass blades. The spray pattern is ragged. The pressure is gone. Most homeowners assume the pump is dying or a main line has snapped. Usually, the culprit is much smaller and far more annoying. It is a grain of sand or a shard of PVC glue stuck inside the irrigation valve. Specifically, it is clogging the diaphragm pilot hole. When that tiny orifice gets blocked, the physics of your irrigation system fail. You lose the pressure differential needed to hold the valve open. You are left with a system that chokes just when your yard needs water most.
I always drill into my new crew members: if you do not fix the soil grading and water pressure first, every plant you put in the ground is just expensive compost. I saw a kid last year try to adjust a head for three hours. He didn’t realize the valve was only 20 percent open because of a piece of grit the size of a salt grain. He was trying to treat a structural failure with a cosmetic fix. We do not do that in professional landscaping. We look at the hydraulics. We look at the engineering. We fix the source.
How to Identify Irrigation Valve Diaphragm Failure
To identify a failing diaphragm, you must **check for weeping heads, low PSI at the nozzle, and valves that refuse to close or open fully.** This component relies on a delicate balance of water pressure above and below a rubber membrane to function correctly. When debris enters the mix, that balance is destroyed, leading to immediate pressure loss across the entire downstream zone.
“Pressure regulation and valve maintenance are critical to irrigation efficiency, as even a 5 PSI drop can reduce the radius of a sprinkler head by up to 25 percent, leading to uneven water distribution and dry spots.” – Texas A&M AgriLife Extension Service
The diaphragm is a flexible rubber disc that separates the top of the valve (the bonnet) from the bottom (the body). It has a small hole in it. This is the pilot hole. Water flows through this hole to create pressure in the top chamber, which keeps the valve shut. When the solenoid activates, it lets that top-chamber water escape. The higher pressure from below then pushes the diaphragm up, allowing water to flow to your sprinklers. If that pilot hole is clogged with debris from a recent sod install or a dirty yard cleanup, the valve will not open correctly. The result is a massive drop in PSI. You get low flow, poor coverage, and eventually, dead grass.
Why does my sprinkler valve have low pressure?
Pressure loss occurs when the diaphragm cannot lift fully away from the valve seat. This creates a restriction in the flow path, much like a kinked hose. This is often caused by sediment, mineral buildup, or physical damage to the rubber membrane itself. Over time, the rubber can become brittle or stretched, especially in regions with high heat or hard water. If the diaphragm is distorted, it will not create a clean seal or a clean opening. You will hear a humming or vibrating sound coming from the valve box. That is the sound of a system struggling against itself. It is a warning that your landscaping is about to suffer.
| Valve Component | Material | Common Failure Mode | Impact on PSI |
|---|---|---|---|
| Diaphragm | Buna-N Rubber | Tearing or Stretching | High (Loss of Pressure) |
| Pilot Hole | Molded Plastic | Sediment Clogging | Severe (Valve Won’t Open) |
| Bonnet Screws | Stainless Steel | Over-tightening/Stripping | Moderate (Leaking) |
| Solenoid Plunger | Steel/Rubber Tip | Corrosion or Grit | Moderate (Intermittent Flow) |
The Forensic Step-by-Step: Cleaning the Valve Diaphragm
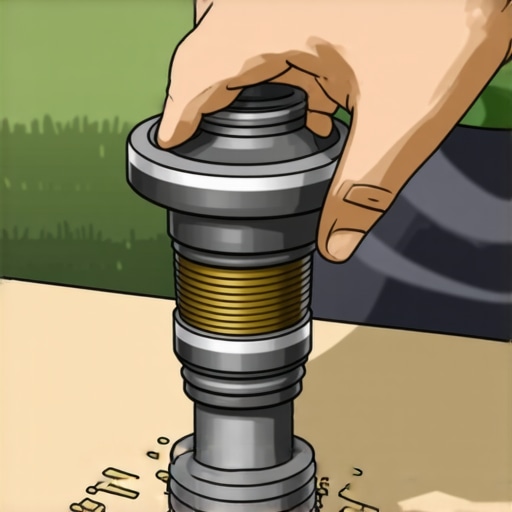
Before you touch a wrench, you must shut off the main water supply. If you skip this, you are going to get a face full of 60 PSI water the moment you loosen the first screw. Locate your backflow preventer or the main irrigation shut-off valve. Turn it to the off position. Now, manually bleed the pressure from the system by turning the bleed screw on the valve you are about to service. Listen for the hiss. Wait until the water stops flowing. Only then is it safe to proceed.
How do I clean a sprinkler valve without replacing it?
To clean the valve, you must **remove the bonnet screws, carefully lift the rubber diaphragm, and flush the internal chambers with clean water.** Inspect the pilot hole for blockages and ensure the rubber is free of tears or mineral deposits before reassembling the unit to restore full pressure. Many contractors will tell you to just buy a new valve. That is lazy. A clean diaphragm can last another five years if the rubber is still pliable. We use a fine-gauge wire or a needle to clear the pilot hole. Do not use a drill bit; you do not want to enlarge the hole, just clear it. Wipe down the valve seat. Even a tiny piece of grit on the seat will prevent the valve from closing, leading to a constant leak that turns your yard into a swamp.
- Shut off the main water supply and bleed the line pressure.
- Remove the 4 to 8 screws holding the valve bonnet in place.
- Lift the bonnet and the spring carefully—do not lose the spring.
- Remove the rubber diaphragm and inspect for any visible tears.
- Use a soft brush or clean water to remove sediment from the valve body.
- Clear the pilot hole using a thin wire or compressed air.
- Check the solenoid plunger for smooth movement.
- Reassemble and hand-tighten the screws in a cross-pattern.
“Properly functioning valves are the heart of an irrigation system; a single obstructed valve can result in a 30 to 50 percent reduction in water application efficiency across a managed landscape.” – Irrigation Association Technical Manual
When you put the bonnet back on, you must use a cross-pattern, similar to tightening lug nuts on a tire. If you tighten one side all the way, you will pinch the diaphragm. This causes a leak. Tighten them all until they are snug, then give each another quarter turn. Do not over-torque. These are plastic housings. They will crack. If you crack the body, you are digging up the whole valve box. That is a two-hour job that should have been a ten-minute fix. Use your head. Be precise. [image]
Environmental Factors and Soil Health
In areas with heavy clay or high iron content, these diaphragms fail more often. The minerals precipitate out of the water and form a crust on the rubber. This makes the diaphragm stiff. A stiff diaphragm does not react quickly to pressure changes. This is why yard cleanup and regular maintenance are not optional. If you are doing a new sod install, you must flush the lines before you hook up the heads. New pipes are full of construction debris. If you don’t flush them, that debris goes straight into your valves. You will be cleaning diaphragms for a week straight.
What is the best way to prevent irrigation clogs?
The best way to prevent clogs is to **install a high-capacity disc filter at the main supply line and perform annual system flushes.** This captures sediment before it reaches the delicate valve components, ensuring that your irrigation system maintains consistent pressure and flow throughout the growing season. Think of it like an oil filter for your yard. It is cheap insurance against a dead lawn. If you have a well, this is mandatory. Sand will chew through a diaphragm in a single season. I have seen systems where the heads were completely packed with fine silt because the installer was too cheap to put in a $40 filter. Do not be that guy. Fix it right the first time.
Check your system every spring. Do not just turn the clock on and walk away. Open the valve boxes. Look for leaks. Listen for that hum. If a zone looks weak, do not just buy a bigger pump or more heads. Open the valve. Clean the diaphragm. Restore the pressure. Your grass will thank you. Your wallet will too. Technical knowledge beats a bigger budget every single time in this business. Keep the grit out of the gears and the water will flow where it belongs.
Comments are closed.