The Hardscape Autopsy: Why Most Dry Creek Beds Fail
A dry creek bed is not a decoration; it is a hydraulic conveyance system designed to manage surface runoff. Last year, I was called to inspect a property where a thirty thousand dollar paver patio was literally floating after a spring storm. The homeowner had hired a contractor who treated a drainage issue like a craft project. They laid down thin plastic sheeting and threw some decorative river jack on top, thinking it would move the water. It didn’t. Instead, the water backed up, saturated the subgrade of the patio, and the resulting hydrostatic pressure caused the base to liquefy. This is the reality of poor engineering. If you don’t calculate the volume of water your site generates, you are just building a very expensive rock-filled swamp. A successful dry creek bed must account for soil percolation rates, peak flow volume, and the Manning’s roughness coefficient of the stone used. Without these considerations, you are failing your landscape before you even pick up a shovel.
The Hydrology of Dry Creeks and Runoff Velocity
To design a dry creek bed that actually moves water, you must first calculate the catchment area and determine the peak discharge rate using the Rational Method (Q=CiA). A functional drainage channel requires a minimum 2% gradient and a cross-sectional area capable of containing a 10-year storm event without overtopping its banks.
“A retaining wall doesn’t fail because of the stone; it fails because of the water trapped behind it.” – Hardscape Engineering Axiom
This principle applies equally to creek beds. If the water cannot move through the channel faster than it enters, it will find a path of least resistance, often into your foundation or under your sod install.
How much slope do I need for a dry creek bed?
For effective gravity-fed drainage, a dry creek bed requires a minimum slope of 2%, which equates to a 1/4-inch drop for every foot of horizontal distance. In heavy clay soils common in regions like the Midwest or Southeast, a 3% to 5% slope may be necessary to ensure water velocity overcomes the surface tension and soil resistance of the channel. Stop guessing. Use a laser level or a transit. A string level is rarely accurate enough for a 50-foot run.
What is the best rock for a drainage creek?
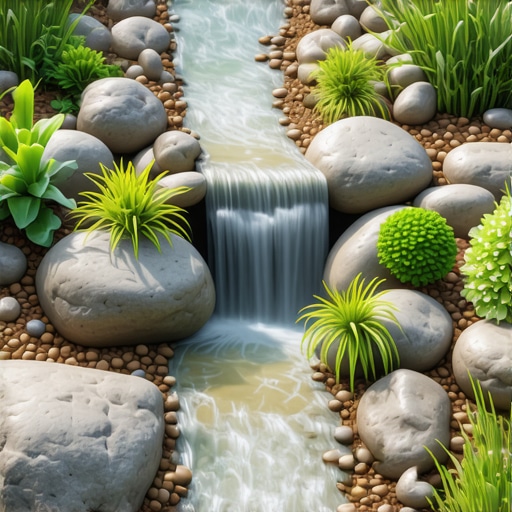
The best rock for a functional dry creek is a combination of angular rip-rap for the base and smooth river stones for the surface. You must use non-woven geotextile fabric (minimum 4oz weight) to separate the stone from the subsoil, preventing the rocks from sinking into the mud over time and maintaining the channel’s hydraulic capacity. Avoid pea gravel. It acts like ball bearings and will wash away in the first heavy downpour. You need D50 stone sizing, where the average stone is 4 to 6 inches in diameter, to provide enough mass to resist the force of rushing water.
The Ground-Up Build: Engineering the Channel
Proper construction starts with the sub-grade. Most DIYers think you just dig a trench. You don’t. You engineer a swale. The center of the creek should be the lowest point, but the shoulders must be compacted to prevent lateral seepage.
“Surface drainage systems must be designed to handle the anticipated peak flow while protecting the soil surface from erosion.” – USDA Natural Resources Conservation Service
When we talk about yard cleanup after a project, we are usually talking about fixing the erosion caused by people who didn’t compact their side-slopes. You need a mechanical plate compactor for the channel walls before any fabric is laid down. Don’t skip this. If the soil is loose, the water will go under your fabric, not over it.
| Material Type | Size Recommendation | Primary Function |
|---|---|---|
| Non-Woven Geotextile | 4oz – 8oz Weight | Soil Separation & Filtration |
| Clean #57 Stone | 1″ – 1.5″ Angular | Structural Foundation |
| River Jack / Cobble | 3″ – 8″ Round | Armor Layer & Aesthetics |
| Boulders | 12″ – 24″ Large | Energy Dissipation (Bends) |
The Installation Process: A Professional Checklist
Precision is the difference between a dry basement and a flooded one. Follow this sequence exactly.
- Utility Locates: Call 811. Do not pierce an irrigation line or a gas main.
- Excavation: Dig the trench 12-18 inches deep. The extra depth allows for a thick stone base without losing the channel’s carrying capacity.
- Fabric Placement: Lay non-woven geotextile. Overlap joints by at least 12 inches and pin them with 6-inch sod staples.
- The Baffle Effect: Place larger boulders at the bends of the creek. This dissipates energy and prevents the water from blowing out the banks.
- Structural Backfill: Fill the bottom 4 inches with clean, angular stone. This provides a stable base that won’t shift.
- Armoring: Top with your decorative river rock. Hand-place the stones to ensure no fabric is visible.
The stone should be ‘keyed’ into the banks. This means the rock doesn’t just sit on top; it is tucked into the edges of the surrounding landscaping. This prevents the edges from collapsing.
Integration with Irrigation and Sod Install
A dry creek bed does not exist in a vacuum. It must interact with your existing irrigation system and your lawn. When performing a sod install adjacent to a creek bed, you must create a ‘mechanical edge.’ This usually involves a spade-cut edge or a hidden metal border. If you run sod directly to the rock, the grass will eventually creep into the stones, clogging the drainage path with thatch and organic debris. This makes future yard cleanup a nightmare. Furthermore, ensure your irrigation heads are not spraying directly into the creek bed. This is a waste of water and can contribute to localized erosion if the heads are high-pressure. Adjust your zones. Make sure the water intended for your plants stays on your plants, and the storm water stays in the channel.
Post-Installation and System Maintenance
Your creek bed will settle. This is normal. In the first year, expect the stones to shift slightly as the soil underneath reaches its final compaction. Check the channel after every major rain event. Look for ‘fines’—small particles of silt or sand—accumulating in the bottom. If you see sediment buildup, it means you have an erosion problem upstream that needs to be addressed with better ground cover or additional landscaping. Once a year, a deep yard cleanup is required. Blow out leaves and organic matter. If leaves rot between the stones, they create soil. Soil allows weeds to grow. Weeds have roots. Roots destroy the hydraulic efficiency of your creek. Keep it clean. Keep it clear. A dry creek bed is a machine. Like any machine, it requires maintenance to perform at peak efficiency. Do not let your investment turn into a clogged gutter on the ground.