The Anatomy of a Failed Yard: Why 2026 Flooding Starts Now
Yard flooding is the result of excessive hydrostatic pressure and poor soil grading forcing water to pool against foundations or drown root systems. A French drain mitigates this by providing a path of least resistance through perforated pipe and washed stone, redirecting subsurface water before it saturates the landscaping.
You see the puddle in the corner of your lawn and think it is a minor nuisance. You are wrong. That puddle is a symptom of a systemic failure in your property’s civil engineering. By the time 2026 rolls around, those repeated saturation cycles will have compacted your soil to the density of concrete, rotted the root flares of your ornamental trees, and likely started the slow process of hydraulic mining under your foundation. I have spent two decades fixing the messes left behind by ‘mow-and-blow’ crews who think a bag of mulch solves a drainage crisis. It doesn’t. You need a structural solution.
The Hardscape Autopsy: Why Your Last Drainage Project Failed
I recently got called out to tear up a $30,000 patio that was sinking because the previous contractor ignored the basic laws of physics. They had installed beautiful pavers but zero drainage. Within two seasons, the water trapped behind the retaining wall built up so much hydrostatic pressure that it blew out the base-layer compaction. The sand migrated, the pavers dipped, and the homeowner was left with a very expensive pond. This is why we do a forensic analysis of the site before we ever touch a shovel. If you don’t account for where the water goes, the water will decide for itself. Usually, that means your basement or your crawlspace.
“A retaining wall doesn’t fail because of the stone; it fails because of the water trapped behind it.” – Hardscape Engineering Axiom
Calculating the Catchment: How Much Water Are We Moving?
Effective drainage design requires calculating the total square footage of your roof and hard surfaces to determine the volume of runoff during a one-inch rain event. Using SDR 35 PVC pipe instead of cheap corrugated tubing ensures that your French drain can handle the flow rate without collapsing under soil weight.
Most homeowners fail because they guess. They buy the cheapest black corrugated pipe from a big-box store and wonder why it’s crushed three years later. We use SDR 35. It is rigid. It has a smooth interior wall that prevents debris from snagging. If you are serious about yard cleanup and long-term stability, you stop buying trash materials. You also need to understand the ‘coefficient of runoff.’ A grass lawn absorbs some water; a concrete patio absorbs zero. If you just installed a new patio, you just increased your runoff by 100% for that square footage. Your old irrigation setup isn’t going to help you here; it’s likely adding to the problem.
How deep should a French drain be for a yard?
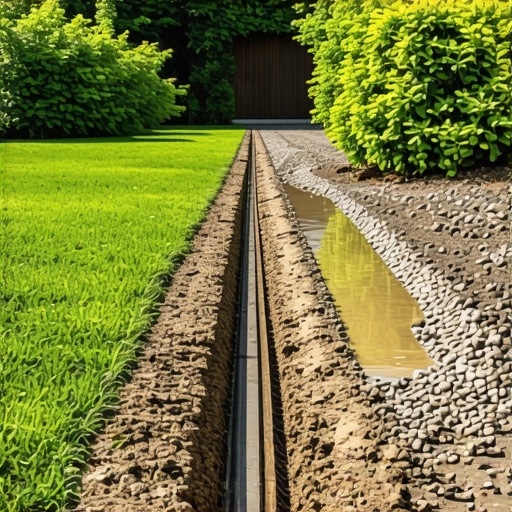
To be effective, a French drain trench should be excavated to a depth of 18 to 24 inches. This depth allows for a 2-inch base of washed #57 stone, a 4-inch pipe, and at least 12 inches of stone backfill to ensure maximum percolation from the surface and sub-surface.
The Materials Breakdown: Real Engineering vs. DIY Hacks
The following table compares the materials used by professionals versus the ‘budget’ options that lead to failure.
| Component | Professional Grade (Recommended) | Big-Box Hack (Avoid) | Why It Matters |
|---|---|---|---|
| Pipe | SDR 35 Rigid Perforated PVC | Thin-wall Corrugated Pipe | Rigid pipe won’t crush; smooth walls prevent clogs. |
| Aggregate | #57 Washed Angular Stone | Round River Rock or Pea Gravel | Angular stone locks together; washed stone has no ‘fines’ to clog. |
| Fabric | 8oz Non-Woven Geotextile | Woven Weed Barrier | Non-woven fabric allows water flow while stopping silt. |
| Slope | 1% to 2% Minimum Grade | ‘Eyeballing it’ | Water does not move without gravity. Period. |
What is the best gravel for French drain drainage?
The gold standard for drainage aggregate is #57 washed limestone or granite. It is large enough (approx. 0.5 to 1.5 inches) to provide massive void space for water movement and lacks the ‘fines’ or dust that eventually settle and turn your drain into a subterranean dam.
The Step-by-Step Excavation and Install
Before you dig, call 811. If you hit a gas line because you were too lazy to get a utility mark, that is on you. Once cleared, you start the ‘trenching phase.’ You aren’t just digging a hole; you are carving a canal. The bottom of your trench must be smooth. Any ‘belly’ or low spot in the trench will collect silt. Silt is the enemy. It will settle, it will grow anaerobic bacteria, and it will stink.
- Step 1: Excavate. Maintain a 1% slope (1 foot of drop for every 100 feet of run).
- Step 2: Line the Trench. Use non-woven geotextile fabric. Leave enough excess to wrap over the top like a ‘burrito.’
- Step 3: Base Layer. Add 2 inches of #57 washed stone.
- Step 4: Pipe Placement. Lay the SDR 35 with the holes facing DOWN. Yes, down. Water rises into the pipe from underneath.
- Step 5: Backfill. Fill with stone to within 4 inches of the surface.
- Step 6: The Burrito Wrap. Fold the fabric over the stone. This is your filter.
“Soil migration is the primary cause of French drain failure; without a non-woven geotextile separator, the aggregate will eventually mix with the native soil, ending its hydraulic conductivity.” – USDA Soil Conservation Manual
Integrating Irrigation and Sod After the Trench
A sod install over a freshly backfilled French drain requires precision. If you put too much heavy topsoil over your drain, you choke it. Use a high-percolation soil mix (70% sand, 30% organic matter) to top off the trench before laying your sod. This ensures that surface water can actually reach the drain instead of sitting on top of the grass.
Check your irrigation heads. If you’ve dug through your zones, don’t just ‘splice’ the lines with cheap couplings. Use professional-grade swing pipes to offset the heads from the edge of the new trench. If the ground settles (and it will, slightly), you don’t want your sprinkler heads tilting or snapping. A proper yard cleanup after this kind of surgery involves more than just raking leaves; it means ensuring the grade still flows away from the house. Don’t skip the compaction of the side-walls. Use a hand tamper. It should bounce when the soil is right.
The Maintenance Schedule: Keeping the Arteries Clear
Your drain is a living system. Every autumn, as part of your yard cleanup, you must inspect the outfall. This is where the pipe exits. If it’s covered in debris or blocked by a rodent nest, the whole system backs up. I tell my clients: ‘The drain is only as good as the exit.’ Install a pop-up emitter or a grated head that can be easily unscrewed and cleaned out. If you see ‘fines’ (tiny silt particles) at the exit, your filter fabric might be compromised. Address it early. Don’t wait for the next 100-year flood to realize your 2026 protection is a pipe full of mud. It will rot. Don’t skip this.