Why Your Sprinkler Backflow is Spouting Water: The Forensic Autopsy
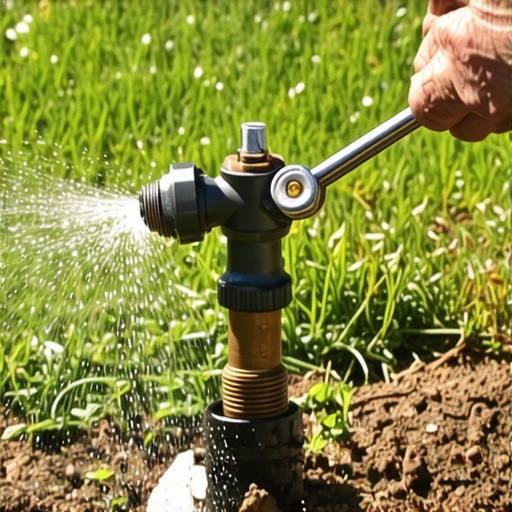
A leaking backflow preventer is typically caused by debris stuck in the internal check valve, damaged O-rings, or a cracked poppet assembly caused by thermal expansion or freeze-thaw cycles. Addressing these mechanical failures early prevents hydrostatic pressure loss and protects the main water supply from contamination. If you hear a hiss or see a steady stream from the canopy, the internal seal has failed. It is not a suggestion; it is a mechanical certainty. I always drill into my new crew members: if you do not fix the soil grading and the irrigation pressure first, every plant you put in the ground is just expensive compost. I have seen too many rookies ignore a weeping backflow, only to have the entire irrigation system lose 20 PSI, resulting in sod install failures and dead turf because the heads would not pop up. You cannot out-fertilize a dry yard.
“Atmospheric vacuum breakers must be installed at least 6 inches above the highest point of downstream piping to ensure proper function and prevent siphoning.” – Penn State Extension Agricultural Irrigation Guide
The 10-Minute Repair Protocol
First, shut off both ball valves on the backflow device. This kills the pressure. Use a large pair of channel locks to unscrew the canopy. Underneath, you will find the bonnet and poppet assembly. 90% of the time, a small grain of sand or a piece of PVC glue from a previous landscaping repair is lodged in the rubber seal. Wipe it clean. Inspect the plastic for hairline fractures. If the plastic is white or chalky, UV damage has made it brittle. Replace the poppet. Apply a thin layer of food-grade silicone grease to the O-ring. Do not use petroleum jelly; it will degrade the rubber. Screw it back on. Open the valves slowly. If it still leaks, your seat is pitted and you need a full replacement.
| Symptom | Likely Root Cause | Required Technical Fix |
|---|---|---|
| Steady spray from canopy | Debris in Poppet/Spider | Flush valve and clean rubber disc |
| Slow drip from underside | Damaged O-Ring | Replace O-ring with silicone lubricant |
| Low pressure at heads | Internal Spring Failure | Test spring tension or replace assembly |
| Water pooling at base | Cracked Body (Freeze Damage) | Full device replacement and pipe repair |
How much does it cost to replace a backflow preventer?
A standard 1-inch pressure vacuum breaker (PVB) unit costs between $100 and $250 for parts, while professional labor adds another $150 to $300 depending on the complexity of the irrigation manifold. Expect to pay more if the technician needs to perform a yard cleanup around a buried or overgrown valve box to access the unit safely. High-end RPZ (Reduced Pressure Zone) valves for commercial sites can exceed $1,000 easily. Do not cheap out on the unit; plastic valves from big-box stores fail three times faster than brass Wilkins or Febco models.
Why is my backflow leaking from the top?
Leakage from the top canopy usually indicates that the internal poppet cannot seal against the bonnet because of insufficient water pressure or a broken internal spring. Most irrigation systems require at least 10 PSI to ‘seal’ the backflow; if your well pump is surging or your city pressure is fluctuating, the valve will chatter and weep. It is a safety feature, not a bug. If the pressure is fine, the rubber disc is likely warped from age or heat. Replace it.
“Backflow prevention is the only barrier between your family’s drinking water and the fertilizers or pesticides applied to your turf.” – AWWA Standards
Landscaping Integration and Site Maintenance
During any yard cleanup, I check the irrigation backflow first. If the backflow is failing, the sod install you just spent $4,000 on will be brown by Friday. We use a 1-inch-per-week watering mandate, but you cannot hit those numbers with a leaking PVB. Check the 811 markings before digging near your main line. A single shovel strike can send a shockwave back to the device, shattering the internal check valve. Keep mulch away from the brass. Mulch holds moisture and promotes corrosion on the test cocks.
- Test the device every spring before the first mow.
- Drain the unit entirely before the first hard freeze.
- Ensure the canopy is securely fastened to prevent UV rot.
- Keep a spare O-ring kit in the garage.
The mechanics of water are unforgiving. A small leak is a warning of a total system failure. Respect the pressure.