The Cost of Ignorance: A Foreman’s Warning
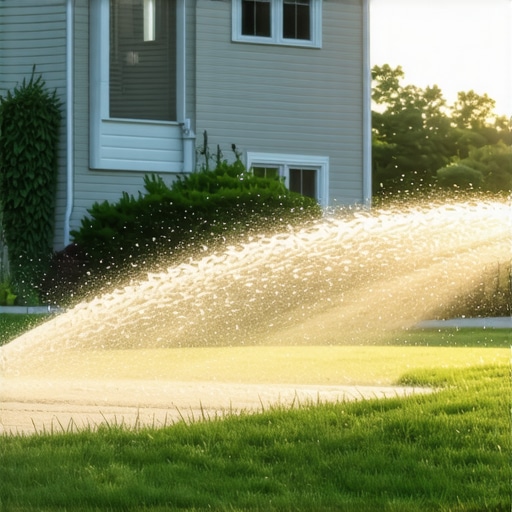
I always drill into my new crew members: if you don’t fix the soil grading first, every plant you put in the ground is just expensive compost. I have spent two decades digging up rotted root balls and excavating sunken foundations because a homeowner or a cut-rate contractor thought they could cheat the laws of physics. One of the most common failures I see is the ‘wet house’ syndrome. People think that as long as the grass is green, the irrigation system is working. That is a lie. If your sprinkler heads are hitting your siding, windows, or brickwork, you aren’t just wasting water; you are actively dismantling your home’s structural integrity. Water hitting a vertical surface doesn’t just evaporate. It runs down, pools at the base, and creates hydrostatic pressure that will eventually breach your foundation or rot your sill plate. It is a slow-motion disaster that costs tens of thousands of dollars to remediate. [IMAGE_PLACEHOLDER]
Identifying the Symptoms of Misdirected Irrigation
Misdirected irrigation manifests as **algae growth on siding**, **foundation settling**, **wood rot at the sill plate**, and **uneven turf saturation** caused by water bouncing off hard surfaces. These symptoms indicate that your **sprinkler arc** and **trajectory** are incorrectly calibrated for your specific landscape layout. When we perform a yard cleanup, the first thing I look for is ‘splashback’ staining on the house. If I see a dark line six inches above the soil, I know the irrigation system is failing. This isn’t just about the house. When water hits the wall, it isn’t hitting the sod install. You end up with a dry strip of turf two feet from the foundation and a saturated, anaerobic mess right against the concrete. This causes fungal pathogens to thrive in the soil while the grass starves for moisture. It is the height of inefficiency.
“Runoff occurs when water is applied faster than the soil can absorb it, a common result of poorly calibrated spray heads.” – Texas A&M AgriLife Extension
The Engineering of an Effective Spray Pattern
Effective spray patterns require **matched precipitation rates**, **precise nozzle selection**, and **pressure regulation** to ensure water lands only on the intended **turf grass** or **planting beds**. Most homeowners use the wrong nozzles. They buy a 15-foot spray head for a 10-foot area and try to dial it down with the adjustment screw. This is a mistake. When you tighten that screw to restrict the flow, you often break the spray pattern into large droplets or a fine mist that drifts in the wind. You need to select the correct radius nozzle from the start. We use high-efficiency rotating nozzles like the MP Rotator. These apply water at a much slower rate (0.4 inches per hour) compared to traditional spray heads (1.5 inches per hour). This allows the water to soak into the soil profile rather than pooling against your foundation or running off into the street.
How do I adjust a pop-up sprinkler head?
To adjust a pop-up head, first identify the **fixed left edge** of the spray, then rotate the **adjustment collar** or nozzle to set the right-side arc boundary. Use a small flat-head screwdriver to turn the **radius adjustment screw** located on the top of the nozzle to fine-tune the distance. Do not over-tighten this screw, or you will deform the orifice and ruin the spray distribution. Check the arc while the zone is active to ensure the water stops exactly at the edge of the landscape bed and does not hit any hardscape or structural surfaces.
| Nozzle Type | Application Rate (in/hr) | Wind Resistance | Best Use Case |
|---|---|---|---|
| Fixed Spray | 1.5 – 2.0 | Low | Small, sheltered turf areas |
| Rotary Nozzle | 0.4 – 0.6 | High | Slopes and clay soils |
| Gear-Driven Rotor | 0.2 – 0.8 | Medium | Large open lawn spaces |
Soil Saturation and the Biology of New Sod
Maintaining new **sod installs** requires **consistent capillary moisture** in the top two inches of the **soil horizon** to encourage root initiation without creating an anaerobic environment. If your irrigation is hitting the house, you are likely over-saturating the edge of your new lawn. This leads to ‘root rot’ (Pythium). I’ve seen $5,000 sod jobs die in two weeks because the homeowner thought more water was always better. You want the roots to chase the water down. This is called geotropism. If the surface is always muddy because of over-spray against the house, the roots stay lazy and shallow. By year two, that grass will die during the first heatwave. You need deep, infrequent watering. Aim for one inch of water per week, delivered in two heavy sessions, rather than daily light mists. This forces the root system to penetrate deeper into the soil profile where moisture is more stable.
“Proper irrigation scheduling is essential for the health of your lawn and to prevent the development of fungal diseases.” – Penn State Extension
How much modified gravel do I need for a patio base?
Calculating the base requires multiplying the **square footage** of the area by the **depth of the base** (usually 4 to 6 inches for patios) and dividing by 27 to find the **cubic yardage**. For a standard 200-square-foot patio with a 6-inch base, you would need approximately 3.7 cubic yards of **compacted 21A or 57 stone**. Always account for a 20% compaction factor when ordering materials. If you skip the compaction, the base will settle, leading to pooling water and pavers that shift toward your home’s foundation over time.
The 5-Step Irrigation Audit Checklist
- Visual Check: Turn on each zone and look for ‘misting.’ If you see a fog, your pressure is too high. Install a pressure regulator.
- Arc Alignment: Ensure no water is hitting siding, windows, or fences. Adjust the collars to stop 2 inches short of the structure.
- Nozzle Inspection: Replace any clogged or chipped nozzles. A single nick in the plastic can ruin the precipitation rate.
- Head Leveling: Check if heads have tilted. A tilted head creates a dry spot on one side and a puddle on the other. Dig it up and re-set it level.
- Catch-Can Test: Place tuna cans around the yard and run the zone for 15 minutes. Measure the depth. If one can has 0.5 inches and another has 0.1, your spacing is wrong.