Identifying the Failure: Why Your Deck is Sinking into the Mud
A sinking deck post usually indicates sub-surface soil failure, often caused by inadequate footing depth, frost heave, or poor site drainage that oversaturates the load-bearing strata. To fix this, you must transfer the structural weight to a temporary pier before excavating a new, deeper concrete base that reaches below the local frost line and rests on undisturbed subsoil. I recently got called out to tear up a $30,000 patio that was sinking because the previous contractor thought 4 inches of uncompacted 2B gravel was ‘good enough’ for a structural load. It wasn’t. The entire surface looked like a topographical map of the Andes within two seasons. When a deck post sinks, it is rarely the wood that failed first; it is the geological medium beneath it. Most hacks will try to shim the beam. Shimming is a band-aid on a gunshot wound. If the dirt moved once, it will move again unless you change the physics of the interface.
“A retaining wall doesn’t fail because of the stone; it fails because of the water trapped behind it.” – Hardscape Engineering Axiom
How deep should deck footings be to prevent sinking?
Footings must extend at least 12 inches below the established frost line for your specific ZIP code to prevent the freeze-thaw cycle from physically ejecting the post from the ground. In many northern climates, this means a minimum depth of 36 to 48 inches. If you are dealing with expansive clay soils, the depth might need to be even greater to reach a stable moisture zone. This is why a standard yard cleanup often reveals hidden structural issues; once the overgrown brush is cleared, you can actually see the daylight between the beam and the post cap. Poor landscaping grading that directs water toward the house rather than away from it is the primary culprit for soil saturation. When soil reaches its liquid limit, its shear strength drops to near zero. Your deck is essentially trying to float on mud. It won’t work.
| Soil Type | Load-Bearing Capacity (PSF) | Sinking Risk Level |
|---|---|---|
| Crystalline Bedrock | 12,000 | Negligible |
| Sedimentary Rock | 6,000 | Very Low |
| Sandy Gravel / Well-Graded Sand | 3,000 | Moderate |
| Clay / Silt / Fine Sand | 1,500 | High |
Can you fix a sinking deck without tearing it down?
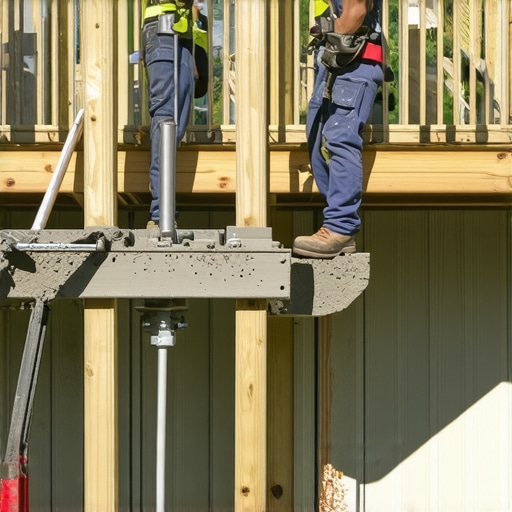
Yes, you can stabilize a sinking deck using a 20-ton bottle jack and temporary shoring to hold the beam in place while you excavate the failed footing. This ‘Jack and Pour’ tactic allows you to maintain the existing structure while replacing the foundation. You must ensure the temporary shoring is placed on a solid mud sill—usually a 2×12 or 4×4 sleeper—to distribute the weight across the yard so the jack itself doesn’t sink while you’re lifting. This is basic civil engineering. If the jack sinks, the deck stays down. You are fighting hydrostatic pressure and gravity. Do not underestimate the weight of wet pressure-treated lumber and the dead load of the decking. It will crush a cheap automotive jack in seconds. Use the right tool or don’t do the job.
The Step-by-Step Jack and Pour Remediation Process
The first step in this tactical repair is clearing the work zone. This isn’t a simple yard cleanup; you need to excavate at least a 3-foot radius around the failing post. Remove any irrigation lines or sod install layers that might be in the way. Once the area is clear, place your bottle jack on a 4×4 timber supported by a wide base plate. Slowly apply pressure until the weight of the deck beam is transferred off the sinking post. You aren’t trying to lift the deck to the moon; you just need to relieve the tension. Next, remove the old post. If it was buried in the dirt, it is likely rotted. Toss it. Dig out the old concrete ‘pancake’—those shallow, 8-inch deep pours that hacks love. You need to reach the B-horizon soil layer. Once you are deep enough, flare the bottom of the hole to create a ‘bell’ shape. This increases the surface area and prevents the footing from sinking in the future. Pour your high-PSI concrete (minimum 3,000 to 4,000 PSI) into a Sonotube form, ensuring it extends at least 6 inches above grade to keep the new wood post out of the moisture zone.
- Inspect all posts for root girdling from nearby trees.
- Check the irrigation system for leaks that saturate the footing.
- Verify that the post-to-beam connectors are G90 galvanized steel.
- Ensure the new sod install doesn’t block the drainage path.
- Slope the concrete pier top to shed water away from the post base.
“Structural stability is a function of soil compaction and moisture control, not just the thickness of the concrete pier.” – Civil Engineering Handbook
After the concrete has cured for at least 72 hours—don’t rush this, the exothermic reaction needs time to complete—you can install a new 6×6 pressure-treated post using a heavy-duty standoff base. This base is critical. It provides a 1-inch gap between the wood and the concrete, preventing capillary action from sucking moisture into the end grain. This is where most DIYers fail. They put the wood directly on the concrete. The wood acts like a straw, sucks up the water, and rots from the inside out within five years. If you do it right, this repair will last thirty. Once the post is secured to the beam with structural screws (not nails, you’re not a carpenter from 1985), you can remove the jack and backfill the hole. Use modified gravel for the first 6 inches of backfill and compact it with a hand tamper until the tamper literally bounces off the surface. Finish the area with landscaping fabric and decorative stone or new sod to ensure the soil stays put. Stop the water, and you stop the sinking. It is that simple.