I’ve spent thirty years looking at turf. Most people see a brown patch and reach for a hose or a bag of 10-10-10. That is a rookie mistake. If one specific zone in your landscaping is toasted while the rest of the turf is holding its turgor pressure, you have a mechanical or electrical failure, not a drought. I always drill into my new crew members: if you don’t fix the soil grading first, every plant you put in the ground is just expensive compost. The same logic applies to your irrigation system. If you cannot master the electrical triggers that control your water flow, your yard cleanup and expensive sod install will be nothing but a waste of time. You have to understand the physics of the water column and the 24VAC circuit before you start digging up pipes like a frantic dog.
The Anatomy of a Failed Sprinkler Zone
To fix a sprinkler zone failure with a $15 solenoid, you must first isolate the electrical fault at the valve box using a multimeter set to Ohms. If the resistance reading is outside the 20 to 60-ohm range, the solenoid’s internal copper coil has failed and needs replacement. This diagnosis prevents unnecessary excavation and keeps your landscaping intact.
“The most common point of failure in low-voltage irrigation control is the solenoid-to-wire connection or the solenoid coil itself.” – Irrigation Association Technical Manual
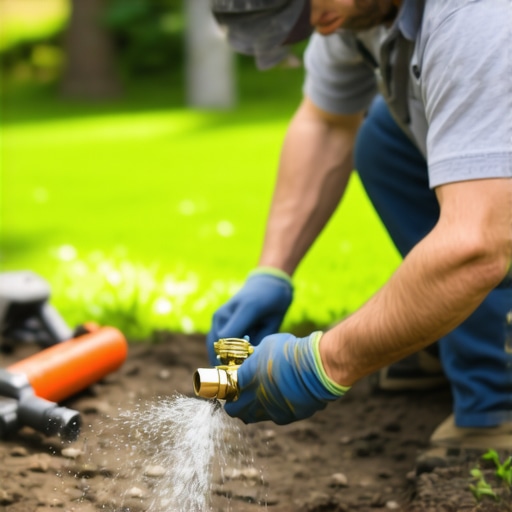
When a zone fails to fire, the first thing I do is check the controller, but the second is always the valve box. Most homeowners see a dead zone and assume they need a full irrigation overhaul. Usually, it is just a small piece of plastic and copper that has succumbed to years of moisture and thermal expansion. The solenoid is the gatekeeper. It is an electromagnet that, when energized by the controller, creates a magnetic field that lifts a metal plunger. This plunger uncovers a small hole called the bleed port, which shifts the pressure differential and allows the main diaphragm to open. It is a beautiful bit of engineering, but it is also a point of high failure. If that copper coil develops a short or an open circuit, your grass is going to die.
How do I know if my sprinkler solenoid is bad?
You can identify a bad solenoid by listening for a distinct ‘click’ when the zone is manually activated at the timer or by using a multimeter to check for resistance. If the multimeter reads ‘0’ or ‘1’ (infinite), the internal wiring of the solenoid is broken. You should also check for physical signs of melting or charred plastic on the solenoid body. If the zone works when you turn the solenoid a quarter-turn by hand but not through the controller, the solenoid is almost certainly dead. This is the ‘Forensic Autopsy’ of irrigation repair. I have seen guys spend days on a yard cleanup only to realize the sod install failed because they didn’t check the solenoids before they laid the grass. Don’t be that guy.
| Measurement | Diagnosis | Action Required |
|---|---|---|
| 0 – 10 Ohms | Short Circuit | Replace solenoid; check for wire nicks |
| 20 – 60 Ohms | Healthy Circuit | Check diaphragm or controller output |
| 100+ Ohms | Open Circuit | Replace solenoid and check wire nuts |
| No ‘Click’ Sound | Mechanical Jam | Check for debris in the plunger cavity |
Replacing the Solenoid: A Step-by-Step Remediation
Replacing a solenoid involves unscrewing the old unit from the valve body and splicing the new unit into the existing low-voltage wiring using waterproof connectors. This process requires no specialized plumbing tools and can be completed in under ten minutes once the valve box is located.
“Proper irrigation system maintenance requires a systematic approach to electrical troubleshooting before any excavation occurs.” – Texas A&M AgriLife Extension
Most of the time, I see DIY failures because they used standard indoor wire nuts. In the humid environment of a valve box, those nuts will corrode in six months. You must use silicone-filled, waterproof connectors like DBY or DBR kits. If moisture gets into that copper, it travels up the wire like a wick, causing resistance to spike and eventually burning out the transformer in your controller. It is a systemic failure that starts with a tiny leak. When you remove the old solenoid, pay close attention to the plunger. If the plunger is missing or the spring is rusted, you have found your culprit. Clean out the solenoid seat with a clean rag. Any grit or sand will prevent the new solenoid from seating correctly, leading to a constant weep or a zone that never shuts off.
Can I replace a solenoid without turning off the main water?
Yes, you can replace a solenoid without turning off the main water supply, provided the valve is closed at the controller. However, you must be careful not to unscrew the solenoid too quickly, as residual pressure may spray water. It is safer to turn off the main irrigation shut-off valve to prevent accidental flooding if the diaphragm is triggered. Here is your checklist for the job:
- Replacement solenoid (must match the brand: Rain Bird, Hunter, etc.)
- Wire strippers
- Silicone-filled waterproof wire connectors
- A multimeter for verification
- A stiff brush for cleaning the valve box
If you are dealing with heavy clay soil, like the red clay we see in many regions, the valve box might be filled with silt. You need to clear that out first. A buried valve is a forgotten valve. Once the new solenoid is in, do not over-tighten it. Hand-tight is enough. If you use pliers, you risk cracking the plastic housing, and then you are looking at a full valve replacement, which is a much bigger headache involving cutting PVC and re-priming joints.
The Long-Term Impact on Turf and Soil
A functioning irrigation system is the only way to protect a significant investment in a sod install or a complete landscaping redesign. Without consistent water, the nitrogen cycle in the soil is interrupted, leading to microbial dormancy and eventual soil compaction. When a zone stays dead for too long, the soil pH can actually shift as the lack of moisture prevents the natural movement of minerals. This is why you see weeds like crabgrass or nutsedge moving in the second the turf weakens. They are opportunistic. They thrive in the stressed soil conditions that your failed solenoid created. Once you have fixed the electrical issue, you need to monitor the zone for ‘thump.’ When the valve closes, you should hear a soft thud. If it is a violent bang, you have water hammer, which can be exacerbated by a solenoid that is not seating properly. This is about civil engineering on a micro-scale. You are managing hydrostatic pressure, electrical resistance, and biological needs all in one small plastic box. Fix it right, or the yard will make you pay for it later. It will rot. Don’t skip the testing phase. Run the zone for a full cycle and check for leaks around the threads. Only then can you call the job done.”