Diagnosing a Leaking Irrigation Valve in Modern Landscapes
To determine if your 2026 irrigation valve is leaking, you must observe surface water accumulation near the valve box, check for persistent weeping from the lowest sprinkler head in the zone, and monitor meter dial movement when all indoor water fixtures are strictly deactivated. These three indicators confirm a failure in the internal diaphragm or the solenoid seal, necessitating immediate mechanical intervention to prevent landscape damage.
I always drill into my new crew members: if you don’t fix the soil grading first, every plant you put in the ground is just expensive compost. The same logic applies to your irrigation hardware. I have seen guys spend thousands on high-end sod install projects, only to watch the turf turn into a fungal swamp because they ignored a slow-leaking valve. It is not just about the water bill; it is about the hydraulic integrity of your entire property. When a valve fails to close completely, it creates a constant state of hydrostatic pressure in the lateral lines. This pressure finds the weakest point—usually a head at the bottom of a slope—and creates a localized bog. I have pulled up dead boxwoods that were literally drowning because a contractor left a grain of sand in the valve seat during a sloppy yard cleanup. This is not guesswork; it is fluid dynamics. If your valve is weeping, your soil is dying. Anaerobic conditions set in fast. The roots stop breathing. The plant dies. You lose money.
“A leaking irrigation valve can waste over 1,000 gallons of water per month, significantly impacting both local water reserves and the structural integrity of nearby hardscapes through soil saturation.” – Irrigation Association Technical Manual
How do I test for a slow-leaking irrigation valve?
The first diagnostic step is the Static Pressure Test. You need to shut off every faucet in the house. Go to your water meter. If that little triangular leak indicator is spinning even a fraction of an inch, you have a breach. If it is not moving, the leak might be downstream of the valve, occurring only when the system is pressurized. This is where most homeowners get confused. A valve that doesn’t seat correctly allows a trickle of water to bypass the diaphragm. This isn’t a flood; it is a slow bleed. You will see it as a ‘puddle that never dries’ around a specific sprinkler head. If you just did a fresh sod install, this leak will rot the delicate new root hairs before they can even knit into the native soil. Don’t let a $30 part ruin a $5,000 lawn.
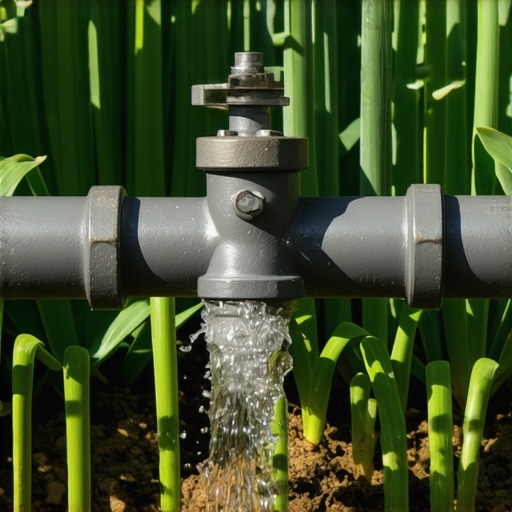
Test 1: The Low-Point Weep Observation
Identify the lowest elevation head in the suspicious zone. If water is constantly bubbling out of this head hours after the cycle has ended, the valve is not sealing. Gravity pulls the bypassed water to the lowest point. It is basic physics. If the head is located on a slope, the soil around it will become spongy. Step on it. If it feels like a sponge, you have a valve failure or a broken lateral line. In my 20 years, 90% of the time, it is a worn-out EPDM diaphragm inside the valve. These rubber components are rated for thousands of cycles, but recycled water or high mineral content in the soil can pit the surface, preventing a watertight seal. This is common in regions with heavy lime or iron in the water supply.
Test 2: The Valve Box Dry-Check
Open the green rectangular or round lid of your valve box. If there is standing water inside, you have a leak at the manifold or the valve union. This is often caused by improper winterization or thermal expansion. In many landscaping setups, the manifold is the heart of the system. If the fittings were not tightened to the correct torque, or if the contractor skipped the Teflon tape on the male threads, it will eventually fail. I have seen ‘mow-and-blow’ crews hit valve boxes with heavy zero-turn mowers, cracking the PVC manifold underground. You won’t see the crack, but the water meter will tell the truth. Look for ‘shimmering’ water on the surface of the valves. If the solenoid—the black cylinder with two wires—is wet at the base, it is likely loose or the O-ring has perished.
Test 3: The Manual Bleed Re-Seating
Sometimes, a valve is just stuck partially open due to debris. Locate the manual bleed screw on the valve. Turn it to open the valve manually, let it run for 30 seconds to flush any silt or grit through the internal bypass, and then close it firmly. If the weeping at the heads stops after 10 minutes, you just saved yourself a service call. However, if the water keeps flowing, the diaphragm is likely torn. A 1/16th inch tear is enough to waste 500 gallons a week. You must disassemble the valve bonnet. Check the spring. If the spring is rusted or weak, the valve cannot overcome the downstream pressure to shut off. Precision is key here. Don’t over-tighten the bonnet screws when you put it back together; you will crack the plastic housing. I have fired apprentices for using power drills on valve bonnets. Hand-tight only.
| Valve Component | Primary Failure Mode | Detection Method | Urgency Level |
|---|---|---|---|
| Diaphragm | Perforation or Pitting | Constant weeping at low heads | High – Causes root rot |
| Solenoid O-Ring | Compression Set/Dry Rot | Water pooling in valve box | Medium – Wastes water |
| Valve Seat | Debris/Silt Blockage | Valve fails to shut off completely | Critical – High water loss |
| Spring | Corrosion/Fatigue | Intermittent closing failure | Medium – Inconsistent zones |
“Proper filtration at the point of entry is the only way to ensure the longevity of solenoid-actuated valves in areas with high particulate counts in the municipal water supply.” – Penn State Agricultural Extension
How much modified gravel do I need for a patio base?
While we are discussing drainage, remember that irrigation leaks can undermine hardscapes. If you are building a patio near your irrigation lines, you typically need a 6-inch base of compacted 2A modified gravel. If a valve leaks under this base, the water will wash out the fines, leading to pavers sinking and cracking. I recently saw a $30,000 patio fail because a leaking irrigation lateral turned the subgrade into mud. The hydrostatic pressure simply pushed the pavers up and out of alignment. Do not install irrigation lines directly under permanent hardscape features if you can avoid it. If you must, use a sleeve. It makes future repairs possible without a jackhammer. Every landscaping project must account for the eventual failure of mechanical parts.
The 2026 Irrigation Maintenance Checklist
- Monthly: Inspect every zone for ‘hot spots’ or overly saturated areas.
- Bi-Annually: Manually flush every valve using the bleed screw to clear sediment.
- Annually: Check the resistance (ohms) of each solenoid; a reading below 20 ohms indicates a failing coil.
- After Yard Cleanup: Ensure no mulch or soil has been piled over valve box lids, which traps moisture and corrodes wiring.
- Sod Install Protocol: Adjust irrigation timers to 3 short cycles daily, but check valves weekly to ensure they are actually shutting off between cycles.
Landscaping is a game of inches and PSI. If you ignore a leaking valve, you are essentially pouring money into a hole in the ground. It is not just about the cost of the water; it is about the cost of the structural damage to your yard. Soil that stays saturated loses its load-bearing capacity. Your trees will lean. Your sod will peel up like a wet carpet. Your hardscape will shift. Take ten minutes once a month to look at your water meter and your low-point heads. It is the difference between a professional-grade estate and a suburban swamp. Don’t be the homeowner who ignores the signs. Fix the valve. Save the lawn. It is that simple. There is no magic trick to irrigation; there is only maintenance and physics.