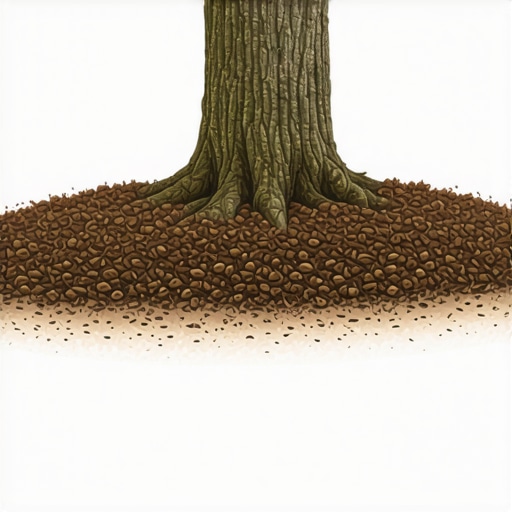
The Symptom: A Slow Death by Bark Suffocation
The bark is mushy. It sloughs off under your thumb like wet cardboard. You see a mature oak or maple that looks like a telephone pole stuck in the ground, lacking that distinctive flare at the base. This is the visual signature of a mulch volcano. I always drill into my new crew members: if you don’t fix the soil grading first, every plant you put in the ground is just expensive compost. I have watched $10,000 specimens die over three seasons because a ‘mow-and-blow’ crew thought they were being helpful by piling six inches of dyed wood chips against the trunk. This isn’t landscaping; it’s a slow-motion execution. When bark is buried, the darkness and moisture invite fungal pathogens that would otherwise never breach the tree’s natural defenses. It will rot. It is just a matter of time.
What is a Mulch Volcano and Why Does it Kill Trees?
A mulch volcano is an improper landscaping practice where mulch is piled high against a tree trunk, causing bark rot and root girdling. This mound traps excessive moisture against the cambium layer, leading to anaerobic conditions that suffocate the tree’s vascular system and invite pathogenic fungi. It stops the tree from breathing. Literally.
“Mulch applied directly against the trunk of a tree can create a moist environment that is conducive to the development of trunk rots and provides cover for rodents that may chew on the bark.” – Penn State Extension
The biology is simple but brutal. Tree bark is designed to be exposed to air. It is the tree’s skin, but unlike our skin, it cannot handle constant saturation. When you pile mulch against it, you create a microbial party zone. The secondary growth layers—the xylem and phloem—are located just beneath that bark. When the bark rots, the ‘highway’ that transports water and nutrients is severed. This is why a tree can look vigorous in the spring and be dead by August. The roots are working, but the pipes are broken at the ground line. Furthermore, high mulch piles encourage adventitious roots. These roots grow out of the trunk into the mulch layer. Once they hit the air at the edge of the mulch pile, they dive back in, often circling the trunk. These are girdling roots. As the tree grows, these roots act as a tourniquet, eventually strangling the trunk and cutting off all sap flow.
The Mechanics of Tree Girdling and Bark Rot
The mechanics of tree girdling involve secondary roots circling the main trunk and constricting the phloem, which prevents the transport of photosynthates to the root system. This structural failure often coincides with bark rot caused by Phytophthora or other moisture-loving fungal pathogens that thrive in mulch. You can’t fix this with more water. In fact, if your irrigation system is hitting that mulch pile, you are accelerating the fermentation process. I’ve seen sod install projects where the installers ran the grass right up to the trunk, then piled mulch on top to ‘finish’ the look. It’s a death sentence. The hydrostatic pressure of the water trapped in the mulch pushes against the bark, forcing moisture into the lenticels, which are the pores the tree uses for gas exchange. Once those are blocked, the tree begins a process of anaerobic fermentation. You’ll smell it before you see the full extent of the damage—a sour, vinegary odor coming from the base of your prize specimen.
| Mulch Method | Typical Depth | Effect on Bark | Root Health Impact |
|---|---|---|---|
| Volcano Mound | 6-12 inches | High Rot Risk | Severe Girdling/Strangulation |
| Flat Layer | 2-3 inches | Moderate Risk | Feeder Root Suffocation |
| The Donut (Pro) | 2-4 inches | Zero Risk | Optimal Gas Exchange |
How to Identify Root Flare Burials
To identify root flare burial, look for a trunk that enters the ground straight like a telephone pole rather than widening at the base. This indicates the critical root zone is suffocating under excess soil or mulch volcanoes, preventing vital gas exchange and encouraging opportunistic pests. Take a trowel and start digging at the base. If you go down three inches and still don’t see the trunk begin to flare out into the buttress roots, your tree is too deep. This is often a result of poor yard cleanup where debris is allowed to accumulate, or simply lazy planting. In my 20 years, I’ve found that 70% of nursery stock is actually buried too deep in the burlap ball before it even reaches your yard. You have to find that flare before you call the job done. If the flare is buried, the tree’s lifespan is halved immediately.
How much modified gravel do I need for a patio base?
While we are talking about grading and depth, remember that hardscaping affects trees too. For a standard patio, you need 6 inches of compacted 2A modified gravel, but if that base encroaches on a tree’s drip line, you are crushing the feeder roots. Soil compaction is the silent killer. A tree’s roots need pore space for oxygen. When you compact the soil for a patio or a walkway, you are effectively sealing the soil. Use 811 to mark utilities before you dig, but also use your eyes to mark where those roots are. If you see roots thicker than two inches, don’t cut them. Bridge over them.
Step-by-Step Remediation for Girdling Roots
To remediate girdling roots, carefully excavate the root flare using hand tools or an Air-Spade to expose the strangling roots. Once identified, use sterilized pruning shears to remove small circling roots, ensuring you do not damage the main trunk tissue or the vascular cambium. This is delicate surgery. You can’t just hack away. You need to identify which roots are ‘stranglers’ and which are ‘feeders.’ A strangler root will be growing perpendicular to the trunk, often pressed tight against it. If it has already started to graft into the trunk, you may need a professional arborist. If it’s still separate, snip it. This releases the pressure and allows the trunk to expand again.
- Step 1: Remove all mulch from the 12-inch radius around the trunk.
- Step 2: Gently brush away soil until the first structural root flare is visible.
- Step 3: Identify any roots crossing the flare or circling the trunk.
- Step 4: Sever crossing roots at the point of origin.
- Step 5: Apply a thin layer (1 inch) of compost, but keep it 3 inches away from the bark.
- Step 6: Adjust irrigation heads to ensure they do not spray the trunk directly.
“The structural root flare should be at or slightly above the finished grade to ensure long-term tree stability and health.” – ANSI A300 Standards
What is the best way to prevent weeds in mulch?
The best way to prevent weeds isn’t piling the mulch high—it’s using a pre-emergent herbicide in early spring and maintaining a consistent 2-to-3-inch ‘donut’ of mulch. Piling it higher just creates a seedbed for weeds and kills your tree. If you are doing a yard cleanup, pull the weeds by hand and then apply a light, fresh layer of hardwood mulch. Avoid the cheap ‘black mulch’ which is often ground-up pallets treated with chemicals that can throw off your soil pH. Stick to cedar or triple-shredded hardwood. They break down and actually feed the soil microbiology rather than just sitting there like a plastic blanket.
Maintenance and Long-Term Care
Once you have rescued your tree from its mulch prison, the work isn’t over. You need to monitor the soil moisture. Because the flare has been buried, the bark there is currently ‘soft’ and vulnerable. It needs a full season of exposure to harden back up. Avoid hitting it with a string trimmer. One hit from a weed whacker can strip that softened bark right off, girdling the tree instantly. During your next sod install, make sure the edge of the grass is kept at least three feet away from the trunk. This ‘tree ring’ is the best gift you can give a growing specimen. It prevents competition for water and keeps mower decks far away from the trunk. Check your irrigation monthly. If the soil around the tree is a swamp, your tree will develop root rot regardless of the mulch depth. Proper landscaping is about balance. You want the roots cool and moist, and the trunk dry and clear. Follow the donut rule: a thick ring of mulch around the outside, and a hole in the middle where the tree lives. It’s simple. It works. Anything else is just killing your investment one inch of mulch at a time. Don’t be the homeowner who pays for a ‘lush’ look today and a tree removal tomorrow. Fix the volcanoes now.
Comments are closed.