The Physics of Failure: Why Retaining Walls Lean
A leaning retaining wall is almost always the result of hydrostatic pressure and improper drainage, where water builds up behind the structure, increasing soil weight and force until it exceeds the wall’s structural capacity. This is often exacerbated by a thin base or lack of geogrid reinforcement that fails to anchor the wall into the hillside.
You see it every spring after the big thaws. You walk out into your yard and notice a section of your segmental block or timber wall looks a bit… off. It is tipping toward your lawn, or worse, there is a visible bulge in the middle third of the structure. I recently got called out to tear up a $30,000 patio that was sinking and a 6-foot wall that was leaning at a 15-degree angle because the previous contractor—some guy with a truck and a shovel but no engineering sense—decided that backfilling with native clay was ‘good enough.’ It wasn’t. Within two seasons, that clay saturated, expanded like a sponge, and pushed 40 tons of pressure against a wall held up by nothing but hope. We had to excavate the entire thing, haul away 20 loads of heavy mud, and start from the subgrade up. It was a forensic autopsy of a failed project that didn’t have to happen.
Hydrostatic Pressure: The Silent Wall Killer
Hydrostatic pressure is the lateral force exerted by stagnant water trapped in the soil behind a wall, which can double the effective weight of the backfill and force the masonry units to rotate outward. Without a dedicated drainage plane, such as clean #57 stone and perforated pipe, this pressure has nowhere to go but through your wall.
“A retaining wall doesn’t fail because of the stone; it fails because of the water trapped behind it.” – Hardscape Engineering Axiom
When it rains, the soil behind your wall acts like a reservoir. If you have heavy clay soil, common in many residential developments, that soil holds onto moisture. It doesn’t just get wet; it increases in volume. This is known as expansive soil. As it expands, it exerts thousands of pounds of pressure per square foot (PSF). If your wall was built as a simple gravity wall—relying only on its own weight to hold back the earth—it has a very low ‘tipping point.’ To combat this, we use the ‘chimney drain’ method. This involves a minimum of 12 inches of clean, angular crushed stone directly behind the blocks, separated from the soil by a non-woven geotextile fabric. This fabric is critical; it prevents ‘fines’ (tiny dirt particles) from clogging your drainage stone. If the stone gets clogged, the drainage fails. If the drainage fails, the wall leans. Simple physics.
How much modified gravel do I need for a patio base?
For a standard paver patio or wall base, you need a minimum of 6 inches of compacted 21A or 3/4-inch modified gravel, which typically requires approximately 1 ton of gravel for every 50 square feet at a 4-inch depth. For a retaining wall base, the trench must be twice as wide as the block width to ensure stability.
The Anatomy of a Failing Structure
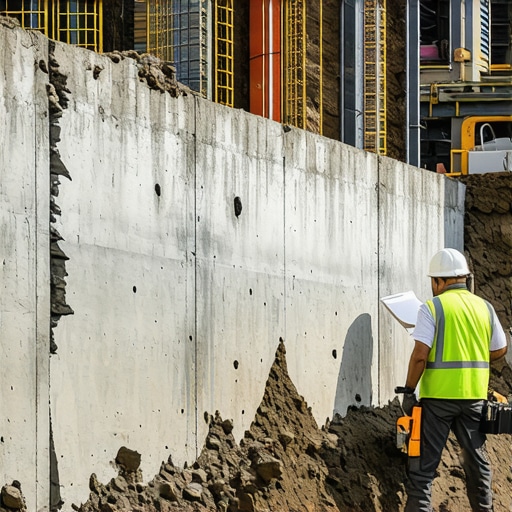
Before you talk about bracing, you have to understand where the failure started. Is it ‘global instability’ (the whole hill is moving) or ‘overturning’ (the wall is tipping from the top)? Most DIY walls fail because they lack a ‘toe’ or because they weren’t buried deep enough. Every wall needs at least one full course of block buried for every 8 to 10 feet of height. This is called ’embedment.’ It prevents the bottom of the wall from kicking out. [image_placeholder_1]
| Failure Symptom | Primary Cause | Repair Severity |
|---|---|---|
| Top Rotation (Tipping) | Hydrostatic Pressure / Lack of Geogrid | Moderate to High |
| Base Slide (Kicking Out) | Inadequate Embedment / Poor Base Soil | Critical (Total Rebuild) |
| Mid-Wall Bulge | Improper Backfill Material | Moderate |
| Differential Settling | Uncompacted Subgrade | High |
Bracing Techniques: Methods of Stabilization
Bracing a leaning wall involves mechanical intervention such as installing helical anchors or deadmen to pull the wall back toward the slope, or adding a buttress to provide external counter-pressure. These methods are designed to arrest further movement, though they rarely return a wall to its original perfect plumb position.
If the wall is leaning less than 5 degrees, you might be able to save it without a full teardown. One method is the ‘Deadman Anchor.’ This involves digging back into the hillside behind the wall, burying a heavy timber or concrete block (the ‘deadman’), and connecting it to the wall face with a galvanized steel rod. As you tighten the nut on the wall face, it pulls the wall back against the weight of the hill. It is an old-school engineering trick that still works. Another option is the ‘Helical Pier.’ These are essentially giant screws that we drive deep into the stable earth behind the wall. They are expensive, but they are the only way to save a massive wall that is too large to excavate.
How do I fix a leaning retaining wall without tearing it down?
You can fix a leaning wall without a full teardown by installing soil nails or earth anchors that bridge the failure plane, or by excavating the backfill and replacing it with lightweight, free-draining aggregate to reduce the load. If the base has shifted, however, a total reconstruction is often the only permanent solution.
The Professional Remediation Workflow
Do not just slap some mortar in the cracks and call it a day. That is like putting a band-aid on a broken leg. You need to address the root cause. Here is the checklist my crew follows when we are called in to stabilize a failing structure:
- Identify the Water Source: Check for broken irrigation lines or downspouts dumping water directly behind the wall. Fix the plumbing first.
- Relieve the Pressure: Drill ‘weep holes’ through the face of the wall. If water starts pouring out of them, you’ve found your culprit.
- Excavate the Surcharge: Remove the soil from the top of the wall to reduce the ‘surcharge load.’ This takes the weight off the structure while you work.
- Install Reinforcement: If the wall allows, install geogrid (a high-strength polymer mesh) between courses and extend it back into the soil at least 4 feet.
- Compaction Testing: Use a plate compactor every 4 inches of lift. Do not just dump dirt in the hole. It needs to be at 95% Standard Proctor Density.
“Soil is the most variable engineering material. If you don’t respect the compaction requirements, gravity will eventually do it for you, and you won’t like the result.” – USDA Soil Mechanics Guide
The “Information Gain” on Wall Stability
While the internet tells you to just use ‘gravel’ for drainage, the pros know that angular crushed limestone is superior to rounded pea gravel. Rounded stones act like ball bearings under pressure, shifting and settling over time. Angular stone interlocks, creating a stable ‘skeleton’ that resists movement while still allowing water to flow freely. Also, never use ‘dirt’ or ‘topsoil’ for backfill within 2 feet of the wall. You want a non-expansive aggregate. If you are in a freeze-thaw climate like the Northeast or Midwest, this is even more critical. Ice lenses can form behind the wall, creating ‘frost heave’ that can move even the heaviest concrete blocks. A thick layer of clean stone provides the air gaps needed for that water to freeze without pushing against your wall.
Maintaining the Line: Year-One Expectations
After you brace a wall, expect some settling. The ground has been disturbed. Keep an eye on the grade at the top of the wall. It should always slope away from the wall, never toward it. If you see water pooling behind the wall, you have a problem. Keep your weep holes clear of debris and nests. Check your irrigation headers; a leaky valve can saturate the soil in 24 hours, turning your backyard into a mudslide. Landscaping isn’t a one-and-done job; it is an ongoing battle against gravity and fluid dynamics. If you treat your wall like a piece of engineering rather than a garden ornament, it will stand for decades. Ignore the physics, and you’ll be calling me for a teardown in five years.