The Forensic Autopsy: When Chemical Ignorance Kills Your Turf
A homeowner called me in a panic last August after they completely torched their front lawn by applying a high-analysis synthetic fertilizer during a 95-degree heatwave. They thought they were being proactive. In reality, they created a chemical nightmare. The excessive nitrogen salts pulled moisture out of the grass blades through osmosis, effectively mummifying the turf overnight. When I arrived, the yard looked like a burnt biscuit. Large, irregular patches of dead, straw-colored grass dominated the landscape. This was not a simple case of drought; this was a total collapse of the soil microbiology and a salt-induced crown rot. The soil was literally hydrophobic, repelling water because of the crust created by the chemical salts. We couldn’t just throw seeds at this and hope for the best. To fix a disaster of this magnitude, we had to go back to the basics of soil engineering and use high-quality sod scraps to restore the biological integrity of the site.
Why Sod Scraps Beat Seeding for Large Bare Spots
To patch huge bare spots effectively, using sod scraps provides an immediate soil-to-root interface that seeding cannot match in speed or success rate. This method utilizes mature root systems to stabilize the soil, prevent erosion, and suppress opportunistic weed growth during the critical 21-day establishment period. It is the most reliable way to ensure 100 percent coverage in high-traffic zones or areas with poor germination history. Most homeowners think they can just sprinkle some tall fescue seeds and walk away. That is a fantasy. In the real world, birds eat the seed, wind blows it into the neighbors yard, and the first rainstorm washes your investment into the storm drain. Sod scraps are heavy. They stay where you put them. They have a pre-developed microbiome that immediately starts working with your existing soil. This is not just about aesthetics; it is about establishing a functional biological carpet that can withstand the pressures of your local climate. If you are dealing with a spot larger than a dinner plate, stop buying bags of seed and start looking for sod.
“A successful turfgrass stand is not merely a collection of plants; it is a managed ecosystem where the soil physical properties and the genetic potential of the cultivar must be aligned for long-term persistence.” – Agronomy Extension Manual
The Anatomy of the Patch: Preparing the Ground
Proper site preparation for a sod install involves excavating the dead material to a depth of 2 inches and amending the underlying soil with 1/4 inch of organic compost. You must address soil compaction and pH imbalances before laying the new turf to ensure capillary action between the old soil and the new sod biscuit. If you skip the prep, your sod will just sit on top like a cheap rug and die. I tell my crew every day: the site prep is the job. The actual laying of the sod is just the finishing touch. You need to use a sharp spade to cut out the dead area. Don’t just pull at it. You want clean, vertical edges. This creates a pocket where the sod scrap can sit flush with the surrounding grass. If your patch is higher than the rest of the lawn, the mower will scalp it. If it is lower, water will pool and rot the roots. Use a garden rake to loosen the top 4 inches of soil. This breaks up the compaction that likely caused the spot to fail in the first place. Check the pH. Most turf prefers a range of 6.2 to 7.0. If you are in a region with heavy clay, you might need a dash of pelletized lime. Don’t guess. Test. Your soil is the engine. The sod is just the paint job.
| Feature | Sod Scrap Patching | Standard Over-Seeding |
|---|---|---|
| Success Rate | 95% in first 14 days | 40% depending on weather |
| Erosion Control | Immediate stabilization | Zero until 3 weeks |
| Water Requirement | Frequent, low volume | Constant misting for 21 days |
| Labor Intensity | High initial effort | Moderate initial effort |
| Soil Biology | Introduces mature microbes | Requires existing soil health |
How much modified soil do I need for sod patching?
For every 10 square feet of bare spots, you will need approximately 2 cubic feet of high-quality garden soil mixed with compost. This allows for a 2-inch base layer that provides adequate pore space for oxygen and water movement. Do not use cheap filler dirt from the hardware store; it lacks the organic matter necessary for root fusion.
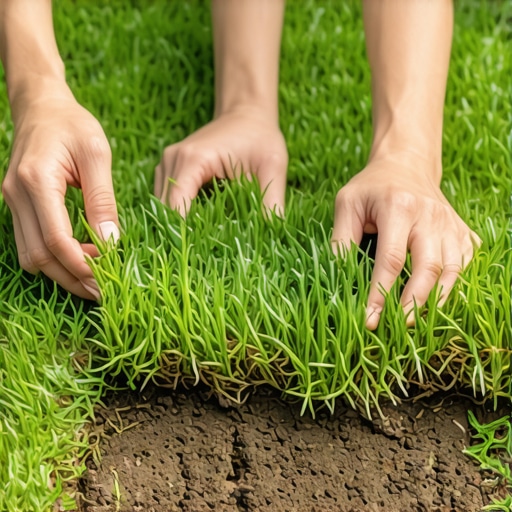
The Step-by-Step Installation: The Landscaper’s Protocol
Start by sourcing fresh sod. Do not use scraps that have been sitting on a pallet in the sun for three days. They are already dead; they just don’t know it yet. The edges should be moist and the grass should be a deep green. Measure your bare spot and cut the sod scrap about 1/2 inch larger than the hole. This is the secret to a professional finish. You want to compress the sod into the hole so the edges are tight. This prevents the edges from drying out and creates a seamless transition. Once the scrap is in place, step on it. Hard. You need to eliminate air pockets. Air is the enemy of a new root. If there is a gap between the sod and the soil, the roots will hit the air and stop growing. We call this air-pruning. It will kill your patch. After firming it down, the sod should be level with the surrounding turf. If it is high, you didn’t dig deep enough. If it is low, add more soil underneath. Precision matters here. A sloppy patch is a tripping hazard and a mower’s nightmare.
“Compaction is the primary cause of turf failure in urban environments; without 50% pore space for air and water, root respiration ceases and the plant dies from the bottom up.” – Penn State Agricultural Extension
Can I use different grass types for patching?
You can, but you shouldn’t. Mixing a cool-season grass like Kentucky Bluegrass into a warm-season lawn like Bermuda will create a patchy, uneven appearance because of different growth rates and color profiles. Always match the species and, if possible, the specific cultivar to maintain a uniform landscape aesthetic. Different grasses also have different nutritional requirements, which makes maintenance a headache.
The Critical Aftercare: Irrigation and Nutrients
Once the patch is in, your irrigation schedule is the only thing that matters for the next 14 days. You aren’t watering the grass; you are keeping the soil-root interface moist. Water the patches twice a day for 10 minutes. Do not flood them. If you see water running off, stop. The goal is a consistent dampness, not a swamp. After two weeks, try to gently tug the grass. If you feel resistance, the roots have taken hold. At that point, you can transition to deep, infrequent watering. This forces the roots to grow deeper into the soil profile to find moisture, making the lawn more drought-resistant. Don’t fertilize the new patch for at least four weeks. Let the roots establish before you try to force top growth. Most beginners make the mistake of dumping nitrogen on new sod. This causes the plant to put all its energy into the blades, leaving the roots weak and vulnerable. Let the plant build its foundation first. The yard cleanup isn’t done until the tools are put away and the timer is set correctly. Follow this protocol and those bare spots will disappear into the rest of the lawn like they were never there.
- Checklist for Professional Patching:
- Sharp flat-head spade for vertical edging.
- Hard rake for soil scarification.
- Organic compost for soil amendment.
- Hand-tamper or heavy boots for compression.
- Oscillating sprinkler for gentle irrigation.
- Fresh-cut sod scraps from a reputable nursery.
Comments are closed.