I always drill into my new crew members: if you don’t fix the soil grading first, every plant you put in the ground is just expensive compost. This applies double to irrigation. Last season, I brought a rookie out to a site where a previous landscaping outfit had performed a massive sod install directly over the top of a twenty-zone irrigation system without flagging a single head. We were looking at a three-quarter-acre lawn that was already showing signs of localized dry spots and swampy depressions. The homeowner was ready to rip it all up. I had to show the kid that finding a needle in a haystack is easy if you have a magnet; finding a plastic sprinkler head under four inches of compacted clay and fresh turf requires a different kind of tool kit. If you don’t map your system, you are essentially flying a plane with no landing gear.
The Visual Forensic Indicators of a Buried Irrigation Head
To find a buried sprinkler head without digging, you should utilize a chatterbox or solenoid activator to create an audible clicking sound or a dedicated wire and valve locator to trace the electrical path through the soil. These professional tools pinpoint the 24V signal emitted by the solenoid, allowing for precise excavation and repair of the irrigation line.
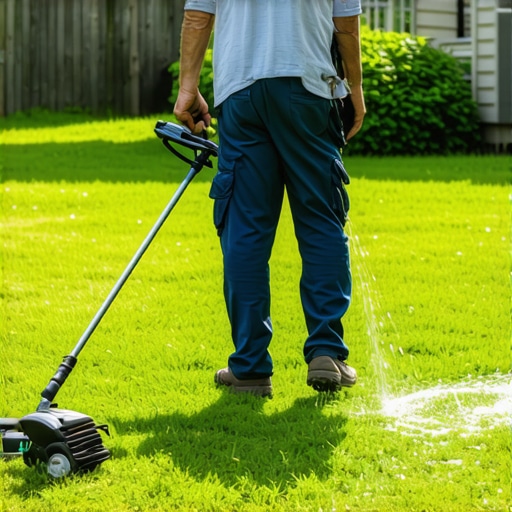
When a head is buried during a sloppy yard cleanup or a heavy-handed sod install, the lawn will tell you exactly where the problem lies. You just have to know how to read the stress signals of the turf grass. We look for the ‘Marsh Effect.’ This happens when a head is trapped but still trying to fire. The water has nowhere to go but out into the surrounding soil base, creating a soft, squishy spot that stays wet long after the zone has shut down. Conversely, you might see a ‘Donut of Death,’ a ring of brown, dormant grass where the head is failing to clear the thatch layer, causing the water to pool underneath and rot the root zone of the immediate area while the rest of the grass starves for moisture.
“Excessive burial depth of irrigation components complicates maintenance and increases the risk of system failure during freeze-thaw cycles.” – Texas A&M AgriLife Extension
The Mechanical Probe Method: Physics of Soil Resistance
The T-handle probe is the most basic tool in my truck, but it requires a surgeon’s touch. You aren’t just stabbing the ground; you are feeling for the specific density of high-density polyethylene (HDPE) or ABS plastic. When you hit a rock, the vibration is sharp and metallic. When you hit a buried head, the feedback is a dull, solid thud. I tell my guys to probe in a grid pattern starting from the last known working head. Irrigation lateral lines rarely run in straight lines once they hit a tree root or a utility conduit. You have to follow the ‘hydraulic ghost’ of the pipe. If you are working in heavy clay, you must be careful. Dry clay can be as hard as concrete, masking the presence of a plastic head. I always recommend running the zone for five minutes to soften the soil before you start the probe grid. This makes the plastic resistance much more obvious against the saturated earth.
The Solenoid Chatterbox: Using Audio Induction
If the probe fails, we go to the chatterbox. This is a device that sends a rapid on-off pulse to the solenoid at the valve box. This causes the internal plunger to click or ‘chatter’ at a high frequency. You can literally walk the yard with a stethoscope or just a keen ear and hear the buzzing under the ground. It is the most non-invasive way to locate a lost valve or a head that is stuck in the closed position. However, this only works if the electrical integrity of the 18-gauge multi-strand wire is still intact. If your yard cleanup crew accidentally severed the wire with a power edger, you are going to need a different approach.
| Method | Equipment Needed | Precision Level | Ideal Soil Condition |
|---|---|---|---|
| Soil Probing | T-handle Probe | Moderate | Moist, soft loam |
| Solenoid Chattering | Chatterbox/Activator | High | Quiet environments |
| Wire Tracing | 900Hz Tone Locator | Extreme | Any, including deep burial |
| Air Induction | Air Compressor | High | Saturated or sandy soil |
How much does a professional wire locator cost?
A professional-grade wire and valve locator, such as those made by Armada or Tempo, typically costs between five hundred and twelve hundred dollars. While this is a steep price for a DIY homeowner, the information gain is massive. These units consist of a transmitter that connects to the station wire at the controller and a handheld receiver with a waterproof wand. As you walk the lawn, the receiver picks up the electromagnetic field generated by the wire. When you pass directly over the wire or the buried solenoid, the signal nulls or peaks, depending on the mode. It allows us to map an entire irrigation system to within an inch of accuracy without lifting a single shovel of dirt. For a massive landscaping project, this tool is the difference between a one-day repair and a week-long excavation nightmare.
Can you find a sprinkler head with a metal detector?
Using a standard metal detector to find a modern sprinkler head is usually a waste of time. Most residential heads are 99 percent plastic. The only metal you might find is a small stainless steel retraction spring or a tiny screw in the nozzle. Unless you have a very high-sensitivity pulse induction metal detector and the head is buried less than two inches deep, the signal will be too weak to distinguish from old nails or bottle caps in the soil. Stick to the chatterbox or the wire tracer for a professional result.
“A retaining wall doesn’t fail because of the stone; it fails because of the water trapped behind it.” – Hardscape Engineering Axiom
The Pressure Drop and Air Induction Technique
If we are really stuck, we use the air compressor trick. I’ll shut off the main water supply and hook up a high-volume air compressor to the blowout port. By pumping air at about 40 PSI through the lines, the buried heads will often start to hiss or even vibrate the soil above them. In some cases, the air pressure will cause the grass and soil above a buried head to ‘bubble’ or heave slightly. This is a last-resort tactic because you have to be extremely careful not to blow out the seals on your zone valves. You need a regulated air flow, not a sudden burst of high-pressure CO2. It is particularly effective in sandy soils where the air can migrate to the surface more easily than in heavy silt or clay.
Professional Irrigation Locating Checklist
- Locate the main irrigation controller and identify the non-functioning zone.
- Check the solenoid for electrical continuity using a multimeter set to Ohms.
- Utilize a T-handle probe in a six-inch grid pattern near the suspected head location.
- Activate a solenoid chatterbox to listen for audible clicking under the turf.
- Use a 900Hz wire tracer to map the lateral line from the valve box to the last head.
- Flag each located head with high-visibility irrigation flags before starting any yard cleanup or sod install.
- Ensure 811 is called if any deep excavation is required to repair a crushed lateral line.
Hydraulic friction loss is another factor people ignore. When a head is buried and leaking underground, it siphons off the pressure for every subsequent head in the line. If you notice the last two heads in a zone are barely ‘weeping’ water while the first three are spraying fine, you have a buried leak or a trapped head somewhere in the middle. The engineering of the system depends on a consistent PSI. When you bury a head, you aren’t just losing that one sprinkler; you are compromising the mechanical integrity of the entire zone. Fix the depth, adjust the soil grade, and keep your heads at the proper height to ensure the longevity of your landscape investment. Stop guessing and start measuring.
Comments are closed.