The Engineering Reality Behind Retaining Wall Longevity
Properly installing retaining wall drainage pipes requires a deep understanding of hydrostatic pressure and soil mechanics to prevent structural collapse within five years. Most failures occur because installers treat drainage as an afterthought rather than the primary life-support system for the wall structure. I recently got called out to tear up a $30,000 patio that was sinking because the previous contractor used a thin wall corrugated pipe and didn’t wrap the aggregate in a proper geotextile. The pipe crushed under the weight of the backfill, the silt clogged the stone, and the entire hillside started moving. When we excavated, it was a swampy mess of gray clay and rotten roots. That is what happens when you cut corners. You don’t just build a wall; you build a water management system. Whether you are doing a sod install or a massive landscaping overhaul, the physics remain the same. Water is the most destructive force in the yard. It exerts thousands of pounds of pressure against the back of your blocks. If that water has no escape route, the wall will bow, crack, and eventually fail. This guide breaks down the 2026 standards for ensuring your hardscape remains upright for decades.
The Physics of Retaining Wall Failure and Hydrostatic Pressure
Hydrostatic pressure is the force exerted by stagnant water against a retaining wall, which can double the effective weight of the soil behind the structure. When ground becomes saturated, the water fills the void spaces in the soil, creating a heavy slurry that pushes outward with immense force.
“A retaining wall doesn’t fail because of the stone; it fails because of the water trapped behind it.” – Hardscape Engineering Axiom
This pressure is why you see walls leaning toward the street or bulging in the middle. It is a slow-motion disaster. Many homeowners think a few weep holes are enough. They are wrong. You need a continuous, high-flow drainage chimney and a perforated collection pipe at the base. This system intercepts the water before it ever touches the back of the wall. We use 1-inch to 2-inch clean gravel for this. It has a high void ratio, allowing water to drop straight down to the pipe. If your irrigation system is leaking, this pressure builds even faster. Don’t ignore the math. Every cubic foot of saturated soil weighs significantly more than dry soil. Your wall must be designed to breathe.
Choosing Your Perforated Pipe and Aggregates
Selecting the correct drainage pipe and backfill aggregate determines if your system will function for thirty years or clog in thirty months. We exclusively use SDR-35 perforated PVC for structural walls because it resists crushing under the weight of the backfill and compaction equipment.
| Material Type | Primary Benefit | Lifespan Expectancy |
|---|---|---|
| SDR-35 Perforated PVC | High crush strength, smooth interior for flow. | 50+ Years |
| Corrugated Flexible Pipe | Cheap, easy to bend around corners. | 10 to 15 Years |
| 3/4 Inch Clean Stone | Excellent drainage, no fines to clog pipes. | Indefinite |
| CR6 / Modified Gravel | Great for base compaction, poor for drainage. | N/A (Use for Base Only) |
Avoid the thin, black corrugated pipe found at big-box stores. It is a magnet for tree roots and collapses easily during the yard cleanup or final grading process. For the stone, never use ‘modified’ gravel behind the wall. Modified gravel contains ‘fines’ or dust that turns into concrete when wet. You need ‘clean’ stone. This means it has been washed of all dust and small particles. This ensures that the water can flow freely through the gaps between the rocks. The size of the stone matters too. We prefer 3/4-inch angular stone. The jagged edges lock together, providing structural stability while maintaining 40 percent void space for water movement.
How much modified gravel do I need for a patio base?
To calculate the modified gravel needed, multiply the square footage of the area by the depth in feet (usually 0.5 feet for 6 inches) and divide by 27 to get cubic yards. Always add a 20 percent buffer for compaction. If you are building a wall on top of this base, the thickness must increase to accommodate the wall’s weight. Compaction is the key. We use vibratory plate compactors and do it in 2-inch ‘lifts.’ If you dump 6 inches of gravel and try to compact it all at once, the bottom 3 inches will stay loose. That is how walls settle and tip. Do it right. 2 inches at a time. The machine should literally bounce off the surface when it is ready. If it feels soft, keep going.
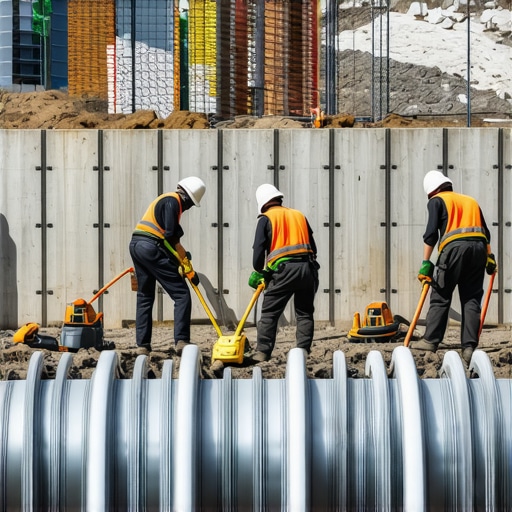
The Excavation and Trenching Phase
The excavation phase involves digging a trench that is wide enough to accommodate the wall units and a minimum of 12 inches of drainage aggregate behind them. This is where the heavy lifting happens. You aren’t just digging a hole; you are creating a foundation.
“Sub-surface drainage is the single most critical component of any structural earth retention system.” – ICPI Tech Manual
I tell my crew that if the trench isn’t level within an eighth of an inch, the whole wall is a waste of time. We use laser levels for everything. The trench floor must be compacted soil, followed by a layer of non-woven geotextile fabric. This fabric acts as a filter. It allows water through but keeps the native soil from mixing with your clean drainage stone. If those two mix, it’s called ‘piping,’ and it will clog your system in a single season. This is also the time to check for utility lines. Call 811. Don’t be the guy who cuts a fiber optic line because he was too lazy to wait for a mark-out. We also look at the grade of the entire yard. If the yard slopes toward the wall, you need a swale or a catch basin further up the hill to take the load off the wall’s drainage system.
Why does my retaining wall have water leaking through the face?
Water leaking through the face of a wall, often accompanied by white powder called efflorescence, indicates that the internal drainage system is clogged or non-existent. This happens when the hydrostatic pressure forces water through the joints of the blocks. It is a sign of impending failure. The white powder is actually salt being leached out of the concrete by the water. To fix this, you usually have to excavate behind the wall and install a proper 12-inch drainage chimney with a perforated pipe. You can’t just seal the front of the wall. That actually makes it worse by trapping the water inside the blocks. The water will eventually freeze, expand, and shatter the face of your stone. You must address the source of the water, not just the symptom.
Installing the 2026 Standard Drainage System
Installation of the 2026 standard drainage system involves laying the perforated pipe at a 1 percent slope and encasing it in a geotextile-wrapped aggregate envelope. The pipe should be placed at the lowest possible point behind the wall, slightly above the leveling pad. Holes in the pipe should face down. This seems counter-intuitive to beginners, but it’s basic physics. As the water level rises in the trench, it enters the pipe from the bottom and is carried away. If the holes face up, the water has to fill the entire trench before it can enter the pipe, which is too late.
- Lay the non-woven filter fabric against the soil bank.
- Place a 2-inch bedding layer of clean 3/4-inch stone.
- Set your SDR-35 pipe with a 1/8-inch drop per foot.
- Backfill with clean stone in 6-inch increments.
- Fold the filter fabric over the top of the stone before adding topsoil.
This ‘burrito wrap’ method ensures that your drainage stone stays clean forever. If you are doing a sod install on top of the wall, make sure the top 4 inches are good topsoil, but keep that filter fabric barrier intact. This prevents the dirt from washing down into the rocks. We also install ‘weep holes’ every 6 to 8 feet along the base of the wall. These are small gaps that allow any excess water to exit the front of the wall if the main pipe ever gets overwhelmed during a 100-year storm event. They are your fail-safe.
The Final Grading and Maintenance Schedule
The final grading and maintenance schedule for a retaining wall involves ensuring the surface water flows away from the wall and inspecting drainage outlets for debris twice a year. After the wall is built, the yard cleanup begins. We grade the soil so it has a positive pitch away from the back of the wall. This is a common mistake. People level the ground, and then water just sits there and soaks into the drainage system. You want to shed as much water as possible on the surface. Check your irrigation heads too. Make sure they aren’t spraying directly onto the wall or into the drainage zone. Over-saturation from a broken sprinkler is a leading cause of wall movement. Every spring and fall, find where your drainage pipe exits. Clear out any grass, mulch, or rodent nests. If the pipe is blocked at the end, the whole system is useless. A quick check with a garden hose can confirm that water is flowing freely through the entire run. This takes five minutes and can save you $30,000 in repair costs. Landscaping isn’t just about looks; it’s about managing the elements. Respect the water, and your wall will stand. Ignore it, and the earth will take its land back. It’s that simple.