The 80 Percent Rule: Why Preparation Dictates Sod Success
Laying 2026 sod varieties over sandy soil requires a fundamental understanding of soil physics and capillary action to ensure deep root penetration. Most homeowners fail because they treat sod installation like laying a carpet rather than a biological transplant that requires pore space, nutrient retention, and moisture gradients to survive. I always drill into my new crew members: if you don’t fix the soil grading and chemistry first, every plant you put in the ground is just expensive compost. I have seen too many rookies slap high-end Zoysia or Bermuda onto raw sand only to watch it mummify within three weeks because the roots had no reason to leave the comfort of the sod farm peat. Sand is essentially a collection of tiny marbles. It has high macroporosity but almost zero cation exchange capacity (CEC). This means it cannot hold onto the ammonium, potassium, or magnesium your grass needs. To make 2026 hybrids thrive, we have to manipulate the sand’s structure before the first pallet arrives on-site.
“Soil texture determines the rate at which water and air move through the profile. For sandy soils, the challenge is not drainage, but the lack of surface area for nutrient adhesion.” – USDA Soil Survey Manual
The Microscopic Reality of Sandy Substrates
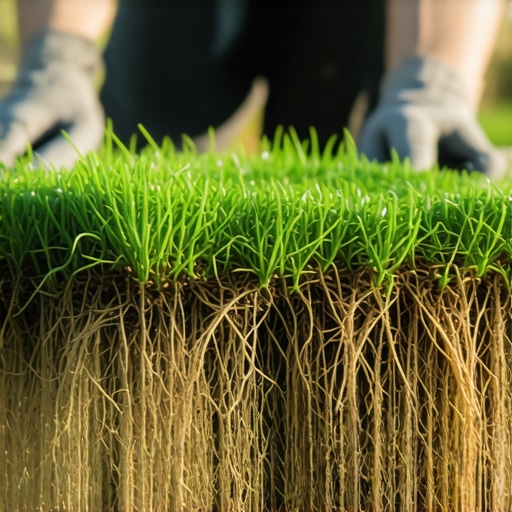
Sand is chemically inert for the most part. When you lay a thick mat of organic sod on top of it, you create a hydraulic break. Water moves through the organic layer of the sod and then hits the sand. If the sand is too dry or too compacted, the water shears off or drains so fast that the roots never chase it. We call this the ‘perched water table’ effect in reverse. You need to bridge that gap. This involves more than just a yard cleanup; it requires mechanical integration of organic material into the top 4 to 6 inches of the sand profile. If you don’t do this, you get root girdling, where the roots just spin around in the sod layer until they starve. It is a slow death that no amount of irrigation can fix.
The Ground-Up Build: Pre-Installation Soil Engineering
Engineered soil amendment for sandy substrates involves introducing humic substances and calcined clay to increase the water holding capacity without sacrificing oxygen exchange. By tilling in organic compost or sphagnum peat moss, you create a biological bridge that encourages primary roots to penetrate deep into the subsoil layers. This process is the heavy lifting of landscaping. We aren’t just clearing weeds; we are building a reservoir. You need to achieve a soil compaction level of about 85 percent. Too loose and the sod sinks; too tight and the roots can’t breathe. We use a water-filled roller to find the sweet spot. If the roller bounces, it is too hard. If it leaves a deep trench, it is too soft.
How much organic matter is needed for sandy soil?
To move the needle on a sandy yard, you need to aim for 5 percent organic matter by volume. This typically means spreading a 2-inch layer of high-quality compost over the entire area and tilling it to a depth of 6 inches. This isn’t a suggestion. It is the requirement for 2026 turf standards.
| Material Type | Benefit for Sand | Application Rate |
|---|---|---|
| Compost | Increases CEC and Biology | 2 Cubic Yards per 1000 sq ft |
| Calcined Clay | Permanent Moisture Retention | 50 lbs per 100 sq ft |
| Humic Acid | Nutrient Chelation | Liquid or Granular per label |
| Wetting Agents | Prevents Hydrophobicity | Monthly during establishment |
The Installation Process: Precision and Friction
Proper sod install technique on sand requires tight seams and staggered joints to prevent thermal evaporation from the soil edges. You must ensure root-to-soil contact by using a sod roller immediately after the turf is laid to eliminate air pockets that cause rhizome desiccation. Every gap between sod pieces is a chimney. Heat rises out of the sand, hits that gap, and sucks the moisture right out of the edges of your grass. I tell my guys to ‘knit’ the pieces together. No overlapping, no gaps. Just a tight, friction-fit seal. Then we roll it. The roller should literally bounce off the compacted base once we are done. If you can see the lines where the sod pieces meet after 48 hours, you didn’t roll it hard enough or the sand wasn’t level.
“Successful establishment of turfgrass on coarse-textured soils depends entirely on the frequency of irrigation and the presence of a transition zone between the sod and the native soil.” – Penn State Center for Turfgrass Science
What is the best irrigation schedule for new sod on sand?
Forget the ‘once a day’ rule. On sand, you need ‘syringing.’ This means watering for 5 to 10 minutes, four to five times a day, for the first 14 days. You aren’t trying to soak the ground 3 feet deep yet; you are trying to keep the rhizosphere (the area around the roots) at a constant humidity level. Sand drains too fast for long soakings in the first week. After day 14, you pivot. You stop the frequent misting and move to deep, infrequent watering. You want to force those roots to go looking for water at the 6-inch mark. If you keep the surface wet forever, the roots stay at the surface. That is how you get a lawn that dies the first time the temperature hits 90 degrees. It will rot if you over-saturate the crown, but it will crisp if the sand dries out. It is a delicate balance.
The 2026 Maintenance Protocol
Once the sod is knit, the maintenance schedule must account for the high leaching rates of sandy soil by using slow-release nitrogen and micro-nutrient packages. Do not use cheap, quick-release fertilizers from a big-box store; they will wash straight through the sand and into the groundwater before the grass can grab them. You need polymer-coated urea. This stuff releases slowly based on temperature and moisture, matching the growth cycle of the plant. Also, keep your blades sharp. A dull mower blade tears the grass, creating more surface area for moisture loss. On a sandy site, every drop of water in that plant is precious.
Sod Establishment Checklist
- Remove all debris and existing vegetation using a sod cutter, not just a weed whacker.
- Grade the sand to slope at least 2 percent away from all structures.
- Till in 2 inches of organic compost to improve Cation Exchange Capacity.
- Apply a starter fertilizer with a high phosphorus count (the middle number) to stimulate root branching.
- Lay sod in a running bond pattern, similar to bricks.
- Roll with a 300 lb water roller to ensure contact.
- Irrigate immediately. The clock starts the moment the sod hits the ground.
The Post-Install Reality
The ‘settling in’ period for sod on sand lasts about a full year. In year one, you are building a root architecture. Do not expect the lawn to look like a golf course immediately. You will see some slight yellowing as the plant adjusts to the local pH. Don’t panic and dump 10 pounds of nitrogen on it. You’ll burn the tender new roots. Instead, use a seaweed-based root stimulant. It contains cytokinins that encourage lateral root growth. By year two, if you followed the soil amendment phase, those roots will be deep enough to withstand a week of drought. If you skipped the prep, you’ll be replacing the sod by then. Landscaping is about the stuff you can’t see. The dirt matters more than the green. “