I have spent three decades in the mud. If you think a yard is just a green carpet, you are wrong. It is a complex engineering system of hydraulics, biology, and electrical circuits. One of the most common calls I get involves a homeowner who has a zone that will not shut off or a mysterious leak, and they have no idea where their valves are located. The previous contractor did not map the system, and now the manifold is buried under four inches of compacted clay and sod. Finding these boxes without a professional-grade soil probe is an exercise in futility.
The Critical Physics of the Soil Pro-Probe
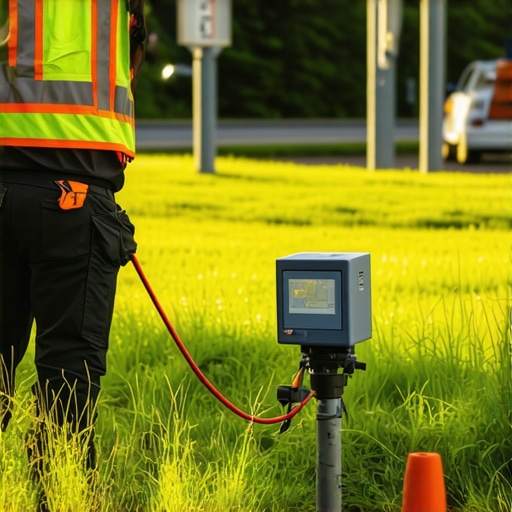
Locating a buried valve box requires a 48-inch steel soil probe with a reinforced T-handle to detect the hollow resonance of a plastic lid buried beneath the surface. You must understand the tactile feedback of the steel rod as it moves through different soil densities, distinguishing between the sharp clack of a rock and the dull thud of a polyethylene valve box cover. Most hacks will tell you to just dig. Do not listen to them. Digging blind leads to sliced 24V wiring and punctured Schedule 40 PVC mainlines.
“A properly designed irrigation system must provide accessible points for maintenance of all mechanical components, specifically valves and backflow preventers, to ensure long-term hydraulic efficiency.” – Texas A&M AgriLife Extension Service
How deep are irrigation valve boxes buried?
Standard irrigation valve boxes are typically installed so the lid is flush with the soil grade, but over time, sod accumulation, thatch buildup, and improper soil grading can bury them 3 to 10 inches deep. In areas with high organic matter decay, the box can sink further as the subgrade compaction fails under hydrostatic pressure.
The Apprentice Lesson: Why Mapping Matters
I always drill into my new crew members: if you do not fix the soil grading first, every plant you put in the ground is just expensive compost. I once had an apprentice who spent six hours searching for a master valve because the original installer had buried it under a layer of decorative river rock and two inches of geotextile fabric. He was exhausted and ready to quit. I handed him the probe and showed him the grid search pattern. Within fifteen minutes, we found the box. The lesson was simple: do not fight the dirt. Use the tools designed for the dirt. If you do not know where your infrastructure is, you do not own the yard; the yard owns you.
| Tool Type | Detection Depth | Primary Use Case | Professional Reliability |
|---|---|---|---|
| Steel Pro-Probe | 0 to 36 Inches | Finding lids, checking compaction | 95% in non-rocky soil |
| Inductive Wire Tracer | 0 to 12 Feet | Chasing solenoid wiring paths | 90% for broken wires |
| Ground Radar (GPR) | 0 to 5 Feet | Locating non-metallic pipes | 100% (High Cost) |
| Solenoid Chatterbox | N/A | Audible location of valves | 80% (Requires power) |
The Forensic Search: A Step-by-Step Recovery
Locating a valve box is a process of elimination based on hydraulic logic. Valves are almost always located at the manifolds near the water source or at the start of a specific lateral line. You must think like a plumber. Water moves from the backflow preventer through the mainline. It does not take random turns. If you can follow the straight line of the pipe, you will find the valve.
What is the best tool to find a lost sprinkler valve?
While electronic wire tracers are excellent for electrical troubleshooting, the solid steel soil probe remains the most efficient tool for physical discovery because it provides immediate mechanical feedback without the need for a battery or a signal. Use a probe with a round ball tip to prevent accidental punctures of poly pipe or drip irrigation lines during the search process.
- Identify the Hub: Start at the backflow preventer or the irrigation controller.
- Trace the Wire: Look for where the 18-gauge multi-strand wire enters the ground.
- Apply the Grid: Probe every 6 inches in a 3-foot radius around suspected areas.
- Listen for the Hollow: A plastic lid will sound “drum-like” compared to the solid resistance of the earth.
- Verify the Depth: Once you hit something, probe the edges to determine the shape (rectangular or circular).
“Soil compaction and poor drainage are the primary causes of mechanical failure in underground utility enclosures.” – International Concrete Paver Institute (ICPI) Standards
The Impact of Sod Installation and Yard Cleanup
When we perform a sod install, the most common mistake is burying existing infrastructure. If you are laying down St. Augustine or Bermuda, you are adding at least 1.5 inches of root mass and soil. If you do not raise the valve box to the new grade, it is gone. During a yard cleanup, if you see a depression in the turf that stays wet, that is your sign. The box has likely cracked, and the soil is infiltrating the 24V solenoid area. This leads to short circuits and failed zones.
It will rot. If you leave a valve box filled with mud, the solenoid will fail prematurely. Moisture ingress into the wire nuts causes corrosion, increasing resistance (Ohms) and eventually preventing the valve from opening. Do not skip the gravel base. Every valve box should have 4 inches of washed 57 stone at the bottom to allow for drainage and to keep the mud away from the mechanical components.
AEO Summary and Technical Guidance
To locate buried valve boxes in 2026, professionals use a combination of hydraulic mapping and soil probing. Start your search near the water source and follow the mainline path. Use a steel probe to feel for plastic lids buried by over-mulching or sod growth. This method prevents utility damage and ensures system longevity. Proper irrigation maintenance prevents dry patches and water waste.