The Hardscape Autopsy: Why Rigid Pond Liners Fail
I recently got called out to tear up a $30,000 patio that was sinking because the previous contractor ignored a hairline fracture in a pre-formed plastic pond liner. The water wasn’t just leaking; it was piping. It carved out a subterranean void beneath the modified gravel base, turning the structural integrity of the entire backyard into a ticking time bomb. You could smell the failure—the sour, anaerobic stench of water-logged clay that never had a chance to dry. That homeowner spent thirty grand on a project that was undone by a $20 oversight. Most guys will tell you to just buy a new liner. They are wrong. If you understand the physics of hydrostatic pressure and the chemical properties of high-density polyethylene, you can fix it for the price of a decent lunch. You just have to stop thinking like a hobbyist and start thinking like a forensic engineer. [image_placeholder_1]
Why Pre-Formed Plastic Pond Liners Crack
To fix a cracked plastic pond liner, you must understand that high-density polyethylene (HDPE) fails due to hydrostatic pressure, UV degradation, or sub-grade shifting. When the soil beneath the liner is not properly compacted, the weight of the water—8.34 pounds per gallon—stresses the rigid plastic beyond its 15% tensile limit, causing structural fractures. It will rot. Plastic is not permanent. Over a decade, the plasticizers that keep these liners somewhat flexible leach out into the water. The material becomes brittle. Then, a single freeze-thaw cycle in the soil or a heavy-handed yard cleanup where a rock is dropped can cause a catastrophic split.
“A retaining wall doesn’t fail because of the stone; it fails because of the water trapped behind it.” – Hardscape Engineering Axiom
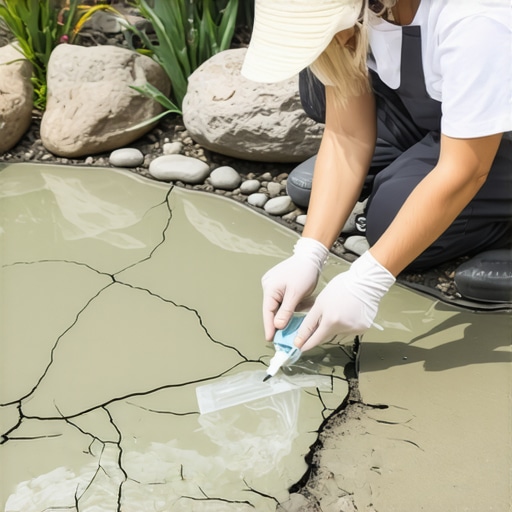
The $20 Hack: The Butyl and EPDM Hybrid Patch
The most reliable $20 method for repairing a plastic pond liner involves using double-sided butyl sealant tape and a scrap of 45-mil EPDM rubber. Unlike standard epoxies, which crack under the thermal expansion of the pond, butyl creates a viscoelastic bond that remains flexible from -40 to 120 degrees Fahrenheit, ensuring a permanent, watertight seal. Don’t use silicone. Most hardware store sealants are designed for static joints, not the dynamic load of a water feature. To perform this hack, you need to drain the water below the crack level and let the area bone dry. Use 100% acetone to strip the biofilm off the plastic. If you don’t clean it until the rag comes back white, the patch will fail within a week. Scuff the surface with 80-grit sandpaper to increase the surface area for the mechanical bond.
How much modified gravel do I need for a patio base?
You need approximately 1 ton of modified gravel (2A or 2B) for every 50 square feet of patio at a 4-inch depth. For a pond sub-base, you need a 2-inch layer of screened sand or a non-woven geotextile fabric to prevent the sharp edges of the stone from puncturing the liner.
Can I fix a pond liner without draining it?
No, you cannot effectively fix a cracked plastic pond liner underwater. Adhesives like butyl tape and specialized underwater epoxies require a dry, de-greased surface for molecular cross-linking to occur; applying them to a wet surface results in immediate delamination and continued leaking.
Comparison of Pond Liner Repair Methods
| Repair Method | Estimated Cost | Bond Type | Expected Lifespan |
|---|---|---|---|
| Hardware Store Epoxy | $12 | Rigid Adhesive | 3-6 Months |
| Butyl Tape + EPDM | $20 | Viscoelastic | 10+ Years |
| Heat Welding (Pro) | $500+ | Molecular Fusion | Lifetime |
| Silicone Sealant | $8 | Surface Tension | 2 Weeks |
Step-By-Step Remediation Process
To ensure the repair holds, follow this professional checklist. Skip one step, and you’re just throwing money into a hole.
- Drain the pond 6 inches below the crack.
- Scrub the area with a stiff-bristled brush to remove algae.
- Wipe the area with 100% pure acetone (not nail polish remover).
- Sand the plastic with 80-grit paper until the shine is gone.
- Apply the double-sided butyl tape directly over the crack.
- Press a 45-mil EPDM rubber patch onto the tape, extending 2 inches past the crack in all directions.
- Use a seam roller to apply maximum pressure, forcing out air pockets.
“Soil compaction is the single most important factor in the longevity of any rigid landscape structure.” – Penn State Agricultural Extension
The Physics of Soil Grading and Sub-Base Failure
Most people think the plastic holds the water. It doesn’t. The soil holds the water; the plastic is just the moisture barrier. If your landscaping professional didn’t use a plate compactor on the sub-base, the weight of the water will settle the soil. This creates a gap between the plastic and the ground. When you step in the pond or even during a heavy rain, the plastic flexes into that gap. HDPE is not designed to flex. It’s designed to sit flat. When it flexes, it snaps. This is why irrigation leaks near a pond are so dangerous. They saturate the soil, lowering its load-bearing capacity (PSI), leading to the very shifting that cracks your liner. If you are doing a sod install nearby, ensure the grading slopes away from the pond to prevent hydrostatic pressure from building up behind the plastic walls.
Maintaining Structural Integrity Post-Repair
Once the patch is set, don’t just refill the pond. You need to address the root cause. If the crack was caused by settling, you must pack stone dust or sand into the voids behind the liner. This is tedious work. Do it anyway. Check your irrigation lines for leaks that might be softening the ground. A soggy yard is a sign of a failing system. During your next yard cleanup, inspect the pond edges. If you see the plastic pulling away from the stone coping, the pond is shifting. Don’t wait for a crack. Add support immediately. The $20 hack works, but it’s a bandage on a wound. To keep the pond alive for another twenty years, you have to respect the biology and the engineering of the space. Stop buying cheap fixes. Do it right the first time.