Stop Treating Your Yard Like a Hobby and Start Treating It Like an Engineering Project
Most homeowners and low-budget landscaping hacks treat sod like a carpet. They think you just unroll it, spray some water, and walk away. This is why 40% of new sod installs fail within the first year. If you want a professional-grade turf, you have to understand the soil physics and biological requirements of the grass plant. We aren’t just making things look green; we are managing rhizome expansion, capillary action, and soil bulk density. If the roots don’t find a home in the substrate immediately, the sod will desiccate and die. It is that simple.
The Apprentice Lesson: Why Grading is the Foundation of Life
I always drill into my new crew members: if you don’t fix the soil grading first, every plant you put in the ground is just expensive compost. I remember a kid we hired three years ago who thought he could skip the final rake and just hide the divots under the sod mats. Within two weeks, those low spots became anaerobic mud puddles and the high spots were bone-dry because the heavy roller couldn’t bridge the gap. We had to rip the whole thing up on our own dime. Since then, he knows that a 2% slope away from the foundation and a perfectly level grade aren’t suggestions; they are requirements for survival. If the sod install doesn’t have 100% surface contact, the roots will hit an air pocket and stop. Dead. Game over.
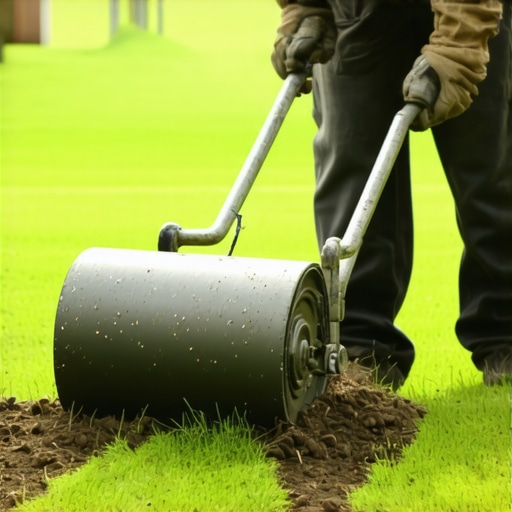
The Heavy Roller Trick: Engineering Root Contact
The heavy roller trick involves using a water-filled drum to exert downward pressure across newly laid sod mats, effectively eliminating air pockets and forcing the adventitious roots into direct contact with the prepared topsoil. This mechanical compression initiates immediate capillary water movement from the soil into the turf, preventing root desiccation and accelerating nitrogen uptake. This isn’t about flattening the grass; it is about welding the biological layers together.
“Root development in newly installed sod is entirely dependent on the elimination of air voids between the sod mat and the soil surface to prevent desiccation of the adventitious roots.” – Texas A&M AgriLife Extension
How much weight should a sod roller have?
The weight of your roller depends entirely on your soil structure. For a standard sod install on sandy loam, a 100 to 150-pound roller is usually sufficient. However, if you are working with heavy clay, you have to be careful. Too much weight will cause compaction, which kills oxygen exchange. You want enough weight to press the roots down, but not so much that you turn the soil into a brick. A half-filled water drum is the industry standard for most residential applications. If the roller doesn’t leave a slight impression, it’s too light. If it’s pushing mud up through the seams, it’s too heavy.
The Forensic Breakdown of Soil Preparation
Before the roller even touches the grass, the yard cleanup and preparation must be surgical. You have to remove every rock larger than a marble. You have to kill off every sprig of invasive Bermuda or nutsedge with a non-selective herbicide at least 7 days before you dig. Then, you till. We don’t just scratch the surface; we need 4 to 6 inches of loose, friable soil. This is where your irrigation system gets checked. If you have a leak under the sod, the roller will find it by creating a sinkhole. Fix it now, or pay for it later. You also need to check your soil pH. Most turfgrasses want a pH between 6.0 and 7.0. If you are at an 8.0, your grass will be stunted and yellow regardless of how much NPK fertilizer you throw at it.
| Soil Type | Roller Weight (Water Capacity) | Passes Required | Primary Goal |
|---|---|---|---|
| Heavy Red Clay | 30-50% Full | 1-2 | Air Void Removal |
| Sandy Loam | 75-100% Full | 2-3 | Capillary Connection |
| Silty Clay | 50-60% Full | 2 | Surface Leveling |
The Rooting Process: What Happens Under the Hood
When the roller passes over the sod, it creates a pressure gradient. This pressure forces the moisture held in the sod’s thatch layer into the dry soil below. This creates a “wicking” effect. Once that connection is made, the roots will follow the moisture down. This is the Information Gain the hacks won’t tell you: you aren’t watering the grass; you are watering the soil through the grass. If you skip the roller, the roots have to jump across a gap of air. Roots can’t jump. They will air-prune themselves and the sod will turn into a brown, crispy mat within 48 hours in the sun.
Irrigation Protocols: More Than Just a Sprinkler
Your irrigation strategy must change the moment the roller leaves the site. For the first 7 to 10 days, you need shallow, frequent watering. We are talking 3 to 4 times a day for 10 minutes each. You want the sod and the first inch of soil to stay saturated. After day 10, once the roots have tacked down (the “tug test”), you shift to deep, infrequent watering. This forces the roots to grow deeper into the soil profile to find moisture. If you keep watering every day, the roots stay lazy and sit on the surface. Lazy roots die in the first heatwave. Don’t be the person with a lazy lawn.
“The most common mistake in turf establishment is the failure to realize that soil is a living, structural medium that requires specific bulk density to support root anchoring without inducing anaerobic conditions.” – Penn State Center for Turfgrass Science
How long does sod take to root with a roller?
With a proper heavy roller application and correct irrigation, you should see root anchoring within 5 to 7 days. By day 14, you should not be able to lift the sod mats without significant resistance. Without the roller, this process can take up to 21 days, or it may never happen at all if the air pockets are too large. Time is money, and in the heat of summer, time is the difference between a successful landscaping project and a total loss.
Critical Pre-Installation Checklist
- Mark all utility lines by calling 811. Don’t hit a gas line for a $500 sod job.
- Perform a 24-hour percolation test to ensure the yard drains.
- Apply a starter fertilizer with a high phosphorus (P) count to stimulate root branching.
- Ensure the irrigation heads are adjusted to 1/2 inch above the soil grade.
- Check the sod delivery for armyworms or grubs. Do not install infested turf.
- Roll the sod within 30 minutes of laying the last piece.
The Aftermath: Year One Maintenance
Once the sod is tacked down, your job isn’t over. You need to keep the mower blade high for the first three months. Taking off more than 1/3 of the leaf blade will shock the plant and stop root production. You also need to stay off the lawn. Foot traffic on new, wet sod creates compaction ruts that the roller won’t be able to fix later. If you see mushrooms, you are over-watering. If you see blue-gray tints, you are under-watering. It is a balance of agronomy and observation. Most people fail because they stop paying attention after the check clears. Don’t be most people.