Trimming Back 2026 Ivy: How to Clear Wood Fences Fast
I always drill into my new crew members: if you don’t fix the soil grading first, every plant you put in the ground is just expensive compost. Last week, I walked a property line where the English Ivy (Hedera helix) had become so dense we started calling it ‘2026 Ivy’ because that is how long it would take the wood fence underneath to completely dissolve into mulch if we didn’t intervene. The homeowner thought a pair of handheld shears would do the trick. They were wrong. Ivy isn’t just a plant; it is a structural parasite that uses adventitious rootlets to anchor into the cellular structure of wood. When you see ivy on a fence, you aren’t looking at a decoration; you are looking at a slow-motion demolition project. My firm doesn’t just ‘trim’ this stuff. We perform a forensic extraction. If you don’t understand the biology of the vine and the engineering of the fence post, you will end up pulling the whole structure down along with the weeds. It is about precision, chemistry, and timing. Most guys just rip and tear. That is how you break pickets and ruin your back. We do it better.
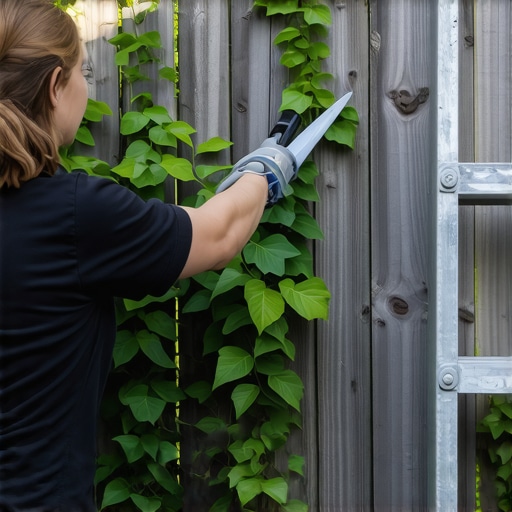
The Structural Decay of Wood Fences Under English Ivy
Clearing English ivy from wood fences requires a systematic ‘girdling’ technique where main vascular stems are severed at the base to kill the upper canopy before removal. This process prevents structural collapse and minimizes damage to the wood grain by allowing the ivy’s adhesive rootlets to desiccate and lose their grip naturally over several weeks. English ivy is a woody evergreen perennial that thrives in the shade but eventually seeks the light, climbing anything in its path. On a wood fence, it creates a micro-climate of perpetual dampness. This moisture is trapped against the pickets and rails, creating the perfect environment for Basidiomycetes, the fungi responsible for white rot and brown rot. These fungi break down the lignin and cellulose that give wood its strength. Once that happens, your fence is no longer a barrier; it is a bio-hazard. [image_placeholder]
“English ivy (Hedera helix) is an invasive species that can quickly overwhelm structures, causing structural damage by penetrating cracks and crevices with its roots.” – Oregon State University Extension Service
Diagnosing the Damage: The Forensic Autopsy of a Smothered Fence
An ivy-covered fence must be inspected for lignin degradation and post-set stability before any mechanical clearing begins. You must check the ‘softness’ of the wood using a moisture meter or a simple screwdriver test to determine if the structural integrity of the rails has been compromised by long-term moisture retention. When we pull up to a yard cleanup job, the first thing I look at is the lean of the fence. Ivy is heavy. A mature vine canopy can add hundreds of pounds of ‘sail weight’ to a fence line. During a high wind event, that ivy acts like a giant green sheet, catching the air and putting immense lateral pressure on the 4×4 posts. If those posts weren’t set 24 to 36 inches deep in high-strength concrete, they are going to snap. Don’t skip the inspection. It is the difference between a successful cleanup and an insurance claim.
How much does it cost to remove ivy from a fence?
Professional ivy removal typically costs between 500 and 1500 dollars depending on the linear footage and the height of the growth. This price reflects the labor-intensive nature of hand-clearing and the disposal fees for heavy, moisture-laden organic debris.
Can I spray vinegar to kill ivy on my fence?
Vinegar, even at high concentrations, is rarely effective against mature English ivy because of the waxy cuticle on the leaves. To kill ivy, you need a systemic herbicide like triclopyr that can penetrate the woody stems and travel to the root system.
| Removal Method | Speed of Results | Risk to Fence Structure | Labor Intensity |
|---|---|---|---|
| Immediate Hand Pulling | Fast | Very High | Maximum |
| Girdle and Desiccate | Slow (2-4 weeks) | Low | Moderate |
| Chemical Foliar Spray | Medium | Moderate | Low |
| Mechanical Bush Hogging | Instant | Critical | Low |
The Multi-Step Removal Protocol: Severing the Lifeblood
The most efficient way to clear ivy is to cut a six-inch gap in every main stem at the base of the fence. This ‘air gap’ immediately cuts off the flow of nutrients and water from the root system to the upper leaves, causing the vine to enter a state of total desiccation. I tell my apprentices: ‘Cut the throat, wait for the ghost.’ You don’t fight live ivy. You fight dead, brittle ivy. Once the vines turn brown and the leaves shrivel, the adhesive strength of the rootlets drops by nearly 70 percent. This allows you to peel the ivy off in large sheets rather than picking at individual stems. If you try to pull it while it is green and turgid, you will take the finish, the stain, and even the wood fibers right off the fence. It will rot if you leave the roots in the ground, so after the top is dead, you have to dig.
- Use bypass loppers for stems up to 1 inch thick.
- Use a folding saw or reciprocating saw for trunk-sized vines.
- Wear long sleeves and gloves to prevent contact with ‘poison ivy’ lookalikes or hidden stinging insects.
- Apply a 25 percent triclopyr solution directly to the freshly cut stumps to prevent regrowth.
- Dispose of all cuttings in a bin; do not compost ivy as it can re-root from fragments.
Reclaiming the Perimeter: Soil Prep, Sod Install, and Irrigation Adjustments
Post-ivy yard cleanup requires aggressive soil remediation to correct acidity and nutrient depletion before a successful sod install can occur. Ivy is a heavy feeder that often leaves the soil compacted and stripped of essential minerals, necessitating tilling, liming, and the application of high-phosphorus starter fertilizer. Once the fence is clear, you are going to see a ‘dead zone’ at the base. This is where we pivot to landscaping mode. You can’t just throw seeds down and hope for the best. We excavate the top 2 inches of ivy-choked dirt, bring in a 70/30 blend of screened topsoil and organic compost, and then lay our sod. If you want that grass to knit into the soil, you need a functioning irrigation system. But here is the catch: many homeowners have their irrigation heads pointed right at the fence. That is what caused the ivy explosion in the first place.
“A retaining wall doesn’t fail because of the stone; it fails because of the water trapped behind it.” – Hardscape Engineering Axiom
The same logic applies to your fence line. If your irrigation zones are over-spraying the wood, you are just inviting the next generation of ivy and rot to move in. We recalibrate the nozzles to 180-degree patterns or install drip lines to keep the moisture in the root zone of the new sod, not on the cedar pickets. Irrigation is about precision, not saturation. A 1 inch per week deep-watering schedule is far superior to daily light mists. It forces the roots of your new sod to chase the water down into the subsoil, creating a drought-tolerant lawn that can actually compete with weeds. Don’t skip this. A high-quality sod install is a waste of money if your irrigation timing is off.
The Long-Term Maintenance Schedule
Maintenance isn’t a suggestion; it’s a requirement. Every six months, walk your fence line. Look for ‘runners’ coming from the neighbor’s yard. Ivy is aggressive. It doesn’t respect property lines. Keep a spray bottle of herbicide handy for spot treatments. If you see a vine, snip it. Don’t wait for 2026. If you stay on top of it, your fence will last 20 years. If you let the ivy take over, you will be buying a new one in five. It is that simple. Landscaping is a battle against entropy. You either win with a plan, or you lose by neglect. Use the right tools, understand the biology, and protect your investment. That is how a pro does it.