
The Science of Soil Grading and Site Preparation
Properly installing sod requires a focus on soil grading and sub-surface engineering to ensure that root systems can penetrate the earth without facing hydrostatic pressure or compaction layers. If the soil is not prepared to a depth of 6 inches, the new turf will fail to establish a resilient rhizosphere, leading to localized dry spots and eventual death. I always drill into my new crew members: if you don’t fix the soil grading first, every plant you put in the ground is just expensive compost. You cannot skip the tilling phase. You cannot skip the soil test. You cannot just throw green carpet over hard-packed red clay and expect it to survive a 95-degree afternoon in July. Soil is not just dirt; it is a complex matrix of minerals, air, and biology. When we perform a yard cleanup, we aren’t just removing debris; we are resetting the stage for microbiology to thrive. If your soil pH is sitting at a 5.2, you might as well be pouring acid on those new roots. You need that pH in the 6.5 to 7.0 range for optimal nutrient uptake. Don’t guess. Test. I have seen guys lose $15,000 in material because they were too lazy to send a $20 soil sample to the lab. They blamed the sod farm. I blamed their lack of agronomy knowledge.
“Proper soil preparation is more important than the quality of the sod itself because the soil is the permanent environment for the root system.” – Penn State Extension Agronomy Manual
Why Quality Sod Installation Starts with Biology, Not Aesthetics
Successful landscaping and sod install projects rely on the biological integration of the turf’s existing root mat into the native soil through capillary action and nutrient exchange. The first 14 days are a race against evapotranspiration. If those roots stay trapped in the sod’s original peat or sand layer, they will bake. You need to force them down. This is where most homeowners fail. They think watering for ten minutes a day is enough. It isn’t. You need irrigation that provides deep saturation. We are talking 1 inch of water per session in the first week. [image_placeholder_1] You have to saturate the soil to a 4-inch depth so the roots have something to chase. Roots are lazy. If the water is only on the surface, they stay on the surface. When the heat hits, they shrivel. We call this ‘root girdling’ when it happens in pots, but in sod, it’s just a slow death. You need to understand the osmotic potential of your soil. Heavy clay holds water but doesn’t let roots move; sandy soil lets roots move but doesn’t hold water. You have to amend based on what you have. No exceptions. No shortcuts. Don’t be a ‘mow-and-blow’ hack. Be a technician. Check your irrigation heads for proper PSI. If you don’t have 30 PSI at the head, your coverage is garbage. You’ll get donuts. Brown circles of death.
“A healthy turfgrass root system is the primary defense against environmental stress, requiring oxygen, moisture, and pore space within the soil profile.” – Texas A&M AgriLife Extension
How do I know if my new sod is taking root?
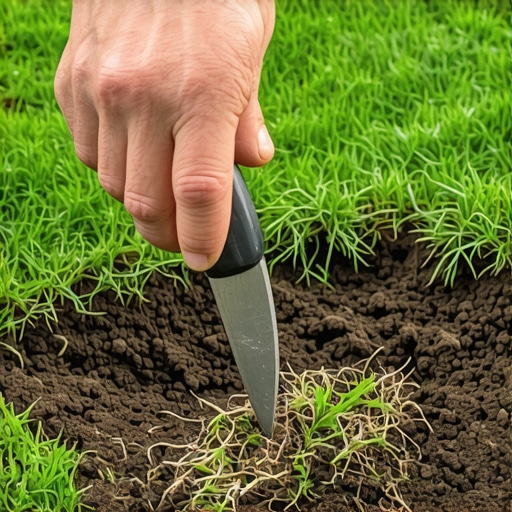
Determining if your sod is establishing requires a physical diagnostic check known as the Knife Test or Tug Test to verify the presence of white feeder roots. To perform this, take a standard utility knife or a flathead screwdriver. Gently insert it into the seam of the sod and lift. In the first 3 to 5 days, it should lift easily. By day 10, you should feel significant resistance. By day 14, if you can still lift the sod, you have a rooting failure. This is often caused by air pockets between the sod and the soil. If you didn’t use a sod roller filled with water, you’ve left death-traps for your roots. Air is an insulator, and roots cannot bridge a gap of air to find soil. You need 100% soil-to-root contact. When you lift that corner for the Knife Test, look for those tiny white hairs. Those are your root hairs. If they are brown or slimy, you have Pythium blight or root rot from over-watering in a poorly drained area. If they are non-existent, your soil is too compacted. You should have aerated. It is that simple. You can’t argue with biology. The Knife Test is the truth-teller of the landscaping world.
How often should I water new sod in the first two weeks?
New sod install watering schedules must transition from high-frequency saturation to deep-infrequent irrigation to encourage geotropism, the downward growth of roots in response to gravity and moisture gradients. During the first week, water three times daily: 6 AM, 11 AM, and 2 PM. Avoid evening watering to prevent fungal pathogens from moving in while the grass is cool and wet. In week two, drop to once a day, but double the duration. You are training the grass. You are telling those roots, ‘The water is deeper now. Go find it.’ If you keep the surface wet forever, you’ll get thatch and shallow roots that will die the first time you go on vacation. This is where irrigation design is critical. You need head-to-head coverage. If your sprinklers aren’t overlapping, you are leaving gaps in the root system’s future. I’ve seen ‘pros’ install systems that leave dry spots under trees. The tree roots will win that fight every time. They will suck the sod dry. You have to over-compensate in those zones. Use a catch-can test to measure exactly how much water you’re putting down. Don’t rely on a timer. Rely on measurements.
| Sod Phase | Water Frequency | Water Volume | Root Goal |
|---|---|---|---|
| Days 1-7 | 3x Daily | 0.25″ per session | Hydration |
| Days 8-14 | 1x Daily | 0.50″ per session | Penetration |
| Days 15-21 | Every 2 Days | 0.75″ per session | Establishment |
| Day 22+ | 2x Weekly | 1.0″ per session | Resilience |
The Forensic Autopsy: Why Sod Fails
When I see sod failing, I look for the compaction layer first. Most builders leave a ‘hardpan’ of construction debris and crushed limestone just 2 inches under the surface. Roots hit that and stop. It’s like trying to grow grass on a sidewalk. You must break that layer. If you’re doing a yard cleanup, don’t just rake the leaves. Address the soil structure. Use a broadfork or a heavy-duty tiller. If you can’t push a screwdriver 6 inches into the ground with one hand, your soil is too hard. Period. No amount of fertilizer will fix that. In fact, adding high-nitrogen fertilizer to struggling sod will just burn the remaining crowns. You want a starter fertilizer with a high middle number—phosphorus. That’s for the roots. Nitrogen is for the top. We don’t care about the top right now. We care about the foundation. Another silent killer is scalping. Homeowners get excited and want to mow their new ‘perfect’ lawn. They set the mower to 2 inches on a St. Augustine or Tall Fescue lawn and cut off the photosynthetic engine of the plant. Never remove more than one-third of the grass blade. If you cut it too short, the plant panics. It stops growing roots and puts all its energy into trying to grow new blades. The roots stop. Then the heat hits. Then the lawn dies. Wait at least 14 days before the first mow, and make sure those roots passed the Knife Test first. If the mower picks up the sod, you’ve just ruined your investment.
- Check Soil Moisture: Use a probe to ensure moisture is reaching 4-6 inches deep.
- Monitor Seams: If seams are gapping, the sod is dehydrating and shrinking. Increase water immediately.
- Color Check: Gray-blue tint means the grass is in permanent wilting point territory.
- 811 Call: Always verify utility lines before any deep tilling or irrigation trenching.
- Fungicide: Keep a propiconazole or azoxystrobin treatment ready if you see ‘melting out’ symptoms.