
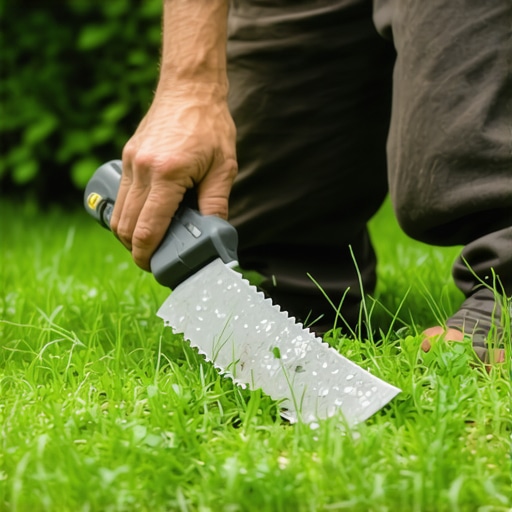
Precision Cutting Techniques: Why We Only Cut Sod with a Sharp Machete or Edger
Successful sod install projects are won or lost in the details of the root-to-soil interface and the clean severance of plant tissue. Most homeowners and ‘mow-and-blow’ laborers treat sod like a carpet, hacking at it with dull shovels or rusted utility knives. This is a fatal error for the plant’s vascular system. When you tear sod rather than slicing it, you create jagged, necrotic tissue that becomes a magnet for Pythium blight and Rhizoctonia. I always drill into my new crew members: if you don’t fix the soil grading first, every plant you put in the ground is just expensive compost. We spend three days on yard cleanup and grading before a single pallet of St. Augustine or Bermuda even hits the site. If the base isn’t level to within a quarter-inch and the soil isn’t chemically balanced, the most expensive sod in the world will fail. We use machetes because they allow for a single, surgical stroke through the fibrous root mat, preserving the integrity of the rhizomes and stolons.
The Biological Necessity of Clean Cuts in Sod Installation
Cutting sod with a sharp machete or specialized half-moon edger ensures the xylem and phloem vascular tissues remain intact to facilitate immediate nutrient transport. Ragged edges caused by dull tools lead to desiccation and increased evapotranspiration, which causes the seams of the new lawn to brown and pull apart within 48 hours. This precision is non-negotiable for irrigation efficiency. When seams are tight and surgically cut, water cannot escape through gaps, ensuring the subsoil stays hydrated during the critical first 14 days of establishment.
“A clean cut on turfgrass sod reduces the surface area of the wound, allowing the plant to seal the breach rapidly and redirect energy toward adventitious root development rather than tissue repair.” – Texas A&M AgriLife Extension
Soil Preparation and the Engineering of the Subgrade
The subgrade must be prepared as a biological engine, utilizing organic matter and porosity to encourage deep root penetration beyond the initial two-inch sod thickness. We begin with a comprehensive yard cleanup, removing all debris, stones larger than 0.5 inches, and any existing thatch layers that could act as a barrier to capillary action. We then incorporate amendments based on a soil pH test, often aiming for a slightly acidic 6.5 range to maximize phosphorus availability, which is the primary driver of root elongation.
“Compaction levels exceeding 300 psi will physically halt root penetration, leading to shallow-rooted turf that is highly susceptible to drought stress and nutrient leaching.” – Hardscape Engineering Axiom
How long does it take for new sod to root?
New sod install projects typically require 10 to 14 days for the primary roots to knit into the underlying topsoil. During this window, irrigation must be precise, maintaining field capacity in the top 3 inches of the soil profile without causing anoxic conditions that rot the root flare.
Can you cut sod with a regular shovel?
You can, but you shouldn’t. A shovel is a blunt force instrument designed for excavation, not horticulture. It crushes the cellular structure of the grass blades and the root mat, creating a bruised edge that will likely die back. A sharp machete or manual edger provides the shear force necessary for a clean botanical break.
| Tool Type | Primary Use Case | Impact on Root Tissue | Efficiency Rating |
|---|---|---|---|
| Machete (Carbon Steel) | Detailing around beds/curves | Surgical; minimal bruising | High |
| Half-Moon Edger | Straight perimeter lines | Clean vertical shear | High |
| Power Sod Cutter | Large scale removal | Mechanical separation | Medium |
| Utility Knife | Small repairs only | High friction; tears blades | Low |
| Spade Shovel | Digging holes | Crushes and shreds | Failing |
Advanced Irrigation Logic for Newly Cut Sod
The irrigation schedule following a sod install must be managed with scientific precision, accounting for evapotranspiration (ET) rates and local micro-climates. For the first week, the goal is not deep watering but frequent misting to keep the leaf blades from wilting while the roots are severed. We set smart controllers to run four times daily for 10 minutes per zone, specifically between 8:00 AM and 4:00 PM. This keeps the humidity high around the crown of the plant. After day seven, we pivot to deep and infrequent watering—one heavy application of 0.5 inches every other day—to force the roots to chase the moisture deeper into the soil horizons. Do not water at night. Night watering on fresh-cut sod is an invitation for fungal pathogens to colonize the damp, wounded tissue.
- Step 1: Clear the site of all invasive species and old turfgrass using a non-selective herbicide or mechanical sod cutter.
- Step 2: Till the soil to a depth of 6 inches, incorporating composted organic matter to improve cation exchange capacity.
- Step 3: Level the area using a landscape rake, ensuring a 2% slope away from any hardscape or foundations to prevent hydrostatic pressure buildup.
- Step 4: Install the sod in a running bond pattern, similar to bricks, to minimize long seams that could dry out.
- Step 5: Use the machete to trim edges around irrigation heads and landscape lighting with zero gaps.
- Step 6: Roll the new sod with a water-filled roller to eliminate air pockets and ensure 100% soil-to-root contact.
The Maintenance Phase: After the Blades Are Put Away
Once the landscaping crew leaves, the homeowner becomes the steward of this living system, requiring a strict agronomic approach to the first mow. Do not put a mower on new sod for at least 21 days. The tractive force of the wheels can tear the developing root hairs right out of the ground. When you do mow, use a sharpened blade—just like our machetes—and never remove more than one-third of the leaf tissue at once. Removing too much photosynthetic surface area shocks the plant and stalls root development. This is the difference between a lawn that lasts 20 years and one that needs to be replaced in 24 months. We don’t do ‘mow-and-blow’ work. We build ecosystems. If you treat the sod install as a civil engineering project, the results speak for themselves. Precision matters. Tools matter. Soil science matters. Don’t let anyone tell you a dull shovel is ‘good enough.’ It isn’t.