
The Forensic Autopsy of a Dying Landscape
The first sign of trouble isn’t always the yellowing leaves; it is the smell. I recently walked onto a property where the homeowner complained that their three-year-old hydrangeas were stunted and dropping foliage. As soon as I jammed my soil probe into the bed, a pungent, sulfurous odor hit me. It smelled like a swamp. I peeled back a layer of dyed red mulch to find exactly what I suspected: a thick sheet of black 6-mil polyethylene plastic. Underneath, the soil was a gray, slimy mess. The root systems of those hydrangeas weren’t growing down; they were matted in a desperate, 1-inch thick web right on top of the soil, trying to find oxygen that the plastic had cut off. This wasn’t a garden anymore. It was a biological dead zone.
The Suffocation of Soil Biology Under Polyethylene
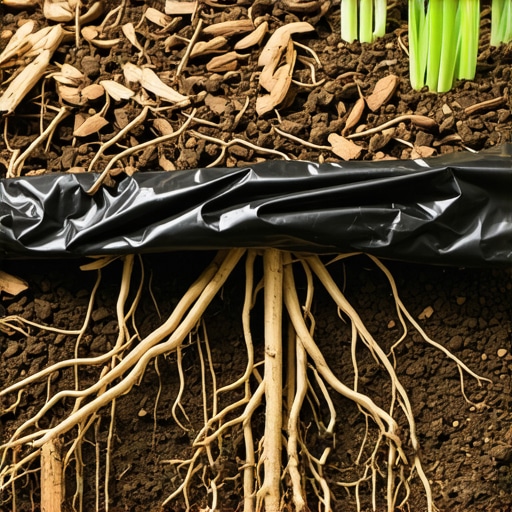
Placing plastic under mulch blocks gas exchange and water infiltration, leading to anaerobic soil conditions. This process kills beneficial microbes and forces roots to grow shallowly, eventually causing plant stress, root rot, and total landscape failure. Soil is a living respiratory system that must breathe. When you seal it with plastic, you are essentially plastic-wrapping your plants’ lungs. Nitrogen-fixing bacteria die off. Mycorrhizal fungi, which help roots absorb nutrients, vanish. You are left with dirt, not soil.
“Soil health depends on the continuous exchange of gases between the atmosphere and the soil pore space; once this is interrupted, anaerobic microbes take over, producing toxic hydrogen sulfide.” – Agricultural Extension Agronomy Manual
How does plastic affect soil gas exchange?
In a healthy landscape, oxygen moves into the soil and carbon dioxide moves out. This diffusion occurs through macropores. When plastic is laid down, CO2 is trapped, and O2 is excluded. This creates a high-acid, low-oxygen environment. In these conditions, roots cannot perform cellular respiration. They suffocate. The plant enters a state of permanent stress, making it a magnet for pests and pathogens. I have seen 50-year-old oaks show signs of canopy dieback because a ‘pro’ decided to put plastic in the drip line. It is professional negligence.
[IMAGE_PLACEHOLDER]
The Hydrostatic Trap: Why Your Soil Is Both Drowning and Thirsty
The physics of water movement under plastic is a nightmare of hydrostatic pressure and surface tension. While you might think the plastic keeps moisture in, it actually prevents 100% of natural rainfall from reaching the root zone. Instead, water sheds off the plastic and pools at the edges, often leading to foundation issues or localized flooding. Meanwhile, the soil directly under the plastic becomes hydrophobic over time or, conversely, becomes a saturated graveyard for roots. Without irrigation lines placed precisely under the plastic, the plants have no consistent water source. Even with irrigation, the water cannot evaporate, leading to perched water tables that rot the root flare.
| Material Property | Black Plastic Sheeting | Cardboard/Paper Layer | Arborist Wood Chips |
|---|---|---|---|
| Water Infiltration | 0% | 95% (once wet) | 100% |
| Gas Permeability | Zero | High | Maximum |
| Organic Matter Gain | Negative (Soil Loss) | High (Carbon) | Extremely High |
| Weed Prevention | Short-term Mechanical | Biological Suppressant | Physical & Chemical |
The Weed Paradox: Why Plastic Actually Encourages Weeds
Homeowners install plastic because they want a low-maintenance yard. It’s a lie. Within two seasons, the mulch on top of the plastic begins to break down into a fine, nutrient-rich compost. Weed seeds blow in, land on top of the plastic, and germinate in that decomposing mulch. These weeds are actually harder to pull because their roots weave into the plastic itself. You end up with a mess of weeds that cannot be easily hoed or pulled without ripping up your entire landscape. It makes a yard cleanup three times more labor-intensive than it would be otherwise.
Does landscape fabric prevent weeds better than plastic?
While landscape fabric is slightly better because it is woven, it eventually suffers the same fate. Silt and organic matter clog the pores of the fabric, turning it into a semi-permeable sheet that acts exactly like plastic. Landscaping professionals who rely on these barriers are usually just trying to hide poor soil preparation. A thick 4-inch layer of organic wood chips is a far more effective weed suppressant because it creates a biological environment where weed seeds struggle to reach the mineral soil. It also doesn’t require a knife to remove three years later.
“The use of non-porous barriers in permanent landscape plantings is contrary to the standards of the International Society of Arboriculture (ISA) due to the risk of root girdling and soil compaction.” – ISA Best Management Practices
The Engineering Case for Organic Mulching
Instead of plastic, a veteran foreman uses biology. We use a sod install removal process followed by a heavy application of arborist wood chips or triple-shredded hardwood. This creates a nitrogen cycle that benefits the plants. As the mulch breaks down, it feeds the earthworms. Those worms tunnel through the soil, creating natural aeration channels. This is ‘free’ labor that improves your soil structure every single day. If you have a serious weed problem, use corrugated cardboard as a base. It suppresses weeds for one season and then decomposes, adding carbon to the soil. It is engineering with nature, not against it.
What is the best way to fix a yard with plastic?
Remediation is a grueling process. You must first manually strip the mulch and pull every square inch of plastic. Dispose of it properly; it’s likely full of microplastics by now. Once the soil is exposed, you will notice it is compacted and likely smells ‘sour.’ Do not plant immediately. Use a broadfork to gently aerate the soil without flipping the layers. Top-dress with 1 inch of high-quality compost to reintroduce the microbes you killed with the plastic. Then, and only then, apply your organic mulch.
Checklist for a Healthy Mulch Bed Installation
- Remove all existing weeds and 100% of old plastic or fabric.
- Check soil pH and nutrient levels (NPK) before mulching.
- Apply a 1-inch layer of organic compost to boost microbiology.
- Install irrigation drip lines directly on the soil surface.
- Apply 3-4 inches of wood mulch, keeping it 3 inches away from plant stems and root flares.
- Avoid ‘mulch volcanoes’ that trap moisture against the bark.
Stop looking for the easy way out. Landscaping is a long game. If you try to shortcut the biology of the soil with a $20 roll of plastic, you will pay for it ten times over in dead plants and professional removal fees. Your soil is alive. Let it breathe. It’s that simple.