
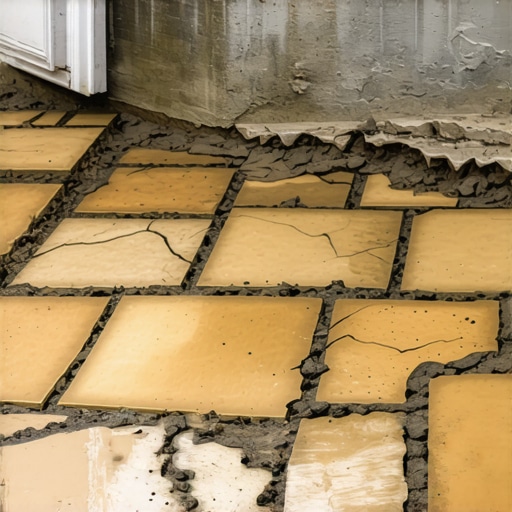
The Hardscape Autopsy: Why That $30,000 Patio Is Sinking
I recently got called out to tear up a $30,000 patio that was sinking because the previous contractor failed to account for basic hydraulic physics. The homeowner was devastated. The pavers were premium travertine, but they were swimming in a soup of saturated clay. This wasn’t a material failure; it was a drainage autopsy. Water had nowhere to go, so it stayed, expanded during the freeze-thaw cycle, and turned the structural sub-base into a slurry. If you don’t fix the soil grading first, every plant you put in the ground is just expensive compost, and every paver is just a tombstone for your bank account. Real landscaping is civil engineering disguised as aesthetics. Water always wins. Your job is to tell it where to lose. Let’s look at the three fatal errors that turn high-end hardscapes into expensive mud pits.
Mistake 1: The Fatal Flaw of the ‘Level’ Patio
A failed patio foundation is often caused by a 0% slope that allows water to pond and infiltrate the sub-base. To prevent structural failure, a patio must have a minimum 2% pitch, which translates to a 1/4 inch drop for every linear foot of distance away from the home foundation. Anything less is a gamble. Most ‘mow-and-blow’ contractors think level means flat. In the world of hardscaping, ‘flat’ is a death sentence. You need a transit or a laser level to ensure that water moves off the surface and into the surrounding landscape. When water sits on a paver surface, it eventually finds the joints. Polymeric sand is good, but it is not a waterproof membrane. It’s a deterrent. Eventually, water migrates into the bedding layer. If that bedding layer is sitting on a flat sub-grade, the water pools. Over time, this saturates the soil, reducing its load-bearing capacity (PSI). This is where the ‘squish’ comes from. You step on a paver, and it rocks. That’s a pumping action. You’re literally pumping the fines out of your base material. Stop it before it starts. Pitch the patio. No exceptions.
How much slope does a paver patio need?
Every professional installation requires a minimum slope of 1/8 to 1/4 inch per foot to ensure gravity-fed drainage. For large expanses, you may need to incorporate trench drains or catch basins if the natural topography prevents a continuous downward pitch toward a safe discharge zone. Do not guestimate this. Use a string line or a laser.
Mistake 2: Using the Wrong Base Aggregates and Skipping Geotextile
Using stone dust or ‘screenings’ as a base material is a cardinal sin because it traps moisture and lacks the structural integrity required for long-term stability. You need clean, angular crushed stone like #57 or 2A modified (depending on the application) to allow for internal drainage and high-density compaction. The goal of a base is to create a ‘crust’ that can handle 10,000+ PSI while still being permeable enough to avoid hydrostatic pressure buildup. Many contractors skip the geotextile fabric between the native soil and the gravel base. This is a mistake. Without that separation layer, the heavy clay or sandy loam of your yard will eventually migrate upward into your clean gravel. This ‘migration of fines’ ruins the porosity of your base. Once your base is clogged with dirt, it holds water. Once it holds water, it heaves. Use a non-woven geotextile with a high flow rate. It acts as a filter and a stabilizer. It costs pennies compared to the cost of a total tear-out.
“A retaining wall doesn’t fail because of the stone; it fails because of the water trapped behind it.” – Hardscape Engineering Axiom
Material Comparison Table for Patio Bases
| Material | Drainage Rating | Compaction Strength | Best Use Case |
|---|---|---|---|
| #57 Crushed Stone | Excellent | High | Sub-base and drainage layers |
| 2A Modified Gravel | Fair | Very High | Standard structural base |
| Stone Dust/Screenings | Poor | Low | Avoid entirely for foundations |
| Polymeric Sand | N/A | N/A | Joint stabilizer only |
Mistake 3: Ignoring Hydrostatic Pressure and Irrigation Runoff
The third mistake is treating the patio as an island. You have to look at the entire catchment area of the yard. If you install a beautiful new patio but leave the irrigation heads spraying directly against the edge, you are injecting water into your foundation every single night. During a sod install, people often raise the soil level around the patio to make it look ‘flush.’ This creates a dike. Water cannot get off the pavers because the grass is higher than the stone. Now you have a bathtub. You need to perform a yard cleanup that involves regrading the areas adjacent to the hardscape. If you have a slope leading toward your patio, you must install a French drain or a dry creek bed to intercept that water before it hits your base. Hydrostatic pressure is the force of water pushing against your structure. If it builds up under your pavers, it will lift them. It’s powerful enough to crack concrete and shift 200-pound wall blocks. Manage the water before it reaches the stone.
“Proper drainage is the single most important factor in the longevity of any segmental pavement system.” – ICPI Tech Spec No. 2
Why is my patio sinking after rain?
Your patio is sinking because the sub-base material has become saturated, leading to soil failure. This occurs when surface runoff is allowed to penetrate the base and cannot escape due to poor grading or the use of non-permeable materials. Immediate remediation requires identifying the water source—usually a gutter downspout or a high-spot in the lawn—and redirecting it.
Pre-Installation Drainage Checklist
- Check gutter downspouts; extend them at least 5 feet away from the patio footprint.
- Perform a percolation test to see how fast your native soil drains.
- Mark all 811 utility lines to ensure you don’t hit an irrigation main.
- Verify a 2% minimum pitch away from all structures.
- Choose an open-graded base if you live in a high-precipitation area.
- Ensure the edge restraint is installed on a solid, drained foundation to prevent lateral shifting.
The Interaction of Sod and Irrigation
New sod install projects and irrigation systems are the natural enemies of a patio if they aren’t coordinated. I see it all the time: a homeowner pays for a beautiful patio, then hires a different crew for the grass. The grass crew brings the soil up 2 inches above the pavers for that ‘lush’ look. Now, every time it rains, the water sits on the pavers, unable to crest the ‘hill’ of the new sod. Within two years, the pavers are covered in moss and the edges are sinking. Furthermore, improper irrigation timing leads to ‘deep saturation’ which can undermine the compaction of your sub-grade. Water deeply but infrequently—exactly 1 inch per week—to keep the roots of your turf going down, rather than keeping the surface (and your patio base) perpetually wet. It will rot. Don’t skip the drainage audit. It’s the difference between a 30-year patio and a 3-year mistake.